Quantcast
Channel: Chickettes Natural Nail Studio & Boutique
Viewing all 441 articles
Browse latest View live

Kate Bryan’s Weekend Wear Look with Almay Cosmetics

$
0
0


I was delighted to be asked by BlogHer to share this Almay-sponsored video series, “Different Occasions. Different Looks. Always Pretty.” In this video, find out how you can get Kate’s Weekend Wear Look!

This look is very natural and also quick and easy to achieve. This video pretty much sums up my every-day makeup routine. I like to keep it simple most days, and I never leave the house without blush and mascara! The Almay CC cream is intriguing. I will have to check it out since I like to wear a very lightweight foundation.


Gelish Reserve Swatch

$
0
0

This is Gelish Reserve, a frosty neutral color.  One of my besties says this is her favorite Gelish color. I, however, am not a huge fan of tans and neutrals.  They don’t work well with my skin tone and I just prefer brighter, bolder colors.  Reserve has a nice shimmer to it so if you like neutrals maybe this one is for you.  Unfortunately, it’s just not for me.

gelish-reserve-swatch
gelish-reserve-2

Ink Mauvelous Swatch & SOG Haul!

$
0
0

This is Ink Mauvelous #44. The color surprised me because it looks nothing like the label on the bottle.  I thought it would be more of a purple shade, but it’s a mauvy pink.  Even though it wasn’t what I expected, the color is gorgeous!  I’ve been wearing this for a few days now and love it.  The purple undertones to this make it unique and it works really well with my skin tone, especially since I have a nice tan right now.
Ink Mauvelous Swatch Ink Mauvelous Swatch

If you follow me on FB or IG, you might already know that I recently scored an awesome haul of SOGs on eBay.  A salon was selling off a lot of used polishes and I got this haul of goodies at a very reasonable price.  There are 60 bottles of Ink and CND Shellac SOGs total including a few dupes and a few Shellac base and top coats. The haul also came with a two-handed UV light.  I’m already in love with the Ink brand, but I’ve yet to try Shellac so I’m very much looking forward to testing and swatching these new polishes.  This should keep me busy for a while!!

You can see a list of all of the SOGs that I own on my stash list.  There is a tab at the bottom called “Other SOG Brands” and this is where all of the new goodies are listed.  There are a few colors in the lot that I’m dying to try, but let me know if there are any on the list that you really want to see and I’ll try to get to them sooner than later.  :)

Chickettes.com SOG Haul

Nail Art with Feather Water Decals from the Born Pretty Store

$
0
0

Chickettes.com Nail Art with Feather Water Decals

I’m always looking for nail art decorations that will work well with gel polish and I have another one to share with you today.  The Born Pretty Store sent me these feather water decals to try.  The set comes with 11 different feather designs, and I chose to use the pink and purple ones to spice up the color that I’m currently wearing (Ink Mauvelous).  Most water decals that I’ve tried don’t work with with SOG… they slip and slide around and don’t get a good bond.  I’m happy to report that these ones work really well!  I’ve been wearing them for a few days now with no lifting or peeling.

Chickettes.com Nail Art with Feather Water Decals

I applied these decals right on top of my current mani which already had a top coat.  For SOG application, I would recommend wiping off the tacky layer before applying these.  For regular nail polish, just let your polish dry before applying.  These are the steps:

  • Remove the clear plastic film from the sheet.
  • Cut out each individual design with scissors.
  • Dip the decal into warm water for 10-20 seconds.
  • Rub the decal between two fingers to remove the white paper backing.
  • Apply and position the decal on your nail, smoothing out any bubbles or wrinkles.  The decals will be slippery when they are wet and should move around pretty easily.  I recommend leaving a slight space between the decal and the edge of your nail to allow the top coat to bond to the nail.
  • Allow the decals to dry completely.  Use a fan or blow dryer.
  • Optional: Apply any decorative accents.  I used a dotting tool to add some white dots around the feathers.
  • Apply your top coat and cure/dry.

Chickettes.com Nail Art with Feather Water Decals

A nice thing about these decals is that they’re very opaque and will work well even on darker colors.  Most of the other decals I’ve tried were very transparent and could only be applied on white or very light colors.  Decals are a great way to add art to your manicure quickly and with very little skill required.

Use code XTL91 to save 10% on your next order from the Born Pretty Store!

Use code XTL91 to save 10%

Here are some photos of the product, and close-up shots of some of the designs.

Born Pretty Store Feather DecalsBorn Pretty Store Feather DecalsBorn Pretty Store Feather Decals

Gelish Under Her Spell Collection Fall 2013

$
0
0

Gelish Under Her Spell Collection Fall 2013 Colorsunder-her-spell-bottles

Gelish MINI® Introduces Six New Shades Inspired by Femme Fatale Fashion

SEDUCTIVE AND FEMININE HUES DEFINE THE FALL SEASON

BREA, Calif. – (July 2013) - Sparked by the feminine textures of lace and tulle, along with fabrics such as velvet and leather that were prevalent on the fashion runways for the fall season, Danny Haile, CEO and founder of Gelish MINI®, is gearing up to launch the “most seductive and intoxicating gel-color collection of the fall season.” These six captivating colors, now known as the Gelish MINI® Under Her Spell Collection, are expected to be available starting August 2013.

“The power of femininity and sensuality played a big role when it came to choosing the concept and creating the colors,”  Haile said. “Ultimately, I wanted the colors to captivate and be strong, yet womanly at the same time.”

Under Her Spell features six new custom-blended colors, each named to evoke the idea of undeniable femininity and sensuality:

  • I’m No Stranger to Love: Rich Navy-Teal
  • A Touch of Sass: Jeweled Black Cherry
  • Love Me Like A Vamp: Jeweled Black Violet
  • Want To Cuddle?: Smoky Dark Taupe
  • Lust At First Sight: Creamy Greyish Mauve
  • My Nightly Craving: Creamy Greyish Pink-Lavender

Gelish MINI® products are available exclusively at Sally Beauty Supply stores nationwide and online at sallybeauty.com. Follow Gelish MINI® on Facebook, Twitter, Tumblr and on Instagram (@GelishMINI).

Gelish MINI® comes in an array of colors, applies like polish, with a twist cap and applicator, but are cured in an LED lamp for 30 seconds or in two minutes with a traditional UV lamps, just like gels. Gelish MINI® stays on the nail for up to three weeks of beautiful wear, with no chipping or peeling. Gelish MINI® soaks off completely in only 15 minutes. For more information, please visit www.gelishminis.com.


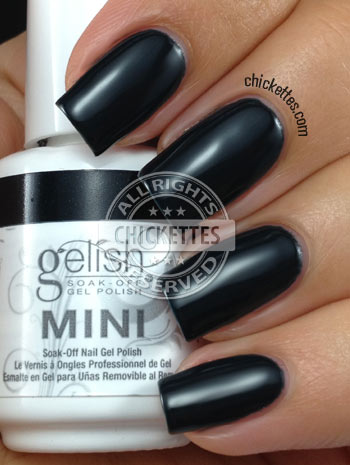
I’m No Stranger to Love: Rich Navy-Teal

I’m No Stranger to Love: Rich Navy-Teal

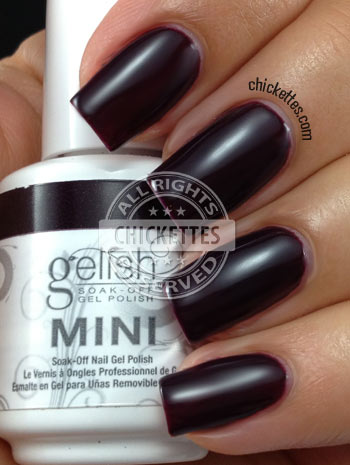
A Touch of Sass: Jeweled Black Cherry

A Touch of Sass: Jeweled Black Cherry

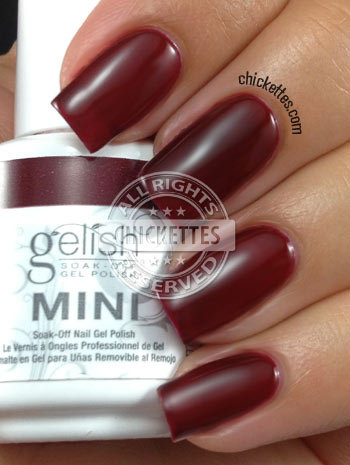
Love Me Like A Vamp: Jeweled Black Violet

Love Me Like A Vamp: Jeweled Black Violet

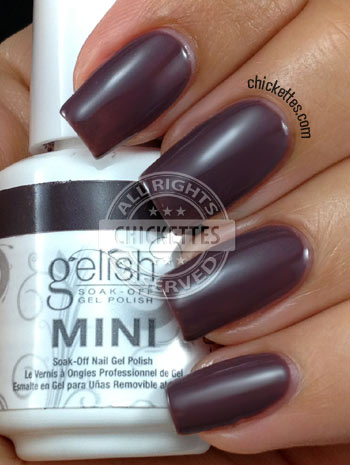
Want To Cuddle?: Smoky Dark Taupe

Want To Cuddle?: Smoky Dark Taupe

Lust At First Sight: Creamy Greyish Mauve

Lust At First Sight: Creamy Greyish Mauve

My Nightly Craving: Creamy Greyish Pink-Lavender

My Nightly Craving: Creamy Greyish Pink-Lavender

CND Shellac Hotski to Tchotchke

$
0
0

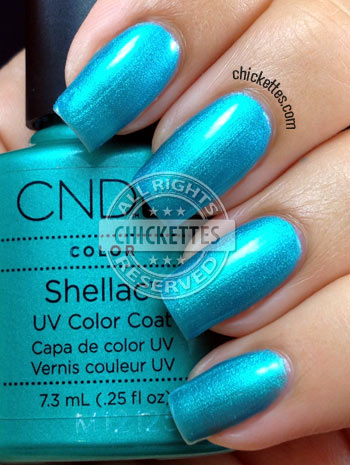
I finally tried CND Shellac gel polish for the first time.  I chose this bright teal blue color from the lot that I recently purchased called Hotski to Tchotchke.  Teal is my favorite color so naturally I was drawn to it and had to try it before all the others.  I love the color and the gorgeous glowy shimmer!  I wore this on its own for 2 days and then decided to punch it up with a lightning bolt stamp.  I used Konad black polish and Bundle Monster stamping plate BM305.

I also tried the Shellac base and top coat for the first time.  The base is much thinner than Gelish and I only used the top coat on one finger because I didn’t care for the consistency.  I immediately grabbed for my Gelish and finished the rest of my nails off with it.  The one finger that had the Shellac top coat has a chip already.  Hmm.  My nails also don’t feel as strong as they do when I wear Gelish, and then there’s the fact that Shellac only cures in a UV light which takes more time.  So my opinion of Shellac is… eh, it’s so-so.  I love the color, but I’ll stick with my Gelish foundation and top coat.

Edit/Update:  The soak-off was super easy using the Shellac base coat and color, so that’s a plus.  I only soaked for 5 minutes and the polish rubbed right off with ease using an orange stick.

CND Shellac Hotski to Tchotchke w/ Lighning Bolt StampCND Shellac Hotski to TchotchkeCND Shellac Hotski to Tchotchke


Simple Gold Polka Dots and Glitter Manicure

$
0
0

I haven’t experimented much with polka dots, so I thought I’d give it a shot. I love the classic look of uniform dots, and I have seen a lot of cute manis lately with metallic dots on white.  I used a combination of different SOG brands for this mani.  The green polish is Ink Wasabi, the blue is Entity1 Electric Runway and the white is Couture Ohh La La French.  I topped each off with Gelish TIO.  I added a couple of rhinestones to the green nails, and some loose gold glitter to my middle finger using the technique in my glitter gradient video.  The gold dots were done with a dotting tool and China Glaze Magical, which is also a great polish for stamping.

I’m sorry I only have one picture today.  I took a bunch, but most of them didn’t turn out very well – my lightbox drowned out the details of the polka dots in most of them… I swear they look better in person.  So this is just a quickie post today.  I’m working on some more Gelish swatches tonight.  I don’t have the new collection yet, so don’t get your hopes up!  I’m still working my way through some of the existing colors.

Chickettes.com Gold Dots & Glitter Nail Art

Gelish Aurora FX Collection

$
0
0

Gelish Aurora FX Collection

The Gelish Aurora FX Collection has been out for quite a while, but I just recently picked up the last two colors that I was missing from the set.  I thought it would make sense to put all of the colors from the collection in one post.  I apologize in advance that the photos are not as consistent as my usual posts since they were taken at different points in time.

This collection is full of gorgeous, glittery colors with magical effects (FX).  Most are thin and wear better as a topper over other base colors rather than on their own.  For swatching purposes I applied three coats of each as a stand-alone polish rather than over another color.  I hope to eventually start showing you some of the cool layering combinations that you can do with these and other Gelish polishes.  The possible combinations are endless.

Close Your Fingers and Cross Your Eyes:

Gelish Close Your Fingers Cross Your Eyes - Aurora FX Collection

gelish-close-your-fingers-2

The Great Googly Moogly:

Gelish The Great Googly Moogly - Aurora FX Collection

Gelish The Great Googly Moogly - Aurora FX Collection

Ali Baba Sim Sala Bim:

Gelish Ali Baba Sim Sala Bim - Aurora FX Collection

Gelish Ali Baba Sim Sala Bim - Aurora FX Collection

Wiggle Fingers, Wriggle Thumbs, That’s the Way the Magic Comes:  This one has a lovely purple shimmer that my photos didn’t capture.

Gelish Wiggle Fingers, Wriggle Thumbs - Aurora FX Collection

Gelish Wiggle Fingers, Wriggle Thumbs - Aurora FX Collection

Oocha Coocha Bing Bang Bam Alakazy Alakazam:

Gelish Oocha Coocha Bing Bang Bam Alakazy Alakazam

Gelish Oocha Coocha Bing Bang Bam Alakazy Alakazam

Izzy Wizzy Let’s Get Busy:

Gelish Izzy Wizzy Let's Get Busy - Aurora FX Collection

Gelish Izzy Wizzy Let's Get Busy - Aurora FX Collection


Shellac Tutti Frutti w/Zebra Print & Glitter

$
0
0

This design was inspired by some pictures that I saw on Instagram over the weekend.  This nail artist features several designs with one nail that’s half animal print, half glitter with rhinestones separating the two.   I knew I had to give it a try, and am so glad I did!

The pink is Shellac Tutti Frutti, which has a pearly finish with a bit of purple iridescence.  The glittery effect was achieved by applying one coat of Couture High Maintenance followed by two coats of Ink Chrome Silver.

It took a lot of steps to achieve the half-and-half look.  I started with one coat of High Maintenance on the whole nail, then wiped off the tacky layer and applied a piece of nail art striping tape down the middle of the nail.  I painted two coats of Tutti Frutti on one side, removed the tape, wiped the tacky layer and applied a fresh piece of tape over the pink edge.  I applied 2 coats of Ink Chrome Silver on the second half.  I applied a thin layer of Gelish TIO over the whole nail, wiped off the tacky layer and then used a piece of scotch tape to cover up the glitter side of the nail so that I could stamp the zebra print onto just the pink half.  I used a dotting tool to apply Gelish Foundation down the center of the nail and then added the rhinestones on top while the foundation was still wet, then cured.  I applied one coat of Gelish TIO over the whole nail.  Ta-da!

Anyone interested in a video to see how this is done, or did I explain it well enough?

Chickettes.com - Shellac Tutti Frutti with Zebra Print, Glitter & Rhinestones

Chickettes.com - Shellac Tutti Frutti with Zebra Print, Glitter & Rhinestones

Note: I don’t normally mention this in my explanations because it seems redundant, but when applying gel polish you have to cure each coat with a UV or LED lamp.

Ink Dilemma, Ravishing & Rock in Red Swatches

$
0
0

Someone asked me if I knew of a cranberry gel polish that’s similar to the Julep Joan swatch that I posted a while ago.  I didn’t know of one, and it’s been on my mind ever since.  I suggested IBD Indian Sari, but that turned out to be much more purple.  When I bought my recent haul from Ebay I pulled out all of the colors that had cranberry-ish labels, which are the three colors posted below.  As we all know, the polish colors don’t always match the labels so I had to swatch them to find out.

This is Ink Dilemma #29.  It’s more of a hot pink, but an absolutely GORGEOUS color.  It has a fabulous shimmer, as do many of the Ink polishes.

Ink Soak Off Gel Polish -  Dilemma #29 Swatch

Ink Soak Off Gel Polish -  Dilemma #29 Swatch

The next one I tried was Rock In Red #1.  As the name suggests the color is red, but it also has some pink tones to it.  In my natural light the label looked more cranberry… in the lightbox it’s definitely red.  This is a nice classic color for everyday wear.

Ink Soak Off Gel Polish -  Rock In Red #1 Swatch

Ink Soak Off Gel Polish -  Rock In Red #1 Swatch

And finally Ink Ravishing #7…. ahhh, cranberry!  This is by far the closest match I’ve found to-date.  :)

Ink Soak Off Gel Polish -  Ravishing #27 Swatch

Ink Soak Off Gel Polish -  Ravishing #27 Swatch

Glam and Glits Ink Soak-Off Gel Polish Swatches

$
0
0

Similar to my Gelish swatch gallery, I thought I would also start a gallery of all of the Ink swatches that I’ve done. I know it’s helpful to see them all in one place, so I’ll update this post on an ongoing basis as I swatch more colors by this brand. Enjoy!

Reds & Pinks:

Orange & Yellow:

Purple, Blue & Green:

Neutral:

Ink Secret Desire w/ Owl & Polka Dots

$
0
0

Who doesn’t love owls?!  I received several nail decal designs from Lucky Star Style, and instantly fell in love with these cute little purple owls.  The purple color on the two outside fingers is Ink Secret Desire, topped with one coat of Gelish Izzy Wizzy.  The white is Ink Glacier, and the pink dots were done using Ink Dilemma.  I didn’t add a top coat to the nail with the dots because I liked the texture – so I just wiped off the tacky layer.  This is a simple mani, but it’s so cute with the owl accent.Chickettes.com - Cute purple owl nail decal & pink polka dots!

Chickettes.com - Cute purple owl nail decal & pink polka dots!

Chickettes.com - Cute purple owl nail decal & pink polka dots!

This is a swatch of Ink Secret Desire – the purple color used above.  I swatched Ink Dilemma a few days ago – another rockin’ color.  I <3 the Ink brand!

Ink Secret Desire Swatch

Ink Secret Desire Swatch

Stamping Dark Roses

$
0
0

I bought the DRK-A stamping plate and a new XL squishy stamper and decided to play with them a bit. The concept of the squishy stamper is great… it’s supposed to be awesome for curvy nails like mine because you can just press it onto your nail and it will wrap around it.  Unfortunately I just can’t get the darn thing to work right! Most of the time it won’t pick up the images, and if it does the image isn’t fully opaque. I heard that you need to file them down and/or wipe them with acetone before using. I tried every trick that I read online and still can’t figure it out… very frustrating. This is the second one that I purchased because I thought for sure something was wrong with the first one that I bought. Anyway, after playing around with my various stampers and stamping polishes I decided that my Konad stamper still works the best, even though I have to roll the images onto my nails. So be it.

I was wearing a burgundy-colored gel polish (can you guess which one it is??? official swatches coming soon), and decided to go for a dark look by stamping a black rose pattern on top. This actually looked much cooler before I applied the top coat because the black polish dried to more of a matte finish. I wish I had taken pictures of it that way. (While I’m making wishes… I also wish for a matte gel top coat!! Anyone know of one?)

Even though I’m sharing this with you, I’m feeling kind of “meh” about it.  I don’t like how it looks with the glossy finish and I probably shouldn’t have applied the top coat over the little black gems… they look like blobs.

gelish-dark-roses-2
gelish-dark-roses-

Blue-Green Gradient with Color Blocking

$
0
0

It’s been a busy week!  My daughter leaves for college on Saturday, so we’ve been trying to get her all packed and prepped for her new adventure.  It’s an exciting time and we’re both experiencing a range of emotions.  She’s my only child, so I’ll be living alone for the first time in my life after she leaves.  Something tells me I’m going to have more time to spend on nail stuff soon…

My mani today was inspired by Sammy of The Nailasaurus.  I saw this image pop up on my Pinterest feed and bookmarked it for a future date, and today was the day I finally tried it.  I started with IBD Jupiter Blue as my base, and then sponged Gelish Don’t Be Such a Sourpus onto the tips.  The color that I sponged on is yellow-ish, but it looks green when applied over the blue.  I wiped off the tacky layer and applied nail art striping tape to my nails to block off the center section. The black that I applied to the sides is actually regular nail polish and not gel.  I used Cult Nevermore because it’s completely opaque with just one coat.  I let it dry and then applied my gel top coat and studs.

I love this look… it’s so simple and sleek, but it took a good amount of time to do.  You could try this with so many different color combinations.
Chickettes.com Blue-Green Gradient with Color Blocking

Chickettes.com Blue-Green Gradient with Color Blocking

Here is IBD Jupiter Blue… I love this color!  IBD is a  more affordable brand of gel polish and the quality and application are great.

Chickettes.com IBD Jupiter Blue SwatchChickettes.com IBD Jupiter Blue Swatch

Gelish Reds

$
0
0

I dropped my daughter off at Ohio State on Saturday… it’s very bitter sweet.  I’ve gone through a range of emotions the last couple of days.  It’s strange to know that she’s not coming home for a while which makes me sad, but I’m excited for her and so proud.  It sounds like she’s doing well with the adjustment so far and is making new friends already.

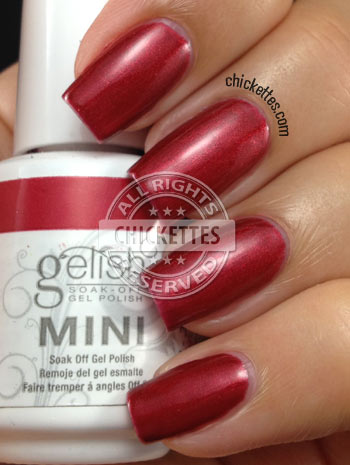
I will have swatches of the new Gelish Fall colors for you very soon! In the meantime, I thought I would post some recent swatches that I did of some Gelish reds. When I inserted the photos below, I thought I had made a mistake because I can’t really tell the difference between Hot Rod Red and Red Roses, except that one of them is a full size bottle and one is a mini. I pulled out my bottles and swatch sticks to check and the colors really are so close it’s hard to tell them apart.  Red Roses is just slightly darker than Hot Rod.  Queen of Hearts is darker than both and has a shimmery finish.  I don’t feel that my photos really do that color justice – it’s one of my favorite reds and a must-have for a collection.

Gelish Hot Rod Red:

Gelish Hot Rod Red Swatch

Gelish Hot Rod Red Swatch

Gelish Red Roses:

Gelish Red Roses Swatch

Gelish Red Roses Swatch

Gelish Queen of Hearts:
Gelish Queen of Hearts

Gelish Queen of Hearts


Shellac Purple Purple

$
0
0

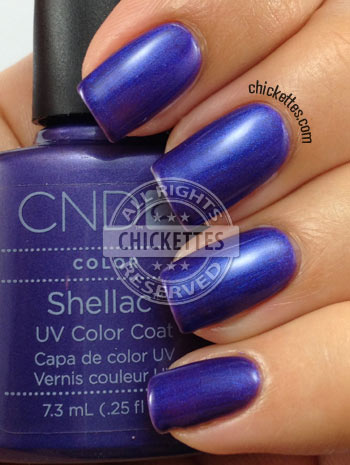
I’m wearing Shellac Purple Purple today. I think it should be called Blurple Blurple because it’s one of those purples that sometimes looks blue. It has a really gorgeous shimmer and is probably one of my favorite purples to-date. The color was really hard to capture on camera because it looks so different depending on the lighting, and my camera wanted to make it look blue even when it looked purple.

Here are the shots taken in my lightbox. The color is fairly accurate, but it’s actually a little more purple in real-life.  My lightbox also mutes the shimmer effects.

Chickettes.com Shellac Purple Purple Swatch

Chickettes.com Shellac Purple Purple Swatch

Here is a shot in the sunlight.  The true color is more like the bottle in this picture.

Chickettes.com Shellac Purple Purple Swatch

And finally a shot under my OttLite.  You can see how blue it looks here.

Chickettes.com Shellac Purple Purple Swatch

Gelish Under Her Spell Collection Swatches & Review – Fall 2013

$
0
0

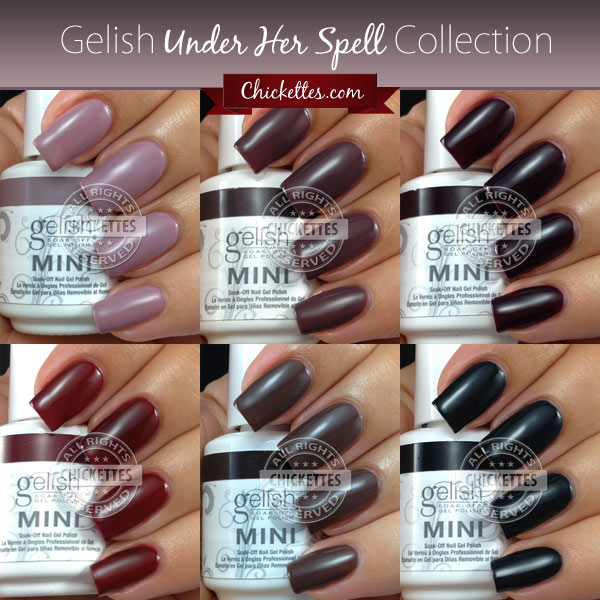
Can you believe that fall is just around the corner? I’ve had a lot of fun playing with bright, bold colors this summer, but I’m ready to start the transition to darker fall colors. Gelish just released their new fall collection called Under Her Spell. It hit the Sally Beauty Supply stores at the beginning of August.  The collection includes six new custom-blended colors.

Chickettes.com Gelish Under Her Spell Collection - Fall 2013 Swatches

Chickettes.com Gelish Under Her Spell Collection - Fall 2013 Swatches

The formula of these polishes is similar to the most recent All About the Glow collection, and they all applied with ease.  They have smooth, creamy finishes.  I applied three coats of each color to achieve the desired opacity for these swatches.

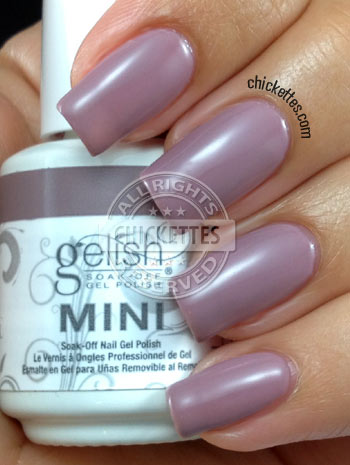
The color that I think everyone is most interested in is My Nightly Craving, which is a unique greyish-pink-lavender shade. This is my favorite of the group… I wore it for several days and loved it! Someone else that I know also wore this color and she had to repair a nail after a few days and she noticed that the newly painted nail was brighter than the others.  I checked my swatch stick and the color did indeed fade to a slightly browner tone. I didn’t notice this as I was wearing it, but just a heads up that the color changes a little over time.

Chickettes.com - Gelish My Nightly Craving Swatch

Chickettes.com - Gelish My Nightly Craving Swatch

This is Love Me Like a Vamp, which is accurately described as a black-violet shade.  It’s a very dark, vampy shade of purple.  While I like the color, I’m finding it difficult to tell all of the Gelish dark purples apart.  I would love to see them release some more unique shades.

Chickettes.com - Gelish Love Me Like a Vamp Swatch

Chickettes.com - Gelish Love Me Like a Vamp Swatch

Here is a quick shot of my collection of Gelish purples. You can see that the dark ones look fairly similar.  I would like to see a true purple with some shimmer or a nice shade of lilac (pretty please).

Gelish Purple Comparisons

I’m No Stranger to Love is a very dark teal/green.  This is another shade that’s so dark it’s almost black.  I think it’s unique and one that I would definitely wear in the cooler months, although I was hoping this one would be a few shades lighter – less black, a little more teal.

Chickettes.com - Gelish I'm No Stranger to Love Swatch

Chickettes.com - Gelish I'm No Stranger to Love Swatch

A Touch of Sass is a creamy, dark burgundy red.  In looking a my swatch pics it’s apparent that I must have applied thicker coats on my middle finger because it’s a bit darker than the others.  That just goes to show that you can control the opacity and shade with the number of coats and the thickness.  (Thin coats are recommended for better curing.)

Chickettes.com - Gelish A Touch of Sass Swatch

Chickettes.com - Gelish A Touch of Sass Swatch

Here is a picture of my Gelish reds, so that you can see how this shade compares to some of the others.  All of the swatch sticks have 3 coats of color.  I’ve seen some swatches of Black Cherry Berry that look similar to my Touch of Sass swatch, but my Cherry Berry is much darker.

Gelish Red Comparisons

Lust at First Sight is a creamy greyish mauve.  This is a really great fall color.  It’s dark and sultry, but not too dark.

Chickettes.com - Gelish Lust At First Sight Swatch

Chickettes.com - Gelish Lust At First Sight Swatch

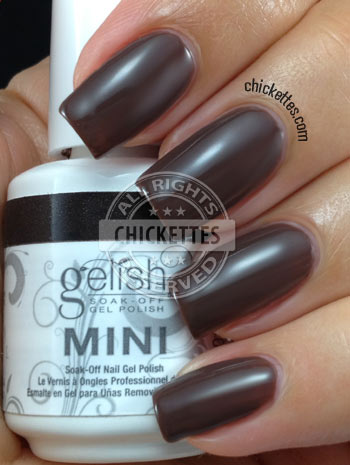
Want to Cuddle? is described as a smokey, dark taupe.  This is a unique shade of brown that I find very rich and warm.  I never really considered myself a fan of browns, but I love this and will definitely wear it this fall.

Chickettes.com - Gelish Want to Cuddle? Swatch

Chickettes.com - Gelish Want to Cuddle? Swatch

So what do you think of the new fall collection?  Which colors are your favorite?

Rainbow Dots with CND Additives

$
0
0

I’m learning about additives and how to use them to create different nail art effects. A friend was kind enough to share her CND additive collection with me, so now I have a whole new set of goodies to play with.  Additives are pigmented powders that you can layer over gel polish to create different effects (there are other uses, but this is how I will likely be using them most).  She showed me this technique using additives to create a dotted manicure with a rainbow gradient. This was my first attempt at it.  It’s not perfect, but it looks so cool!

I started with two coats of Ink Glacier and I used a brush to apply different color additives on top of the tacky layer. I used a dotting tool to add dots of Gelish TIO on top. After curing for 30 seconds, I used an alcohol wipe to wipe off the exposed additives and was left with this effect.  You can see that some of my dots ran together.  Next time I’ll flash cure each finger to keep the TIO from running together.  Pretty cool, huh?

Chickettes.com Rainbow Dot Effect Using CND Additives

Here’s what my nails looked like before I wiped off the excess.  I’m really impressed with the coverage of the additives.  You can’t even tell there’s white polish underneath.

Rainbow Dot Effect Using CND Additives

And here’s a quick shot of my new additive collection.  Linda was kind enough to send me little pots of each color with handwritten labels.  A little really goes a long way with these powders, so this will last me a LONG time.  Thank you, Linda!!

Additives

Beauty Blogazons Weekly Roundup

$
0
0

beauty blogazon roundup

Gradient Zebra Stripe Manicure

$
0
0

I’ve been playing with CND additives again!  It’s SO easy to create gradients with additives… why did I wait so long to try these?

For this mani I started off with 3 coats of Couture Little Black Dress, and then applied three different color additives into the tacky layer of my gel polish to create a gradient effect.  At the base of my nails I used CND Antique Bronze, then CND Pink Gold Sparkle in the middle, and CND Violet Pearl on the tips.   I blended them together well to create a seamless gradient.  Then on all of my nails except the ring finger, I used a dotting tool dipped into Gelish Top It Off to randomly apply some stripes.  After curing the TIO, I used alcohol wipes to remove the excess additive powder.  I applied a coat of TIO on all of my nails and cured one last time.  On the ring finger I added some round gold studs provided to me by the Born Pretty Store.

Chickettes.com - Gradient Zebra Stripe with CND Additives

Chickettes.com - Gradient Zebra Stripe with CND Additives

Here’s a shot of what my nails looked like BEFORE the excess additive powder was wiped off.

Chickettes.com - Gradient Zebra Stripe with CND Additives

And these are the cool studs that I added tot he ring finger. This set of nail art studs from the Born Pretty Store includes gold and silver studs in many different shapes and sizes, including circles, squares, teardrops, hearts and stars.  Save 10% on your next Born Pretty Store order with coupon code XTL91.

cnd-additive-zebra-3

Viewing all 441 articles
Browse latest View live


Latest Images