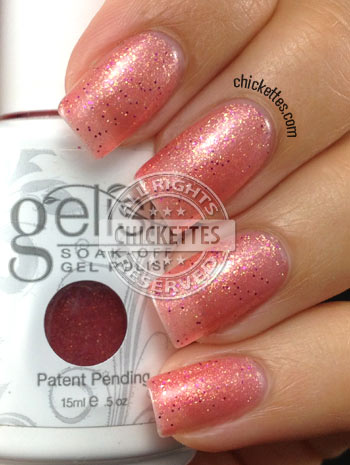
I needed a quick and simple mani the other day and decided to wear Gelish High Bridge again. I swatched this polish a while ago, but accidentally deleted the photos before I had a chance to post them. Oops! This polish is sheer and shows some visible nail line, but I adore it. The base is pink, and it’s loaded with different color micro-glitter. I’ve seen other pictures of this color and they all looked like a much brighter pink… I’m not sure if the formula was changed or if mine is different, but it definitely isn’t as bright as I expected.
Gelish High Bridge
Kate Bryan’s Date Night Look with Almay
I was delighted to be asked by BlogHer to share this Almay-sponsored video series, “Different Occasions. Different Looks. Always Pretty.” In the first video, find out how you can get Kate’s Date Night Look!
I enjoy reading Kate’s blog, The Small Things, which covers a variety of topics including hair and beauty, fashion and crafts. This video is a great example of a simple, elegant look that anyone can achieve. I never spend more than 5-10 minutes applying makeup and this is definitely a look that I will try.
KBShimmer 2013 Summer Colors
This is The Dancing Green. It has a green base with blueish undertones and is loaded with glitter of different shapes and sizes, in blue, green and purple shades. I love the color combination of this polish. I applied coats, and topped it off with 2 coats of KBShimmer Clearly On Top.
This next color is one of two matte polishes that are in the collection. This is 24 Carrot Bold (love the name), a bright orange polish with gold shimmer. This one is actually brighter than it appears in the pictures, and I took photos of it with the matte finish and with a top coat.
The third polish that I have to show you is Pimp My Pride, which is a white base with red and blue metallic glitter. I applied 2 coats of Pimp My Pride over 2 coats of China Glaze White on White, and topped it off with KBShimmer Clearly On Top. As the name suggests, this is a perfect polish to show American pride on holidays like Memorial Day and the Independence Day.
Guest Post: Gel Nail Art with Swarovski Crystals
I have a treat for you today!! I have long been admiring Kim Baker’s gorgeous gel polish manicures in some online forums. She creates elaborate designs with crystals, beads and gems that awe and inspire. I asked if she would be interested in writing a guest post to share her technique, and thankfully she accepted. Enjoy! ~ Andrea

Gel II Sky Blue, stamped with Sally Hansen rnp Gone Grey
Hello everyone, Andrea has invited me to let you know how I do my crystal manicures. I get a lot of my inspiration from some of the gorgeous Japanese nail art I’ve seen on the internet. I’ll have ideas rolling around in my head sometimes for days so the first thing I will do is swatch my designs to see if what’s in my head will translate nicely to the nail. Once I settle on a design, I gather all the gems and embellishments I plan to use and any tools like the Magical Pick and dotting tool or toothpick. I then do my gel polish mani as normal except for the top coat. I remove the sticky layer from the color coat with alcohol.

TruGel Boysenberry (purple) , IBD Hot Springs (green) Ink Diamond Snow (golden shimmer) stamped with rnp Sally Hansen Commander in Chic
Now I’m ready to apply the gems. One great tip is to use Gelish Foundation as the “glue” to place the gems and other embellishments in, using the gel also allows you to reposition any of your design if you need to. I swear Gelish Foundation is better than Super Glue, lol. Since using it I have not lost any crystals. You can use Super Glue but in my experience I did lose some gems using it. I will place a little Foundation gel on a small piece of foil and then using the dotting tool I place the gel on the nail where I want my crystals. Using the Magical Pick I pick the gems up and place them into the gel I laid down. Once I get the design where I want it I will cure for 30 seconds in an LED lamp to lock the gems in place. Now it’s time to top coat, I usually apply 2 coats over EVERYTHING, this helps to further secure the design. With normal wear the topcoat will wear off the tops of the stones but they should remain secure.

LeChat Pink Lady (pink) Orly Luxe (gold) stamped with rnp Sally Hansen Commander in Chic
I get a lot questions about what crystals I use and what colors and sizes. I prefer Swarovski stones because they really can’t be beat for the sparkle and color selection but there are some other economical alternatives like Korean DMC (diamond machine cut) glass stones. I prefer to buy from places that sell by the single stone so I can get more colors and sizes without breaking the bank. I will usually get 25-30 stones in a pack for about $1.75 – $2.50. If you are careful with your soak off you can reuse the stones. Good sizes to start with are SS5 – SS8, when I first starting using crystals I wouldn’t use anything bigger than SS6 but I have found that combining both smaller and larger (up to SS10) stones can make for much more interesting designs. As far as colors, I started with about 6-7 basic colors: clear, red, blue, green, yellow, pink and purple. Some of my favorite stones are the Swarovski opals, they really do look like opals on the nail and the AB (aurora borealis) stones, these have a special coating that make them flash a rainbow of colors.
With some many colors and sizes there really is no limit to what you can create, let you imagination go wild!

Mild East #69 (green, Ebay) stamped with Sally Hansen rnp Flashy Fuchsia. I would not recommend this gel brand because the soak off was a nightmare. Took over an hour to get it all off!
Swarovski Crystals:
Magical Pick:
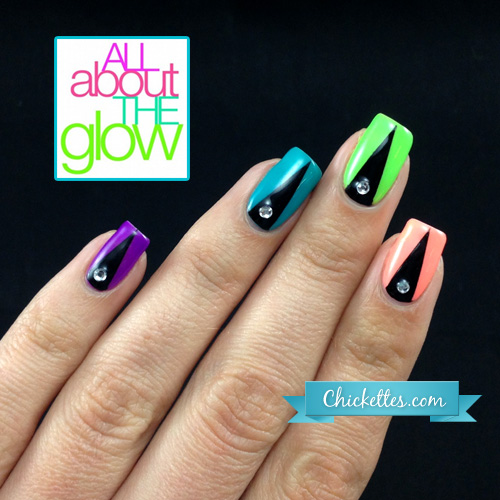
Colorful Stiletto Half Moon Nail Art
I started with three coats of different colors from the All About the Glow Collection: You Glare, I Glow (purple), Radiance is My Middle Name (blue), Sometimes A Girl’s Gotta Glow (green), I’m Brighter Than You (orange/peach) and Brights Have More Fun (pink). I topped each nail off with one thin coat of Gelish Top It Off, and wiped off the tacky layer. Then I used nail art striping tape to create the triangle shapes and I painted them in with Cult Nevermore. After Nevermore dried, I applied another thin coat of TIO and then I dotted the Gelish Foundation onto my nails where I wanted to place the gems. I put the gems in place, cured in my LED lamp and then applied one more thin coat of TIO over it all. It sounds like a lot of coats of polish, but I applied very thin layers and my nails don’t feel thick at all.
And guess where I wore this fancy mani… to the NKOTB concert! LOL I went to “The Package” tour and saw Boys II Men, 98 Degrees and NKOTB. I LOVED them back in middle school and I was offered a free ticket to attend the concert in a suite with lots of food and drinks. It was a good time, though I only knew the original songs from way back in the day.
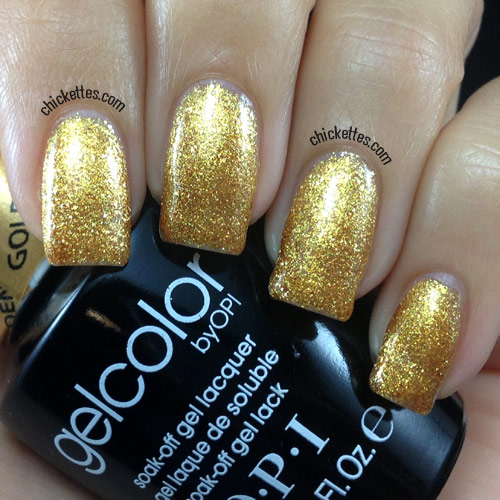
OPI Gelcolor Goldeneye
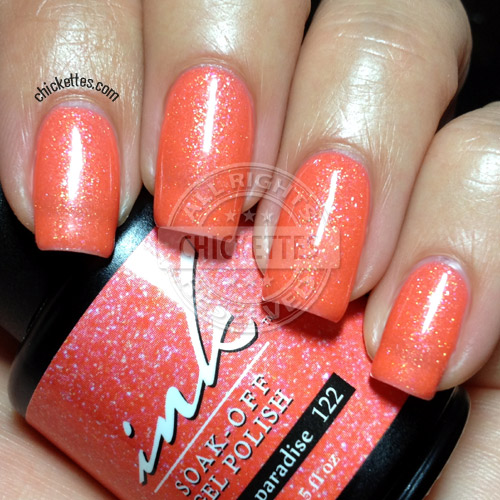
Ink Passion Paradise Swatch
LacQit One-Step Gel Polish Summer Colors & GIVEAWAY!
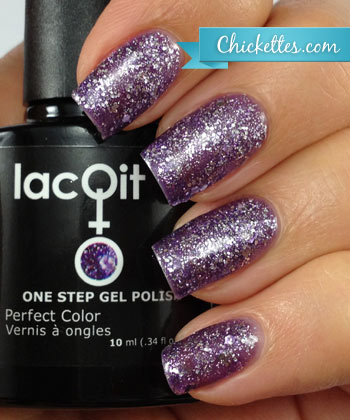
LacQit released six new colors this summer, and they were gracious enough to provide one of each for a giveaway for you lovely readers! LacQit is a one-step gel polish that doesn’t require a base or top coat, and provides long lasting wear! It’s super easy to apply and remove. I reviewed the LacQit kit and polishes earlier this year. You can see some of the color swatches and read more about LacQit here.
The six new colors are shown in the swatch photo above, and two of them are glitter polishes! I am currently wearing Pop On This Purple, seen below.
Giveaway Information
The Prize:
ONE lucky winner will receive ALL six of the new LacQit gel polish colors:
- A Flare for Pink
- Pop On This Purple
- In a Blue Streak
- Tangerine Tango
- Shades of Grey
- It’s a White Out
Note: These polishes require the use of a UV or LED lamp to cure.
The Rules:
- The giveaway begins today, June 27th and will run through July 7th.
- Entries will be collected via Rafflecopter only.
- The winner will be selected randomly via Rafflecopter and announced on July 8th.
- The winner will be notified via email, and will have 48 hours to claim the prize or a new winner will be selected.
- This giveaway is open INTERNATIONALLY.
- Entries will be verified.
GOOD LUCK!
IBD Indian Sari & Road to Paris Swatches
Indian Sari is gorgeous and has a really nice shimmer, but it’s definitely more purple than I anticipated. Below are some pictures of Indian Sari taken in my lightbox. The lighbox tends to make polishes look a little more matte than they actually are, so I also took a shot under the OttLite to show off the shimmer and gloss a little better.
Road to Paris is also a shimmery purple, but it’s more sheer and more on the pink side. Actually after looking at Indian Sari this looks very pink, but if I put it next to my pinks, it looks purple… so I guess it’s a hybrid! It also has a gorgeous shine, but I forgot to get a picture under the OttLite. This is also not the cranberry color I was looking for though, so the hunt for cranberry continues!
I am really starting to like the IBD brand. All of the colors that I’ve tried so far have been beautiful, they applied and soaked off well, last as long as other brands, and they’re half the cost!
Ninja Polish – Color Shifting Nail Polish
This is Alexandrite, a blue/green/purple color shifting glitter topper. I applied three coats of this on it’s own to show off the colors of the topper by itself, but this would look great over a lot of colors. I recommend applying over black, blue or purple. This one is unfortunately out of stock at the moment, but hopefully it’ll be back soon because it’s quite stunning. These pictures were all taken in my lightbox.
All of the following polishes are from the Enigma Collection. It’s so hard to describe the color of some of these because of the shifts. This first one is Mystic Glacier. I would describe it as a blue base with a gold/copper shimmer shift. The first photo was taken in my lightbox, and the second was taken under an OttLite.
This is Shillelagh, which is an emerald green with a gold/copper shimmer shift. I had a really hard time capturing the shift on camera. The first photo was taken in my lightbox, the second outdoors, and the third under an OttLite.
This is 100% Columbian, a black base with a shimmer that shifts from copper/redish-brown to green depending on the lighting and angle. The color shifts are really amazing. They tricked my mom yesterday… she asked when I changed my polish from brown to green. LOL The first two photos below are in the lightbox, and the third is under an OttLite.
And last but not least, is Divinity. This one is really complex and beautiful. I wish my pictures did it justice. I may have to try this one again and attempt to capture the shifts better. ![]() The base is purple, though after a few coats it looks more red. The colors shift from purple to red to gold/copper to green!
The base is purple, though after a few coats it looks more red. The colors shift from purple to red to gold/copper to green!
Patriotic 4th of July Nail Art
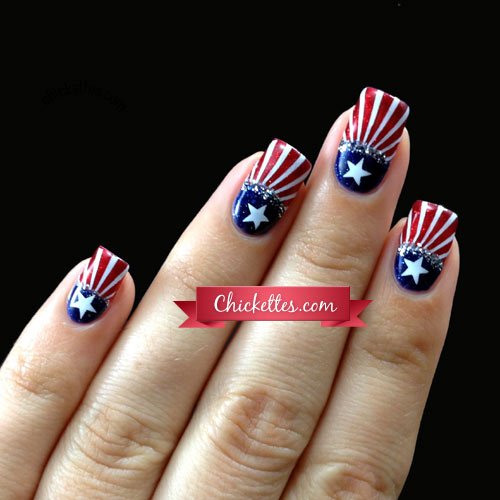
Happy Independence Day (two days early)! I’m in a very patriotic mood, and what better way to show it than with good ‘ol red, white, and blue with stripes and stars! I stayed up half the night working on this mani and I actually did both hands (sometimes I only do nail art on one hand, shhhhh…). This is very sparkly in person because I used two gorgeous Gelish glitter polishes for the main colors.
I first used a dotting tool to apply the blue half moons. The first coat is Gelish Caution, and for the second coat I used Gelish Holiday Party Blues. Then I painted the red onto the tips using Gelish Queen of Hearts for the first coat and Good Gossip for the second coat. (The two glitter polishes wouldn’t have been opaque enough on their own in just 2 coats.) I applied a thin layer of Gelish TIO and then stamped on the stripes and stars with Konad White polish. The stripes are from Bundle Monster plate BM301, and the stars are from Cheeky plate CH5. I used my dotting tool again to apply a thin line of silver glitter over the top of the half moon with Ink Chrome Silver, and finished it off with another coat of Gelish TIO.
Gelish 18G LED Lamp Review

If you follow me on Instagram or Facebook you might already know that I recently purchased a new toy… the Gelish 18G LED lamp! It’s been on my wishlist for a very long time, and I finally broke down and bought it. The price tag is a little steep and is what kept me at bay for so long, but now that I have it I’m not sure how I survived without it!
I originally started out with the Thermal Spa UV lamp, which is a great lamp at a very reasonable price. I used it for about 2 years and never had to change the bulbs, so it served me well. The 2 minute cure time was the only downside. I almost always apply 3 coats of color, and with a base and top coat I would have to cure each hand 5 times for 2 minutes each time. This lamp does fit both hands, but I always ended up doing my hands one at a time anyway. Then I upgraded to the Gelish Mini Pro 45 lamp, which cures the polish in just 45 seconds, but it only does four fingers at a time, so I had to cure my thumbs separately.
The 18G lamp fits all 5 fingers at once and the curing times are lightning fast! It only takes 5 seconds to cure the foundation, 20 seconds for lighter colors, 30 seconds for darker colors and 20 seconds for the top coat. Oh yea!! So now it only takes up to 2 minutes to cure each hand instead of 10.
This lamp is pretty high tech. It has 3 buttons on the back where you can set it to cure for 5, 20 or 30 seconds. It has a motion detector and detects when you slide your hand or foot into the opening and automatically turns on. It has a little shield that you slide down over your hand to keep the light inside the lamp and from blinding you. The lamp beeps when it turns on and off, so if you aren’t paying attention you know when it’s done. I usually watch TV while I’m doing my nails so this is nice.
The bottom plate is magnetic and pulls right off for easy cleaning. Below is a picture of the inside with the bottom plate pulled off.
I read in some reviews that people complained about the length of the power cord, but this lamp has the longest cord of all the lamps I’ve tried/owned. I think the biggest downside is that the lamp doesn’t have an on/off switch, so you have to unplug it if you want to completely turn it off. It also gets a little warm when in use, but not to the point of being uncomfortable.
I’m completely in love with this lamp. It’s going to make swatching so much faster and easier… I feel a swatch-a-thon coming on! If you’ve been debating about whether to buy it, my recommendation is “JUST DO IT!!”
Graffiti with Nail Art Transfer Foils
Here’s what Deep Sea looked like before I applied the foils. It’s a deep, dark blue with some purple shimmer. The photo at the bottom shows off the shimmer a little better.
Beach Sunset Nails with NCLA Wraps
I’m counting down the days to my beach vacation… only 4 more days until I’m soaking up the sun on a white sand beach. Ahhh! I’m getting myself in beach mode with these “So L.A.” nail wraps that Nail Polish Canada sent me. You can read my full review of this product and see pictures of the other fun pattern that I tried here.
I had a little trouble with application this time around. I couldn’t get a few of the edges to lie completely flat, and I tried to overcompensate with the top coat which ended up causing a few wrinkles to appear. The pattern seems to hide these imperfections though so they’re really not very noticeable. I’m still very pleased with how easy these wraps are to apply and I think they’re an awesome way to add designs to your nails with very little effort.
Water & Hibiscus Flower Nail Art
I started with two coats of Sheek White and one coat of Ali Baba Sim Sala Bam. Then I applied one coat of My Favorite Accessory (teal), and Deep Sea (dark blue/purple) onto my nails and used a dotting tool to drop little circles of top coat into the color before curing. I let the dots spread for a few seconds, cured, and applied another coat of Ali Baba on top. Finally, I topped it all off with my Gelish TIO. Whew… that’s a lot of coats of polish!
The hibiscus flowers are stickers/decals from Lucky Star Style Nail Decals. The decals are actually pink, but when applied over blue they look purple, which turned out to be perfect for this mani! These decals work great with gel polish. If you’d like to try them out you can use the code “firstorder” when checking out at Lucky Star Style to save 20% on your first order.
Gelish Ali Baba Sim Sala Bim
Gelish Go Girl Swatch – Fade Alert
Gelish Little Princess Swatch
Gelish All About Me Swatch
Gelish All About Me is a dark creamy purple. It has some reddish undertones which gives it a bit of a vampy look. I really like this and can see wearing it more in the fall and winter months. I think it would look awesome with a layer of Good Gossip over top to pick up the red tones. It would also work well with a shimmery topper like Ali Baba or Izzy Wizzy since those would pick up on the purple tones.
Beach Manicure
I stayed up late the night before our flight and changed my polish. I didn’t have time to take pictures at home, so I grabbed a quick shot while I was on the beach the first day. My new bikini is teal and purple, so I went with a simple teal and purple theme using Gelish Radiance is My Middle Name and You Glare, I Glow. I used some loose glitter to add a glitter gradient to most of my nails, and stamped a tropical flower design onto my middle finger using Bundle Monster plate 318 and Konad white. My mani lasted perfectly through the week and was a great compliment to my new suit!

