Quantcast
Channel: Chickettes Natural Nail Studio & Boutique
Viewing all 441 articles
Browse latest View live

Rainbow Foil Nails with Gel Polish

$
0
0

I’ve been wanting to play with nail art transfer foils again for a while.  I’ve only used them one other time, you can see that mani here.  I had an idea in my head of a rainbow pattern with foils, though it didn’t turn out exactly as I had imagined when I sat down to do it.  I still love the way it turned out though – it’s very colorful and fun.

For this mani I prepped as usual and started with two coats of Couture Little Black Dress.  After curing the second coat, I took my foils and applied them to the tacky layer of the polish which acted like the glue.  If your gel polish isn’t sticky enough to do this you can try applying a very thin coat of foundation gel over your color (cure it) as the glue, or you can use actual foil glue.  Once I was happy with my foil application, I applied a layer of top coat over all the nails and cured.  Then I applied the square gold studs using my gel foundation as the glue and curing for several seconds, and I top coated over the studs once more.  What do you think?

Chickettes.com Nail Art with Transfer Foils and Gel PolishChickettes.com Nail Art with Transfer Foils and Gel Polish


Messy Mansion Stamping: Koi Fish & Water Nails

$
0
0

This is another mani that I created using a Messy Mansion stamping plate.  Plate MM29 has some awesome aquatic imagery including a koi fish, seahorse, mermaid and various water images.  I started with three coats of Couture Milano, a soft pale blue.  I stamped a water pattern onto each nail using Kleancolor Metallic Aqua.

The coy fish on the middle finger was creating using the stamping decal methodology.  This was my first successful decal, but it took me a few tries before getting it right.  I’m learning that the key to making decals is having patience, something that I lack.  I applied a regular nail polish base coat (Seche Vite) onto a plastic baggie.  After it dried I stamped the fish image onto it and colored it in with a couple of Kleancolor polishes, Metallic Yellow and Metallic Mango.  After letting the decal sit overnight to dry, I lifted it off of the baggie and cut it out with scissors.  I painted a fresh coat of seche vite over my nail and pressed the decal onto the nail until I got it to lay flat.  I cleaned up the edges with polish remover and let the polish dry completely before finishing off with one layer of gel top coat.  I see more decals in my future!  Keep in mind when you’re using regular nail polish with gel polish that you have to let it dry completely before applying gel over top.

Messy Mansion Stamping: Koi fish & water nailsMessy Mansion Stamping: Koi fish & water nails

Here’s what the MM29 stamping plate looks like. I can’t wait to use the image in the center of the plate for some nail art.

MM29.jpg

Gelish Day Dream Confetti – Limited Edition

$
0
0

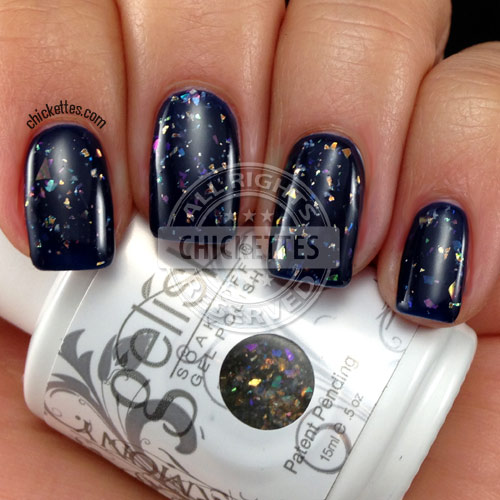
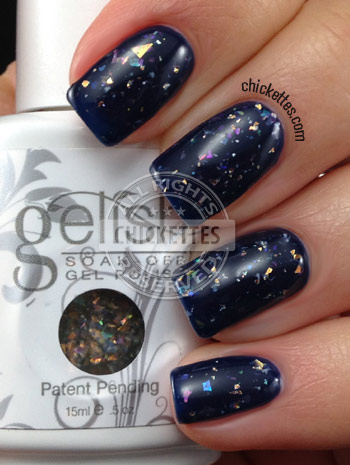
I happened to get my hands on a bottle of a limited edition Gelish polish called Day Dream Confetti.  It’s a flakie topper and was exclusively for sale for a limited time at Cosmoprof stores (which is for pros only) on Black Friday of last year.  You can read more about this here.  There was also a matching Morgan Taylor nail lacquer.   If you have access to Cosmoprof you may still be able to find these, but no guarantees.  I was fortunate enough to have a friend pick this up for me.

Day Dream Confetti is what I expected the Trends polish Rough Around the Edges to look like.  It has different colored iridescent flakes in a clear base, and it looks completely different depending on what base color you wear underneath.  I applied one coat of this topper over Gelish I Heart My Instructor, a very dark blue.  With just one layer of top coat over it, this polish is completely smooth and flawless.  If you recall, my Rough Around the Edges was very chunky and lumpy, so this was a pleasant surprise.  I’m not quite sure why they made this LE though – I think it would be a great seller!

Gelish Day Dream Confetti over I Heart My InstructorGelish Day Dream Confetti over I Heart My Instructor


3D Textured Diamond Plate Nails

$
0
0

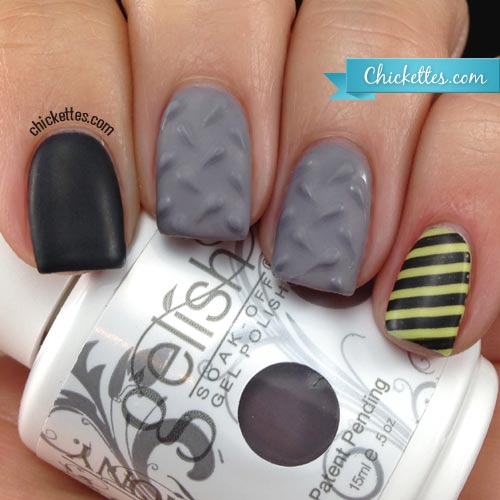
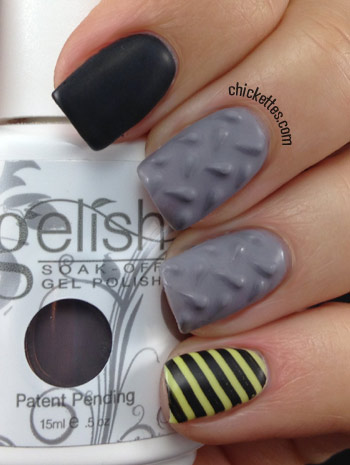
I’ve seen some really cool 3D textured nails popping up on Instagram and Pinterest, so I decided to experiment to see if I could create a textured look using just soak-off gel polish.  I think the result turned out pretty cool!  I ended up with this industrial look that resembles a diamond plate pattern.  I created a video to show you how easily this is done, which you can watch at the bottom of this post.

My index finger has three coats of Gelish Black Shadow.  The pinky finger has two coats of Couture Tres Chic, and is stamped with stripes from Cheeky plate CH10 and black Konad polish.  The diamond plate nails have two coats of Gelish Let’s Hit the Bunny Slopes and then the pattern was drawn on using a dotting tool (3 coats).  The entire mani was topped off with the Gelish Matte TIO, which makes the texture pop even more.

Chickettes.com 3D Textured Diamond Plate Nail Art using SOG PolishChickettes.com 3D Textured Diamond Plate Nail Art using SOG PolishChickettes.com 3D Textured Diamond Plate Nail Art using SOG Polish

China Glaze Gelaze Flying Dragon Swatch

$
0
0

Sally Beauty Supply had a Buy-One, Get-One Free (BOGO) coupon this week, and I took advantage of it and picked up some of the new China Glaze gel polishes called Gelaze.  I believe there are 40 colors out currently (correction: there are 34 colors), and I bought 8 of them.  My favorite of the bunch was Flying Dragon, so I had to wear it and swatch it first.  It’s a gorgeous shade of purple with tiny shimmery blue and pink glitter flecks in it.  I’ve seen some photos of the RNP version of this color, but I think the gel version outshines it.  It’s truly stunning and unique.  I don’t want to ever take it off!

China Glaze Gelaze - Flying Dragon SwatchChina Glaze Gelaze - Flying Dragon Swatch

You’re probably wondering about the wear of the Gelaze polishes.  I haven’t done any wear testing as of yet, but Michelle over at Manic Talons has so you can visit her site to read the review (the results were great, BTW).  I also haven’t done any fade tests on the polishes that I picked up, but I will monitor them and report back if there are any issues, though I’m hoping there’s nothing to report.  I can tell you that these applied really nicely.  They don’t require a base coat, so you save a step in the process.  I applied three coats of Flying Dragon onto my nails and they don’t feel thick at all, but they still have the strength that can be expected from a gel polish.  So far I’m really impressed with this brand.

Currently these polishes are only available for sale at Sally’s, which I know is a downer for many of you because you don’t have access to the stores or they don’t ship to your region.  You can find them on their website here.  I’m hoping that they will eventually make their way to other distributors as well.

I also wanted to mention that the retail price of these polishes is pretty reasonable at $12 ($11 with a Sally’s card).  With the BOGO coupon, I got them for $5.50 each!  The size of the bottles was smaller than I expected though at only .33 ounces (their RNP bottles are .5 ounces).

Here is a quick picture of the other colors that I picked up.  For Audrey is my favorite blue in RNP, and I’m so happy to see it in gel now!

China Glaze Gelaze Swatches

Ibd Just Gel – Precious Peridot Swatch

$
0
0

I just bought 15 new ibd Just Gel polishes, the 8 Gelaze colors that I showed in my last post and a few Fingerpaints, so there are lots of swatches coming soon!

This is a swatch of ibd Precious Peridot, which is a hard color to explain. In some lights it looks very green and in others it looks more brown, but it has a gorgeous sparkly finish. I know my photos always look a bit matte and that’s because of the way the light is filtered in my lightbox and it doesn’t do the shimmers the justice that they deserve. I’ve been trying to find a way to make my lightbox not mute the shimmer like it does, but I haven’t found the perfect solution yet.  Oh, I apparently also forgot to top coat the pinky finger, so that one looks even more matte!  LOL

I really like the ibd brand for numerous reasons. It wears well, it’s extremely affordable at $7-8 per bottle, it applies well… all around it’s a great product. I will be adding more of these to my collection over time.  I bought a bunch of pink shades from the ibd line so that I can test them for fading.  I’ll share the results when I’m done.

ibd-precious-peridot-swatchibd-precious-peridot2

Black and Red Gothic Nails with Cross & Gelaze Liquid Leather Swatch

$
0
0

I picked up these cross studs from the Born Pretty Store and I’ve been trying to decide what to do with them. I was inspired by Candy Coated Talons to use red foils over black polish to create a gothic look. I started with three coats of Gelaze Liquid Leather. Normally I would stick the foils into the tacky layer of the color polish, but this time I actually top coated so that I could swatch the color (pics below). After taking my swatch pics I applied a thin layer of Gelish foundation gel over top and stuck the foils into the tacky layer, and then finished off with a layer of TIO.

I also used my Gelish foundation as the “glue” for the cross. I applied it under and all around the edges of the cross and cured it, and then applied a layer of TIO around and over the entire cross.  I created a video to show you my techniques for using transfer foils and applying large studs, which you can watch at the bottom of this post.

Chickettes.com Red and Black Gothic Nails using Foils & Cross Stud

Here are pictures of Gelaze Liquid Leather by itself. I had a little trouble with application of this color. There was some shrink-back at the tips requiring flash curing and I also found out the hard way that it needs to be applied in thin coats or you’ll get wrinkling. It took 3 coats to get decent coverage. I don’t think this will be my go-to black. Couture Little Black Dress has the best coverage of all the blacks that I’ve tried.

Just a quick reminder that Sally’s has a BOGO sale going on for the entire month of March on the new Gelaze line of gel polishes.

Chickettes.com Gelaze by China Glaze "Liquid Leather" Swatch

And here is the video that I created to show you the techniques that I used in this mani.  The products used in this video are:  Gelaze Liquid Leather, Gelish Foundation Gel, Gelish Top It Off, Nail Art Transfer Foils, and a Cross Stud.

St. Patrick’s Day Nail Art 2014

$
0
0

I’m getting in the spirit for St. Patrick’s Day with this festive nail art.  I purchased some shamrock nail art stickers from Etsy last year and have kept them on hand for this occasion.  I’m really happy with how this manicure turned out.  The sticker decal worked wonderfully.  I see that they are now sold out where I purchased them, but if you can find them elsewhere they are a great buy.

I used four different gel polishes in this design: Gelaze In the Lime Light (light green), Couture High Roller (dark green), OPI Goldeneye (gold) and Gelish Artic Freeze (white).  On my middle finger I started out with two coats of Arctic Freeze, wiped the tacky layer and then applied the decal.  I added the gold accents with a dotting tool.  I used nail art striping tape as guides for the stripes on my thumb and ring finger, and carefully applied the colors in between the tape lines using a dotting tool.

I’m ready to paint the town green!

Chickettes.com St. Patrick's Day Nail Art 2014Chickettes.com St. Patrick's Day Nail Art 2014


Gelish Trends: Too Tough To Be Sweet & Feel Me On Your Fingertips Swatches

$
0
0

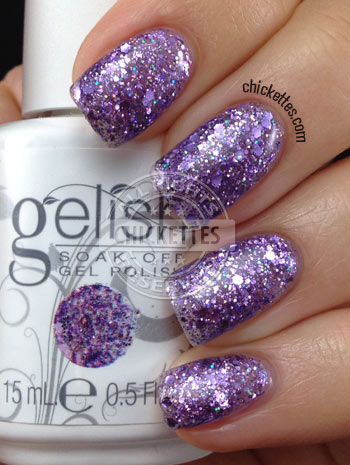
I’m almost done swatching all of the Gelish Trends – only one more to go after today!  You can view all of my other ones over on my Gelish swatch gallery page.  The first one shown here is Feel Me On Your Fingertips.  It’s a purple glitter topper with a clear base.  I applied three coats to get it to look like this, but honestly my nails looked and felt way too think.  This would probably look better applied thinly over a purple or blue base.  You can see that it also has tiny little specks of blue in it too.  It’s super gorgeous and sparkly like all of the Trends!

Gelish Trends - Feel Me On Your Fingertips

Gelish Trends - Feel Me On Your Fingertips

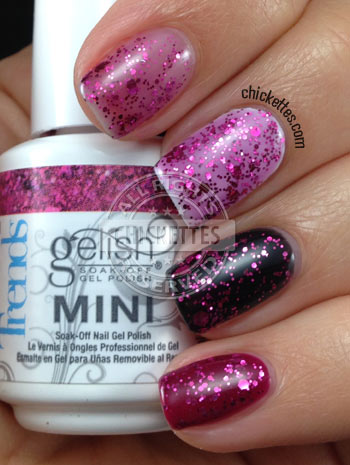
And this is Too Tough To Be Sweet, a pink/cranberry-ish glitter topper.  I’ve worn this one a few times with nail art and loved it. This one has a pink tinted base, but it’s pretty sheer even with three coats.  In the picture below I have applied two coats of Too Tough To Be Sweet over four different bases: clear, white, black and cranberry (Gelish Rendezvous).  I love the look of it over black and cranberry.  You can see this color in my recent “Owl Love” mani.

Gelish Trends - Too Tough to be SweetGelish Trends - Too Tough to be SweetThe Trends toppers are a bit hard to remove since I think they are basically glitter in a top coat base, so if you apply multiple layers your nails will be very strong but may take longer to soak off.  I recommend using a coarse grit file to file off your top layers before attempting your soak-off to speed up the process.

Gelish Trends Life of the Party Swatch & Collection Overview

$
0
0

Gelish Trends Life of the Party is the last color from the collection that I have to show you.  This one is a gorgeous glittery red that reminds me of the ruby slippers in The Wizard of Oz!  I think it’s the best red glitter polish yet.  In some lights it appears to lean slightly pink.  The swatch below shows what it looks like in three coats.  This polish wasn’t as thick as some of the other Trends that I tried and it has a red tinted base, so it wears well on its own.  I seriously can’t stop staring at my nails!

Gelish Trends Life of the PartyGelish Trends - Life of the Party

You can view all of the other Trends swatches over on my Gelish swatch gallery page.  I listed the Trends at the top of the page.  I have also written about each of the colors in this line, so you can read my write-ups here if you’re interested in learning more about any of them.  Overall I really like the Trends line.  I didn’t previously consider myself a glitter topper kind of person, but some of these are pretty unique and wear well all on their own without a base color.  I loved them all, except for one… Rough Around the Edges.  That one just didn’t do it for me, but the others are all winners in my book.

The Trends are a little harder to remove than regular gel polish and require a longer soak-off time, so I recommend filing the top layers well with a coarse grit file before attempting your soak-off.  This will make the process go much faster.  You can also try applying heat during your soak-off with the use of a heating pad or warming mitts to aid in the removal process.

Below is a picture of my swatch wheel that contains all of the Trends.  These are three coats each on a white wheel.  The names of each corresponding color are listed below.  You can click this image to enlarge it.

gelish-trends-swatches
1. Concrete Couture
2. Am I Making You Gelish?
3. A Pinch of Pepper
4. Lots of Dots
5. Girls’ Night Out
6. Sweet 16
7. Party Girl Problems
8. Getting Gritty With It
9. Let Me Top You Off
10. Candy Shop
11. All That Glitters is Gold
12. Too Tough To Be Sweet
13. Rough Around the Edges
14. Are You Feeling It?
15. Life of the Party
16. Feel Me On Your Fingertips

Using Acrygel for Added Strength & Nail Repairs

$
0
0

Everyone that uses gel polish needs to know about the “acrygel” technique.  Acrygel is a combination of the words acrylic and gel.  It’s a method for adding strength to your nails using acrylic powder and gel foundation, so you get the strength of acrylic with the soak-off ability of gel.  I first learned about this technique on YouTube from Anna’s Nail Art.  I’m not going to try to reinvent the wheel and make a video on this since she already has some amazing ones, which I’ll embed at the bottom of this post.  Also, Kim from Ten Little Canvases just recently created a video on how to repair a broken nail with acrygel.

I really just wanted to let you all know that this exists and share my experience with it.  I use the acrygel technique on my mom every time I do her nails because it helps with the splitting that she gets in one of her nails and it makes her gel polish last longer – normally it peels off on her within a week (because she picks at it!).  But she gets much better wear with one or two coats of acrygel underneath her polish.  I also apply it to my nails frequently for added strength.  Below is a photo of what my natural nails look like with two coats of acrygel over them.  I use my Gelish Foundation gel and crystal clear ibd Flex Powder.  As many of you know, I go rock climbing and this really helps protect my nails from breaking when I climb.

It’s not noticeable, but the nail on my middle finger is actually broken near the tip.  It snagged and ripped the other day when my nails were bare, so I patched it up with acrygel and now it’s being held together nicely and it looks and feels like a normal nail.

acrygel-gelish-foundation

The acrygel layer(s) under your polish will soak right off like gel polish.  Read my article about how to remove gel polish if you are unsure how this is done.  It usually takes a little longer with acrygel since there are more layers and the bottom layer will be a little gummy after soaking.  I always file down my nails with a coarse file before soaking to make the process go faster. You can also file your nails down and do a fill instead of completely soaking off all of the layers (see the second video below).

This is an explanation of my technique. You can also watch the videos below to see how Anna and Kim do it.

1. Prep nails by lightly buffing them, wiping them off with alcohol and applying Gelish pH Bond.
2. Apply a coat of Gelish Foundation gel on each nail.
3. BEFORE curing, sprinkle ibd Flex Powder over each nail and tap off the excess powder.
4. Cure in an LED lamp for 20-30 seconds.
5. Wipe off any excess powder with a lint-free alcohol wipe.
6. Repeat steps 1-5! (optional)
7. Buff the nails to smooth them out and eliminate any thick edges.
8. Apply gel color polish & top coat as normal or simply top coat for a natural look.

Video:  Anna’s Acrygel Technique

Video: How to do a re-fill of acrygel instead of soaking off

Video: How to repair a broken nail with acrygel

Peach Swatches: ibd Sundance, Gelaze Peachy Keen & Gelaze Flip Flop Fantasy

$
0
0

I don’t know about you, but I’m getting really excited for spring and summer colors. I love to wear bright, fun colors on my nails. I recently purchased a bunch of new gel polishes and have quite a few spring-y shades to share with you. I’m going to start swatching them in color groups.  Today’s swatches are the peach shades from my haul.  They all have a cream finish and each is shown with three coats of polish over two layers of acrygel.

First up is ibd Just Gel Polish Sundance.  Sundance is a light, pastel shade of peach.  This is the lightest peach shade that I own currently and I love how soft it looks.  This is a great spring color, and I love the quality and affordability of the ibd brand.

ibd Just Gel Polish - Sundance
ibd Just Gel Polish - SundanceThis is Gelaze Peachy Keen.  It’s a few shades darker than Sundance, and is another stunning color for spring and summer.  I am experiencing the shrink-back issues with Gelaze that many of you have also mentioned.  I address this issue by flash curing each nail in my lamp for a few seconds after applying the first coat.  This prevents the polish from moving and gives better coverage.  I’ve also heard that this polish applies better when it’s cool/cold, so that’s something to try too.

I did a wear test of Gelaze on my right hand for 10 days.  I applied it as suggested with no base coat and used the Gelaze top coat.  I didn’t have any chipping or peeling in the 10 days that I kept it on, though I didn’t think the soak-off was any faster than normal.  I’ve heard many people say that it’s not lasting on their nails.  If you’re having issues with it staying on you could always try it over a gel foundation like Gelish – that should help it last better, but it defeats the time-saving aspect of a baseless polish.

Gelaze Peachy KeenGelaze Peachy KeenAnd get ready for this one… put your shades on!  This is Gelaze Flip Flop Fantasy, a very bright shade of peach/orange.  I had a very hard time photographing this color because it’s so bright, so these photos may not be 100% color accurate.  It’s actually very close to Gelish I’m Brighter Than You, but is a touch less neon.  I wore this color for several days and couldn’t stop looking at it… it made me crave the beach!  This is a perfect color to wear to the beach and/or on summer vacation.

FYI – the Gelaze polishes are currently only sold at Sally Beauty Supply, and they have a Buy-One, Get-One sale on this brand for the entire month of March (2014).  I combined that deal with my Sally’s card discount a coupon and got them even cheaper!

Gelaze Flip Flop FantasyGelaze Flip Flop FantasyThis is a picture of all of my peach / coral / orange shades side by side so you can see how they compare.  This also isn’t 100% color accurate because the brightness of Flipflop Fantasy & I’m Brighter Than You really threw my camera for a loop, but you can at least get an idea of how the shades and finishes vary from one another.  You can view the individual swatches of the Gelish colors over on my Gelish gallery page.

Peach/Orange Gel Polish Swatches

Zig Zag & Polka Dot Mani

$
0
0

This is the mani that I’ve been wearing this week.  I love that it feels bright and spring-y.  I picked out these three colors as I thought they’d look nice together, sat down at my nail station and ended up coming up with this. The three colors used are: Gelaze Purple Panic, a gorgeous bright pink with a slight purple shimmer; ibd Hollywood Royalty, a blue-ish purple (or purple-ish blue, I can’t tell) with a shimmer finish; and Gelish Oh What A Knight, a metallic bronze shimmer. Here’s what I did for each nail.
  • Index finger: Two coats of Purple Panic, dotted with Oh What a Knight.
  • Middle finger: I did a purple glitter gradient into the tacky layer of my foundation gel. You can watch this video to see how a glitter gradient is done. Unfortunately I have no idea what this glitter is called since I got it for free and it has no label.
  • Ring finger (& thumb): I applied one coat of Oh What a Knight (great coverage), and then a thin coat of my Gelish top coat, cured and wiped off the tacky layer. I applied two chevron decals that I got from Etsy onto my nails, pressing them down really well from edge to edge and painted on the pink and purple colors and cured. After curing, I pulled off the decals at a sharp angle and top coated.
  • Pinky finger: Three coats of Hollywood Royalty, dotted with Oh What a Knight.

The first photo is more color accurate. The second is a bit too bright and Hollywood Royalty looks more blue than it is.

Chickettes.com Zig Zags & DotsChickettes.com Zig Zags & Dots

Gelaze Awakening, ibd Tabloid Talk, Ink Berry Funk

$
0
0

I have swatches from three different brands today.  I laid out all of the colors that I own that need to be swatched and put them into color groupings.  These are the purple-leaning pinks and/or pink-leaning purples of the bunch.  The first color seen here is Gelaze Awakening.  It’s a really lovely shade of purple with a golden shimmer.  This color is very similar to ibd Road to Paris, but has a little better coverage.  You can see how the two compare in the last photo on this page.  I applied three coats of Awakening for this swatch.

Gelaze Awakening

Gelaze AwakeningThis is ibd Tabloid Talk from the Tinseltown Collection, which is a little more pink than purple and also has a really nice shimmery finish.  This color is rather sheer and still shows visible nail line after three coats as seen below.

ibd Just Gel Polish - Tabloid Talk

ibd Just Gel Polish - Tabloid TalkAnd the last colors that I have today is Ink Berry Funk.  Yikes, this was a hard color to photograph… I don’t think it’s quite as blue-ish as it appears in my pictures.  This color definitely doesn’t match the label on the bottle though, which is much more reddish.  This polish has a frosty finish and will show brushstrokes if you aren’t careful in your application, and it has great coverage with just two coats.

Ink Berry FunkInk Berry FunkThis is a photo of the three colors above next to some other comparable colors from my collection.  You can click on the image to enlarge it.

purple-pink-compsYou may also notice that I used different lighting in my photos today than normal.  I’ve been experimenting with my lighting to try to show more of the high gloss shine of the polishes.  My lightbox setup was previously filtering the light so much that it often made the finish of the polishes look matte.  So let me know what you think of the lighting and if you prefer to see the shine as in these photos.

Dark Pink Swatches: Gelaze 108 Degrees, Gelaze Purple Panic & FingerPaints Art You Sure?

$
0
0

Hi everyone! I have several new shades of pink to swatch so I’m breaking them down into three groups; light, medium and dark. Today I have the darker shades to share with you, and all three are beauties.  All of these swatches are shown with three coats of polish.

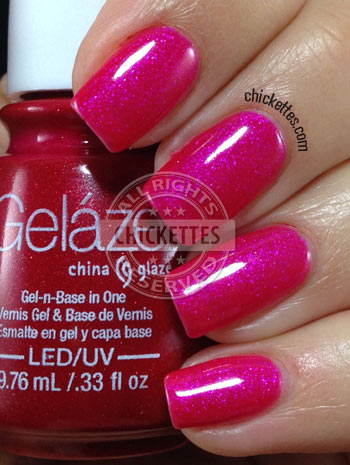
This is Gelaze 108 Degrees, a gorgeous shimmery hot pink.  Wow!  I can’t say enough about how stunning this polish is!  It’s bright, bold and fun.  As with most of the Gelaze polishes, I did experience some shrink-back so I flash cured to keep the polish in place on the tips and edges.  I also found the formula of this polish to be a bit thick and difficult to apply… but I didn’t mind so much because it’s so darn pretty.

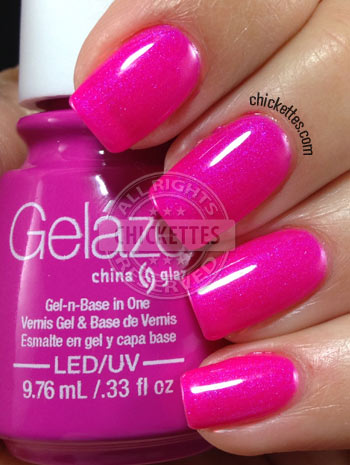
Gelaze 108 Degrees SwatchGelaze 108 Degrees SwatchThis is Gelaze Purple Panic, another bright, fun color for summer.  It leans slightly purple and has a purple-ish shimmer finish.

Gelaze Purple PanicGelaze Purple PanicAnd this is FingerPaints Art You Sure?, a very dark pink with a shimmer finish.  This is a very red-leaning pink and is the darkest shade of pink that I currently own and is a great addition to my collection.

This was my first time using FingerPaints gel polish, and I rather liked the formula and the ease of application.  It also has very narrow brush, which I didn’t think I was going to like, but it actually made it easier to control the polish near the edges and get down into the curve of my pinky finger.  The FingerPaints and Gelaze brands can both be purchased at Sally Beauty Supply, and both have small bottle sizes at 0.33 fluid ounces.  Most full size polish bottles are 0.5 fluid ounces, so just be aware of that difference.

FingerPaints Gel Polish - Art You Sure?FingerPaints Gel Polish - Art You Sure?Here is a photo of my darker pinks next to one another.

dark-pink-comps-2And here’s a quick photo of Art You Sure? next to Ink Ravishing and Gelish Rendezvous (spelled wrong on my swatch stick).  I consider these to be a little more cranberry-ish than pink.

dark-pink-comps


Spring Floral Stamped Nails & ACG Flawless Swatch

$
0
0

I’m soooo eager for spring, I can’t help playing with spring colors even though it’s still snowing here. This mani may look a bit complicated, but it’s really just a few simple colors and a stamp. I will deconstruct the mani in the subsequent pictures. The black floral outlines were added last and were stamped on using Konad black polish and Messy Mansion stamping plate MM20.

Chickettes.com Spring Floral Stamped NailsThis is what my nails looked like before I added the stamp.  I was trying to do another brushstroke design, except the brushstrokes looked more like blobs after I cured the polish.  I still really like this look all on its own without the stamp though.  This has a base of Artistic Color Gloss Flawless, and then I used a dry brush to add streaks of color with Gelaze Spontaneous (purple), FingerPaints Cool Blue Harmony, ibd Peach Blossom (pink), and ibd Aphrodite (silver glitter).

Chickettes.com Spring Brushstroke NailsAnd here’s what Artistic Color Gloss (ACG) Flawless looked like all on its own before I added the color streaks (blobs?).  Flawless is a really pretty, pale pastel yellow with a tiny bit of shimmer to it.  I’ve been looking for a pale yellow shade to use in spring and Easter manis, and finally found the perfect one!  You’ll probably see more of this color in the coming weeks.  :)

This was my first time using the ACG brand and I liked it for the most part.  It’s a full size bottle (0.5 fl oz) that I picked up from Amazon for under $10.  I did experience some shrink-back and had to flash cure, but that was the only issue.  The color was opaque in just two coats and cured great in my LED lamp.

Artistic Color Gloss - FlawlessArtistic Color Gloss - Flawless

Light Pink Gel Polish Swatches

$
0
0

Chickettes.com Light Pink Gel Polish Swatches

Hi everyone.  I’m working through all of my untried polishes to get them swatched, and today I have some light pinks to show you.  Pinks and mauves are known to have fading issues, so I did fade tests on all of these polishes and I’m happy to report that none of them had issues.  They are listed below from lightest to darkest (I think).  I also have some medium pink polishes that are a few shades darker than these that I’ll be swatching in the next week or so.

This is ibd Just Gel Polish I’m No Damsel, the lightest pink that I currently own.  It has a nice creamy finish and is pretty opaque with three coats.  It still had some visible nail line with just two coats, so you could wear it with two coats but it would be a little more sheer.  This pink is so pale that it almost looks white in some lights… it’s a really nice, soft color.

ibd Just Gel Polish - I'm No Damselibd Just Gel Polish - I'm No DamselThis is ibd Just Gel Polish North Wind.  It’s also very pale, but it has a slight blue-ish tint to it and has a frosty finish.  It will show your brush lines if you don’t apply carefully in long strokes.  It still shows just a touch of visible nail line after three coats.

ibd Just Gel Polish - North Windibd Just Gel Polish - North WindGelaze Diva Bride is also a pale pink, and I think it appears to have a bit of a peachy tint to it.  I really love this color and think it would be great for spring and Easter.  It’s a little sheer and also just barely shows some visible nail line after three coats.

Gelaze by China Glaze - Diva BrideGelaze by China Glaze - Diva BridePan-Duh is another frosty light pink by ibd.  This color is a little richer pink than the others from ibd.  This frosty finish will also show brushstrokes if not applied carefully.

ibd Just Gel Polish: Pan-Duhibd Just Gel Polish: Pan-DuhAnd lastly, this is Artistic Colour Gloss Glisten.  Glisten has a nice shimmer finish and is opaque in two to three coats.  Glisten reminds me of Gelish Light Elegant, except it’s a little more pink and Light Elegant leans a little peachy. The finish is very similar though.

Artistic Color Gloss - GlistenArtistic Color Gloss - GlistenAnd here is a comparison picture of all of my light pinks next to one another.  You can click on the image below to see it in a larger size.  I no longer own the ones that have X’s marked on them.  You’re So Sweet is a fader and this is shown in it’s faded state.

Chickettes.com Light Pink Gel Polish Comarisons

Beauty Blogazons Spring Giveaway – $500 Prize!!

$
0
0

Blogazons Spring 2014 Giveaway

The Beauty Blogazons, a group of beauty, fashion and lifestyle bloggers have connected again to give away $500 of cold hard cash to get you ready for the Spring! Will you do a major beauty haul? Pick up the ultimate Spring wardrobe? Maybe pay a few bills? The choice is yours! Please take a little time to visit and thank all the bloggers that chipped in to make this happen:

Glitter.Gloss.Garbage
Beauti-Ville
Beyond Beauty Lounge
Beauty by Miss L
Glamorable!
Liesl Loves Pretty Things
Alilacquer
Makeuprshutup
Crazy Beautiful Makeup
Polished to Precision
TheFabZilla
BellBelleBella
Midnight Manicures
Beautyfiends
Cosmetic Sanctuary
polish insomniac
Geniabeme
Makeup, Life and Love
Beauty Info Zone
Beauty and Fashion Tech
Chickettes
Daydreaming Beauty
Prime Beauty
XO, Noelle
MakeUpMom123
GlitzGlamBudget

The Prize

One winner will receive a Visa Gift Card for $500, or a Paypal payment of $500, the choice is yours. Winner will be contacted within 48 hours via email. This giveaway is for everyone all over the world so feel free to enter and share the love!

a Rafflecopter giveaway

Soft Pink Rose Nail Art Using Decals

$
0
0

Swatching all of those light pinks the other day inspired me to do a girly design for my weekly mani.  I bought some rose water decals from the Born Pretty Store a while ago and thought they’d pair perfectly with ibd I’m No Damsel since it’s such a soft, light pink.  So I started with three coats of I’m No Damsel, then wiped the tackiness off and applied the decals. I used a cotton swab to press the decals onto my nails and push out any wrinkles and I also applied some heat with my hair dryer (per the instructions).  After the decals were dry and in place just as I wanted them, I applied my Gelish TIO and cured one last time.  For the accent nails I applied three coats of ibd Jupiter Blue and added stripes using my white Ink Art Gel Polish.  These water decals were really great to work with and I love how this mani turned out!

Chickettes.com Soft Pink Rose Nail ArtChickettes.com Soft Pink Rose Nail Art

YouVeeShield Review – UV Protection Solution for Gel Polish Manicures & Pedicures

$
0
0

youveeIf you or your clients are concerned about UV protection during gel manicures, there’s a new product on the market that’s designed to block 99% of the UV light that’s emitted from nail lamps.  The product is called YouVeeShield and it is a disposable shield that is placed over the hand (or foot!), fitting securely around each finger tip to ensure that your skin is not exposed to the UV light.  I was sent a package of the shields to try, and made a short video to show you how it works which you can see at the bottom of this post.

I feel that this product is a better fit for salon use than at-home use, so please keep that in mind when reading this review as I’m going to approach this from the salon perspective.  I previously wrote an article about some other UV protection solutions that are more suitable for at home use and I also mention these briefly at the end of the video.

Advantages:

  • It blocks virtually all UV light leaving only the fingertips exposed, providing your clients with some peace of mind.
  • It can be used on hands and feet, and one shield can be used on the left or the right by simply flipping it over.  View the instructions for use here.
  • The shield is one-size-fits-most with flexible slits for fingers or toes.
  • It’s an inexpensive solution.
  • The shields are disposable so you don’t have to worry about sanitizing after use, just throw them away.

Disadvantages:

  • The shield doesn’t allow for full movement of the fingers and feels slightly awkward to wear.
  • The shield is not a glove so it lays on top of your hand which I thought felt a little clumsy.   The shield can blow in the wind if you are out in the open or near a fan and it will move around if the person wearing it isn’t still.  Hopefully your clients sit still while they’re having their nails done, so this may not be a problem.
  • I’m not sure how environmentally friendly the product is, so the disposable nature may also be a disadvantage from that perspective.

Overall I think it’s a good product for salon use.  Since I do my own nails at home I would personally prefer to wear UV gloves or just apply some broad spectrum sunblock.  If you’re interested in buying this product or learning more, please visit the YouVeeShield website here.

Video Demonstration:

Details about the manicure that I was sporting in this video can be found here.

Viewing all 441 articles
Browse latest View live


Latest Images