I started going through my gel polish stash, and realized that I have a whole bunch of colors that I haven’t swatched yet! I’m going to start sprinkling in some of the swatches as I can. I have lots of good dark colors for fall and winter, so the timing is perfect. Today I have two green shades from ibd Just Gel Polish. I’m often asked for recommendations of affordable gel polish brands, and ibd is one that’s always at the top of my list. Many of the ibd colors can be found on Amazon.com in the $7-8 range, which is super affordable. And the quality of these polishes is fantastic!
This is ibd Green Monster, a really great shade of dark green. It’s not a pure green and seems to have some slight blue or grey-ish tones that really warm it up. It was almost opaque in two coats, but I applied three for best coverage.
Jade Dynasty is a nice, soft shade of jade green. This shade is a bit muted and is also slightly sheer. You can see some visible nail line after three coats, which I’m not a huge fan of. But the color is really pretty and is also great for fall.
It’s been a while since I’ve shown you my stash! I stayed up late the other night working on creating new swatch sticks and organizing my polishes, and I thought that some of you might really enjoy seeing how I organize and store my stash and swatch sticks. I know I love getting a peek into other bloggers’ work and storage spaces.
First, if you don’t already know, I keep a spreadsheet of all of the gel polishes that are in (or have been in) my stash. You can find that online here. I have also built up a collection of regular nail polish, mostly indies and stamping polishes, but I don’t track those in my spreadsheet. I update the file very regularly because it helps me stay on top of what I have, and what colors I have swatched (or need to swatch) for the blog.
Normally when I buy or receive gel polish I also swatch the colors onto swatch sticks so that I can easily compare the color(s) with other colors that I already own. Having the colors on swatch sticks also makes it easy to select one when I want to polish my nails or do nail art. I have to admit though that choosing a color can be a little overwhelming at times!
Below is a picture that I took with all of my swatch sticks together. You can see that I put them on binder rings, and most are organized by color. Some are also organized by brand and then color. The cup of swatch sticks sits on my work station, and that’s where I put them right when I’m done creating them until I have time to put them on the binder rings. There are probably another 100 polishes on my shelves that I haven’t even created swatch sticks for yet.
When I post my swatch comparison pictures, I’m often asked about the supplies and techniques, so let’s get into that a little. I like to swatch my colors on clear swatch sticks. I prefer the sticks over swatch wheels because it’s easier to re-arrange, organize, and label them. I’m also a little OCD about keeping them uniform, so I try to always buy the same kind with the rounded handle. I once bought the clear sticks with square handles and I hated them… they didn’t fit on my binder rings and I had to do the swatches all over again. I usually buy the clear swatch sticks from this listing on eBay- they are shipped from China so it does take some time to receive them.
I find that sometimes the sticks have an oily covering on them which makes the polish application a little wonky, so I use alcohol wipes to clean off the swatch sticks before applying the polish. I don’t use a base coat on the swatch sticks, I just paint the color right onto the stick and cure each coat. I do apply a top coat, and for the sticks I just use whatever top coat I have handy – a less expensive brand if possible.
As the picture above demonstrates, I also label each of my swatch sticks. I use a Brother P-Touch label maker to create the labels that go onto the handles. I like clear labels with black text, but the clear tape only comes in 1/2″ size and I do have to trim them down with scissors to fit. I think the 3/8″ labels would probably fit on the swatch sticks perfectly, but they don’t come in clear.
As you saw in my picture of all of the swatch sticks, I organize them on binder rings by color and/or brand. The 2″ binder rings work perfectly. I hang the binder rings on my wall using Command wire hooks. I love that they aren’t permanent and are easy to remove from the wall without leaving any damage or sticky marks.
Below is a current picture of my work station. You can see that the swatch sticks are hung on the wall beside and below my shelf. I put them there so that they are within reach when I’m sitting in my chair. My work station is a little messy, but hey, it is what it is. I made the work station out of two helmers with a glass table top resting on them. The helmers, glass top and chairs are all from Ikea. I don’t have an Ikea near me, so I purchased them online. And since I’m also often asked about the light that I work under, I use this OttLight from Amazon. I love it!
The polish shelf on the wall was custom-built for me by my dad. It’s the best thing ever! I have most of my polishes sorted by brand. I can usually fit two rows of polish on each shelf, depending on the brand/bottle size. It works great with round bottles. Some of the larger square bottles don’t fit in two rows. I haven’t counted, but I think if I completely maximize the space and put two rows of polish on each shelf, I can fit between 5-600 bottles on it. I love to see my polishes out in the open – stuffing them away in dark drawers makes me sad!
My polish stash has also started to overflow onto my bookshelf. I cleared out all of the other stuff and placed 4 clear nail polish display racks that hold approximately 60 bottles each. On the top shelf I have a rack filled with stamping polishes, and one filled with indies… these are all regular nail polishes, not gel. And then the second shelf has two racks that are filled with the complete gel polish collections from Revel and Pink Gellac (you will be seeing more of both of these brands on my blog very soon!).
In addition to all of the polishes that you see on the shelves, I do have a couple of helmer drawers full of regular nail polish, but they are ones that I’m very unlikely to use. Eventually, I’d like to find something crafty to do with them (last year I made ornaments). I also store my swatching supplies, nail art supplies, extra cotton balls, etc in those drawers. I think that about sums up my storage, display and organization of polishes and swatch sticks. Please let me know if you have any questions.
If you want a little peek into the history of my polish stash, just visit the posts here. I’m absolutely amazed at how my collection has grown in just two years. If you look at my post from September 2012, I said I had 90 bottles of polish – that included base/top coats, RNP, and gel. Right now I have right around 500 bottles of gel polish colors, which I know from my spreadsheet. I have no idea how many base and top coats or RNP’s I have… probably a couple hundred more. Maybe over the next 2 years I’ll take over the giant empty shelf that’s in my daughter’s room! She’s away at college and I keep teasing that I’m going to take over her room with my stuff. LOL
Here are a few close-ups of the swatch sticks… I just love seeing the rainbow of colors!!
Daisy Gel Polish released several new colors in the Daisy Duo line, and I have three of them to share with you today! Daisy Duos are two-step gel polishes that can be applied without a base coat, and they each come with a matching regular nail lacquer shade. They just released an optional base coat which helps aid in the removal process. I plan to conduct a full wear test of the Daisy Duos with and without the base coat in the near future, but I did test the soak-off using the new base coat and it was fantastic. The polish and base peeled off in sheets after just 7-8 minutes of soaking in pure acetone, with no scraping required. Gotta love that! I haven’t tested removal without the base yet, but my soak-off experience with other one and two-step gels has been less than desirable.
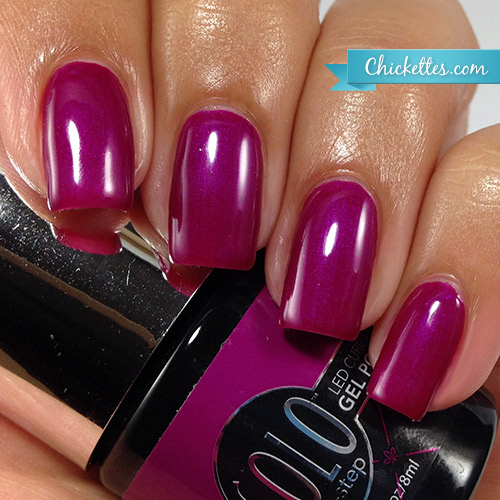
So let’s take a peek at some of the new colors. Daisy Duos can be found over at Esther’s Nail Center. The newest shades have slightly different packaging and show the name on the handle of the bottle. The color below is called Queen of Grapes. It’s a very pretty dark, shimmery, reddish purple. My photos really didn’t do this polish the justice it deserves… it has such a beautiful purple shimmer! I think that reddish purples are becoming some of my favorite shades, and this particular color is really fantastic for fall and winter.
This is Antique Purple. It’s a medium-to-light shade of greyish purple. I don’t have any shades like this in my collection. I think I may have had my lightbox filter on for this one because the shine looks a little muted, but it has the same high gloss shines as the other two colors. This is another great fall shade.
And this lovely light pink cream is called Fairy Dream. A lot of times light pink shades are hard to apply evenly and they can look a little patchy, but this one applied really evenly and has good coverage. This shade can be worn year-round and I think it’s subtle enough for corporate office wear.
Michelle over at Manic Talons also posted a review and some color swatches of Daisy Duos today. Head on over to her site if you’d like more information about how this brand of polish wears because she conducted a full wear test. Read it here.
Daisy Gel Polish can be found at Esther’s Nail Center for $12.95 each. The bottles are full size (0.5 oz), and they each come with a matching nail lacquer so that you can match your toes to your hands! You can also view swatches of all of the Daisy colors here: https://www.esthersnc.com/info/daisy-gel-polish-color-swatches/
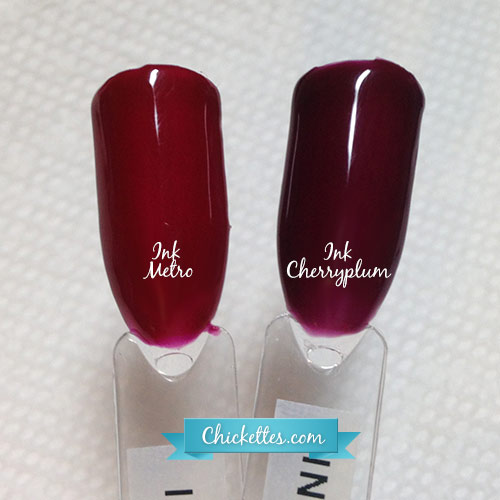
I’m trying to work through some of my untried polishes, and I came across two burgundy shades by Ink. This is a great shade for the season so I thought I’d share. Both shades have a creamy finish and have decent coverage with two coats, but I applied three coats in these swatches. Ink Metro #49 is the lighter of the two shades as seen below.
And this is Ink Cherryplum #26. It definitely has some purple undertones, but the label on the bottle is way off on this one. I’ve had this bottle for quite a while so this may have been corrected since I bought this. If not, try not to be thrown off by the label.
When I look at the polish colors in the two pictures above they look very similar, so I took a picture of my swatch sticks side by side so that you can see that they are definitely different. Metro didn’t look as light/bright on my nails as it does on a clear swatch stick. And when compared like this you can definitely see the purple undertones in Cherryplum.
I have a new toy… the Robart Hobby Paint Shaker. It’s been on my wishlist for a very long time, and I finally broke down and bought it. This miniature paint shaker is really meant for hobby paints, but it also works great for shaking nail polish. I’ve heard a lot of women talk about their Robarts in various nail groups, and my friend Michelle from Manic Talons has mentioned hers a few times. After asking her some questions about it, I finally bought it.
Hand-shaking gel polish can cause some serious air bubbles that make it difficult to get a smooth application. You’re really not supposed to shake gels for that reason, but rather roll them between your hands. Sometimes polishes need a really good mixing, and that’s where the Robart comes in handy. It mixes the polish well, and it doesn’t cause any bubbles!
As soon as I received my Robart in the mail, I started playing with it and made this short video to demonstrate how it works. I’ve used it a few more times since then. I had a couple of polishes that seemed a little thin when I was applying them and they had some shrink-back issues. After putting them on the Robart for a couple of minutes they applied like a dream with better coverage and no shrinking. And as you’ll see in the video, the Robart also helps shake up glitter polishes because the glitter always seems to sink to the bottom over time.
So far I’m super happy with this purchase! I bought this on Amazon for $41. There are actually two versions – the one I have which is powered with a cord (see it here), and then there is a cheaper version that runs on batteries for only $33 (see it here). The expense of batteries really adds up over time, so I avoid them whenever possible. You can also purchase replacement straps if the little rubber strap breaks.
I saw another product on Amazon called the PROshaker. This one is says it’s endorsed by OPI Gelcolor, and comes with a much stiffer price tag of $99. I admit that I was tempted to buy it because it looks much more sleek, but the price tag scared me off. If any of you own this shaker I’d love to hear your thoughts on it.
And I literally JUST heard about another shaker yesterday with a more reasonable price tag called the ForPro shaker. I wish I had seen this one before I bought the Robart. This one is $34 on Amazon, can be used with batteries OR the AC adapter, and comes with extra straps. I heard that it’s quieter than the Robart and doesn’t move around as much. I might have to buy this one so I can do my own comparisons.
Leave a comment if you own any of these shakers, or if you know of any other good ones!
I just recently discovered that Bundle Monster sells gel polish in addition to stamping polish, stamping plates, nail art tools & accessories, and lots of other beauty and fashion-related things. Today I have swatches of the b.m.c. Oasis Collection, which is a set of six neutral gel polish colors. The colors in this collection are very pale, soft and muted.
I don’t have the b.m.c. gel base and top coats, so I used my Gelish ones for these swatches. The majority of the colors were completely opaque in just two coats, and they applied from edge-to-edge with no shrinkage. They also cured perfectly in 30 seconds in my 18G lamp. I did not conduct a full wear test on these polishes to see how they hold up over time.
Poised Serenity is a pale, blue-toned grey (available on Amazon.com here). This shade is lighter than Gelish Cashmere Kind of Gal, and has more blue (or is it green?) undertones. This color is a little hard to describe. In the picture it looks more blue to me, but when compared next to other colors I can say it’s definitely grey.
Cafe au Lait is another shade of grey with khaki green undertones (available on Amazon.com here). This is another tricky shade that looks green, but is actually more grey.
And, Peaceful Harmony is a light, peachy pink shade (available on Amazon.com here). This is the only color in the collection that has a slightly different consistency. It required three coats for full coverage and it has a very, very subtle shimmer. I should also mention that this color faded to a lighter shade of pink over time. It didn’t stay as peachy. None of the other colors in this collection had any fading issues.
The b.m.c. Oasis Collection can be purchased at BundleMonster.com, or on Amazon.com. The prices are extremely reasonable… in fact they are the least expensive gel polish that I’m aware of. The colors can be purchased individually for under $6, or you can buy the whole set of six for less than $30!
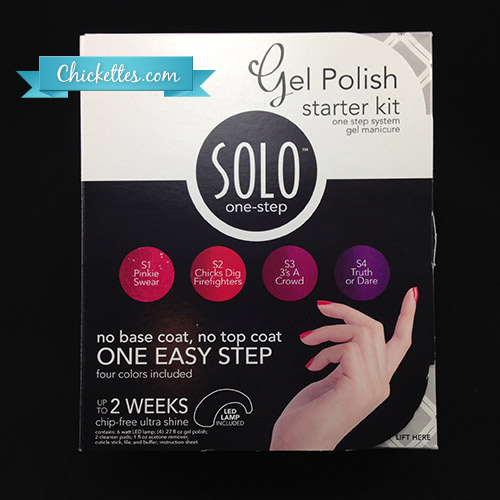
Today I’m reviewing SOLO One-Step Gel Polish, a new line of gel polish for the at-home user from the makers of Gel II. This polish promises long-lasting wear for up to two weeks. It’s a one-step gel, which means that it doesn’t require a base or top coat. You simply apply two layers of color, cure each coat, and you’re done! The polish dries to a shiny, tacky-free finish.
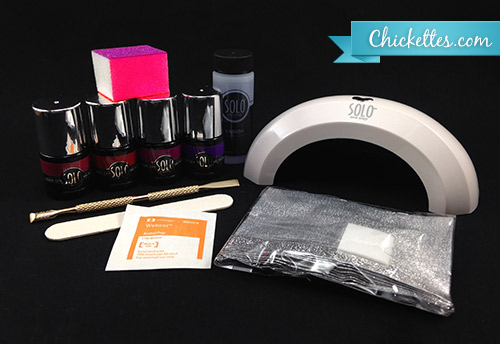
I received a SOLO One-Step Gel Polish Starter Kit. This kit has all of the essentials to give yourself an at-home gel manicure. It comes with a small LED lamp, four shades of gel polish, cleansing wipes, a metal cuticle pusher, a nail file, a nail buffer and a 1 fl oz bottle of gel polish remover.
Application:
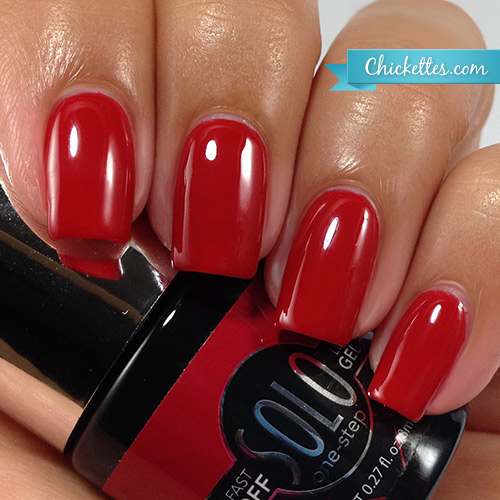
I unpacked my kit, read the instructions, and got busy applying my gel polish. I prepped my nails by pushing my cuticles back, lightly buffing, and cleansing with an alcohol wipe. After letting the alcohol dry, I applied my first coat of gel polish. The color that I chose to use for my wear test was called 3′s a Crowd (see swatch below). The polish applied well and went on from edge-to-edge without any troubles. I did find the brush a bit awkward to hold and handle at first. The bottles are small, so the brushes are short and then the round cap makes them a bit stout. After some practice it got a little easier.
I did notice a slight discrepancy in the instructions – the box says to cure for 30 seconds, but the instructions inside the box said to cure each coat for 60 seconds. I decided to try to cure my polish for 30 seconds first to see if it was long enough. A few of my nails were still slightly tacky after 30 seconds, so I cured a little longer. I would say that 45-60 seconds was sufficient. Once the polish was cured completely it felt perfectly smooth and not tacky to the touch at all. All of the colors provided good coverage with just two coats.
The lamp is small and only fits 4 fingers at a time. The thumbs have to be cured separately, which doubles the curing time.
Wear:
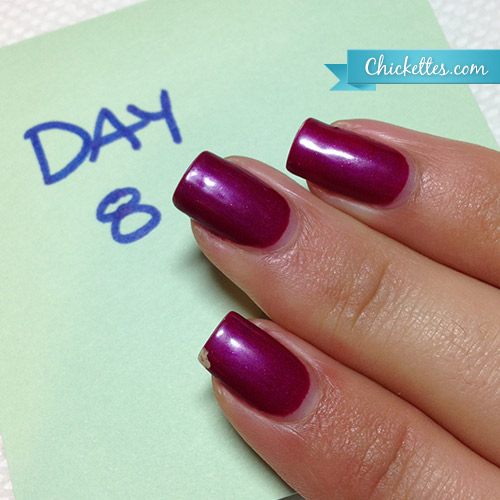
I wore my SOLO gel manicure for 7 days with no problems. They stayed shiny and looked good. There was very minimal tip wear. The polish didn’t provide much strength, so my nails were a little soft and could bend, but that didn’t cause the polish to chip or crack like some others I’ve tried. On day 8, I got my first little chip on my index finger.
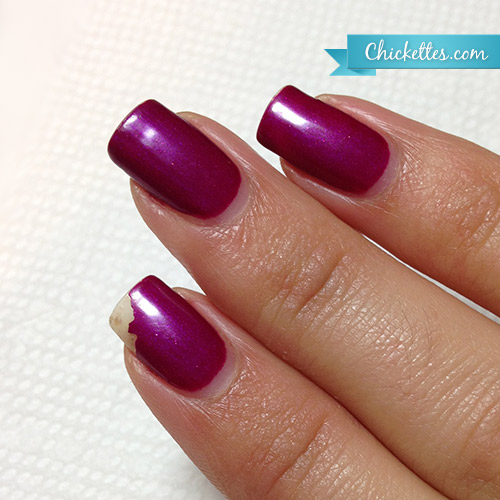
I continued to wear the polish for two more days, and on day 10 the chip was much worse so I decided to soak the polish off. All of my other nails were still perfectly in tact and probably would have held up for at least a few more days.
Removal:
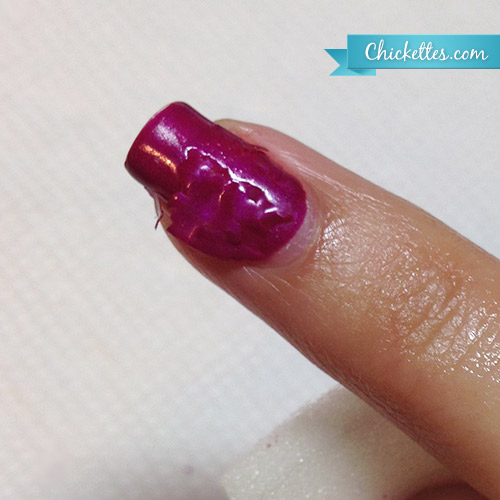
The removal process was fast and easy, just how I like it. I followed the instructions and lightly buffed my nails and then soaked them. The instructions say to soak for 10 minutes and then start pushing off the gel. I checked my nails after just 8 minutes and the polish was already starting to peel off as seen in the picture below. I pushed off the polish that was ready and soaked a little longer. The total removal process took about 12 minutes. The gel stuck to the tips of my nails a little better, so I needed to add some more remover to the tips to get it to loosen up. I did very minimal scraping, and lightly buffed my nails after all of the gel was off.
The Colors:
Let’s take a look at the four colors that are included in the starter kit!
Pinkie Swear is a red-leaning pink with shimmery glitter. (It looks more red to me than pink).
Chicks Dig Firefighters is a classic, bright, fire engine red cream.
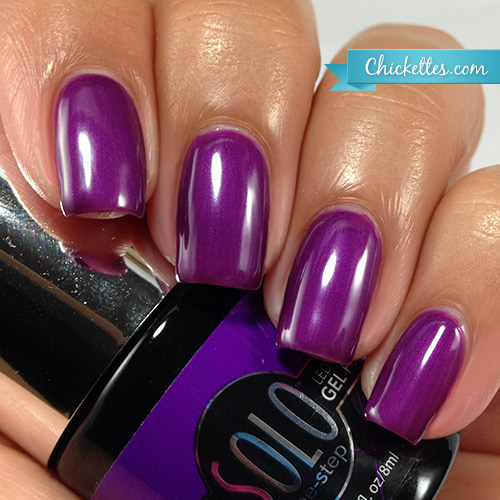
3′s a Crowd is a gorgeous pink-ish purple. This is my favorite color in the set, which is why I selected it for my wear test.
And Truth or Dare is a really pretty, frosty purple.
Cost & Where to Buy
The SOLO One-Step Gel Polish Starter Kit can be purchased for $129.99 on the SOLO website at http://sologel.com. The individual polishes are available for $15 each.
The polishes are only .27 ounces (8 mL), so I feel that the prices are high for the size of the bottles. You do save some money by not having to purchase a base and top coat.
Thoughts on One-Step Gel Polishes
One-step gel polish is awesome for people on the go that want long-lasting wear, but don’t have a lot of time to invest in their nails. You can apply just two coats of polish, cure, and not have to think about them for 10-14 days. The SOLO brand was very easy to remove too!
I usually find that the one-step gels don’t provide the strength that you get with a 3-step. So if your nails are flimsy and need a little extra strength, a 3-step gel system might be the better option. Gel top coats also provide that super high-gloss shine that you generally can’t get with a one-step polish. But you can always apply a layer of gel top coat over your one-step gel if you want that extra shine, or a little extra strength.
I know I’m a terrible enabler, and I’m probably a little behind the times on this one, but I just discovered LeChat Hologram Diamond. I saw this beauty up for sale in one of the FB groups that I frequent and knew I had to have it (thank you, Connie!).
Wowwy, wow, wow! Take a look at this beauty. It’s a clear base that’s loaded, and I mean LOADED, with holographic glitter. This swatch is two coats of LeChat Hologram Diamond all by itself. In the picture you can see a little visible nail line, but it’s really not noticeable in person. My nails are just ridiculously sparkly like a disco ball, and I love it! If you like holographic glitter, this is a must-have polish! It even comes with a matching RNP if you buy the Perfect Match set (available on Amazon here). (UPDATE: I’m not 100% certain whether the polish in this Amazon listing is LED curable. The picture shows an old bottle that is UV-only, but the seller says in the Q&A section that it is LED curable.)
This picture is intentionally blurry to show off more of the holo sparkle. I’m sorry, am I drooling?
I’m really loving the LeChat brand and will be adding more shades to my collection soon, so there will be more swatches to come! I also purchased the LeChat base and top coats so that I can do a formal wear test.
ProGel just released the new Pretty in Punk Collection for Fall which contains eight edgy shades with various types of finishes including creams, shimmers and glitters. I learned about this collection during my trip to Cosmoprof, and knew I had to have it when it came out. This was actually my first time using the ProGel brand, and so far I’m very impressed. I will be conducting a wear test in the near future, but for now I can only talk about the application of this brand. Seven out of eight of these swatches have just two coats of color. The only exception is Nirvana Nights, the grey metallic-looking shade – that one has three coats because it was a little sheer. All of the other colors had really good coverage with just two coats. They all applied really well, with no shrinkage. The brush was perfect for a three-stroke application and it was very easy to control and get into the curves without making a mess. The top coat also has a great high-gloss shine. Most of the colors are pretty unique, but some are similar to shades that I already own. I’ll mention any similarities as we look at each individual color. The ProGel brand is super affordable at just under $7/bottle on Amazon, so these are a great buy! Rebel & Romance is a very pretty, light, shimmery lilac shade. It’s a little on the pink side, but it’s more purple than pink. This is a pretty unique shade compared to others that I own. Velvet Underground is one of the two glittery shades in the collection. This is a great berry color with really fine glitter. The color is similar to Gelish Rendezvous, but the glitter makes it different. Velvet Underground and Miss Mischief had a different texture than most of the other colors in the collection. The fine glitter made them a little gritty. They went on well though and were super glossy after adding the top coat. Miss Mischief is the other glitter polish that I just mentioned. This is a nice dark purple. The closest color that I have to this shade is Gelish Night Reflection, but again it has a different finish. Teal Dawn is a shimmery teal-leaning grey. This seems to be one of the trends that we’re seeing this fall… there are a lot of different shades of grey being released. I know this doesn’t look grey on my nails – it looks more teal, but when this color is compared against other shades it definitely looks more grey than teal. I think the shade of my skin makes the undertone colors pop more on these grey-ish shades. I don’t own any colors that are quite like this one. Nirvana Nights is a shimmery steel grey. I had to give this color a really good shake with my Robart to get it blended well. This is the one color in the collection that needed three coats for the best coverage. Nirvana Nights is similar to Gelish Midnight Caller, but it’s more of a true grey tone and Midnight Caller looks a little blue-ish when they are side-by-side. Secret Scene is a hard-to-describe neutral color. It’s sort of a brown/purple/taupe combo. It’s in the same color family as ibd Smokey Plum, but is several shades lighter. I have this swatch stick paired up with my browns and taupes. Grunged Groupie is a gorgeous, shimmery, chocolate brown. This color is very, very similar to Gelish’s fall color Whose Cider Are You On. Amped is a metallic-looking shimmery bronze shade. It’s different from other colors in my collection, but the finish is most like Gelish Oh What a Knight. Amped is darker and more brown-toned. Do you have any favorites from the Pretty in Punk collection?
Revel Nail (http://www.revelnail.com) is a new gel polish line that provides high quality products at prices most anyone can afford! I’ve taken some time to review the product line and am so excited to share it with you. Revel Nail gel polishes are professional-grade quality and can be used in salons and spas, or in the comfort of your own home. They are custom formulated and are 3-free, and vitamin E enriched.
Pricing
Let’s talk a little about the pricing, because I think it’s going to blow your minds. Revel Nail gel polishes are full size bottles (0.5 fl. oz.) that retail at just $7.49 a bottle! They also have some amazing bundle deals. These packages are a no-brainer for salons, or collectors like myself.
Starter Kit: You can get a starter kit that includes a base coat, top coat, and one color for a shipping and handling fee of $10.99 (if there is a specific color that you want, put it in the notes upon checkout).
Spring 2014 Kit: This kit includes 24 colors, a base coat and a top coat for $175. If you use the code CHICKETTES at checkout you can get this kit for ONLY $150! That’s less than $6/bottle!
Fall 2014 Kit: This kit includes 16 fall colors, a base and a top coat for $139 (currently on sale for $119).
Total 2014 Kit: OR you can get all 40 colors, plus a base and top coat for $285.
Application
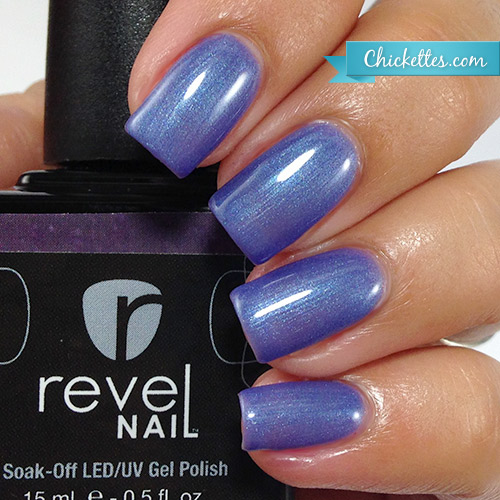
I realize that I may sound like an infomercial, but the prices really are amazing for the quality of the product. So let’s get down to application and the wear test. I selected a color called Hysteria to use for my wear test. Hysteria is a gorgeous, frosty blurple (blue-ish purple). Application was flawless. I liked that the thin brush allowed me to really get down into the curves of my nails. The consistency of the polish was nice and easy to apply in thin coats. This particular color required three coats for best coverage, but some of the other shades that I have tried only required two coats. The polish cured in my LED lamp in just 30 seconds, and I didn’t have any issues with shrinkage or pooling. The top coat had a really nice high-gloss shine too. Here is the end result:
Wear
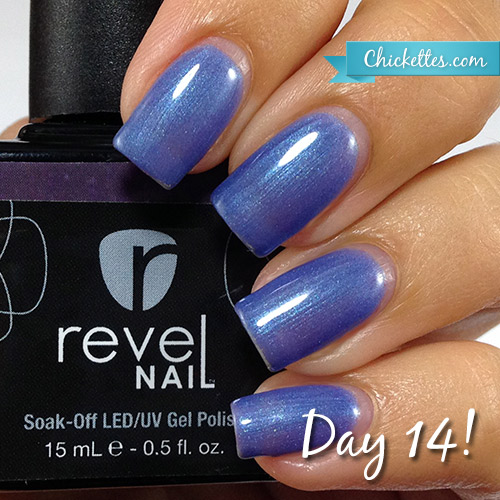
I wore this manicure for two full weeks without any tip wear, chipping, or peeling, and the high-gloss shine was maintained for the entire duration. I’d say that’s a successful wear test! I really have zero complaints about application or wear, it was absolutely perfect. My nails also felt nice and strong with this polish on.
Not all nails are created equal so for anyone that experiences peeling or chipping, Revel recommends using a primer. And this goes for all gel polishes… a primer really helps the gel adhere to your nail. But be aware that using a primer does increase the removal time. I didn’t need to use a primer, but I just wanted to mention that.
Removal
Revel’s website says that the polish will soak off in just 7 minutes. I put that to the test, but unfortunately it was not the case for me. I buffed the top coat of my nails and soaked them in acetone using my Nail Mates. After 8 minutes of soaking the edges were starting to lift just a bit and I was able to push off some of the polish with an orange stick, but there was still a lot left on the nail. I repeated the soak & push process. It was adhered really well to the tips, so I had to apply a little more acetone to that area. The total soak-off process probably took 18-20 minutes. It is a good deal longer than the advertised time, but it wasn’t a deal breaker for me. This removal was pretty similar to what I experience with the Gelish brand.
Colors
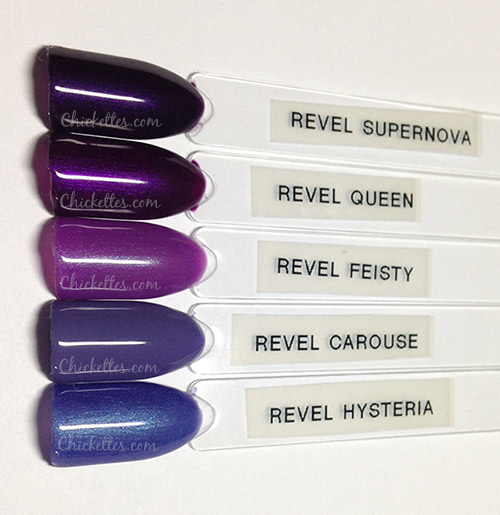
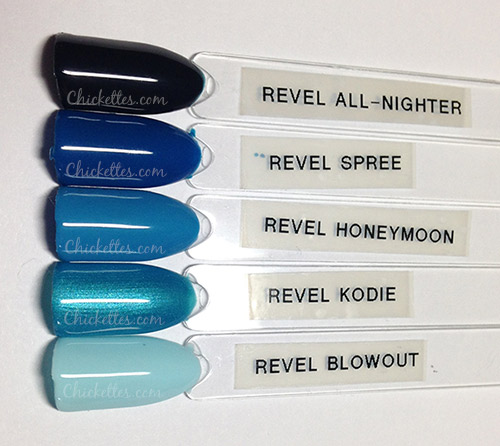
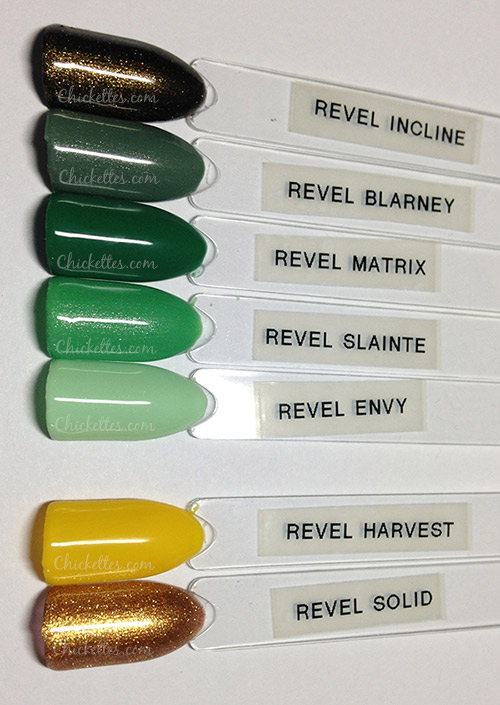
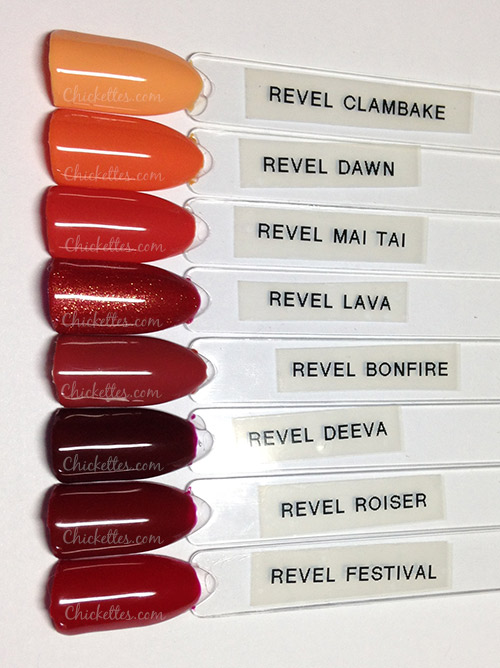
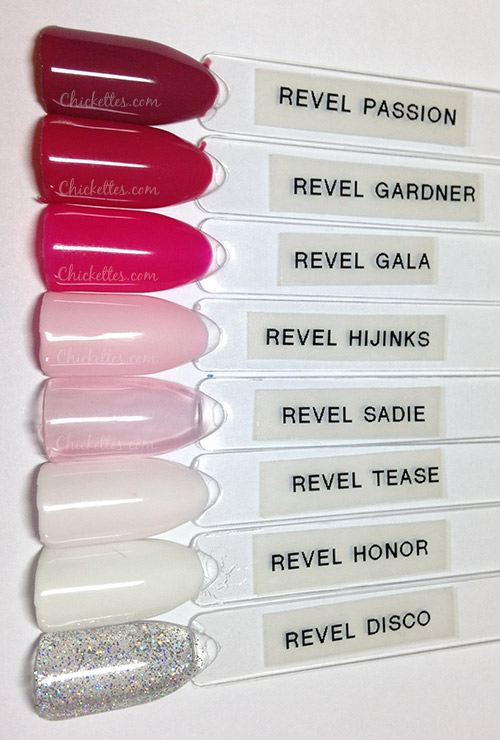
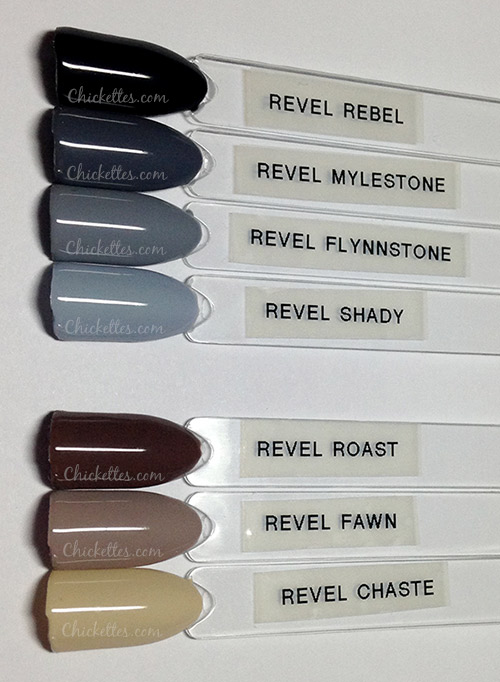
Revel currently has 40 colors to choose from. They released 24 colors in the 2014 Spring line and another 16 colors in the Fall line. I chose a few colors swatch on my nails, and below I also have pictures of all 40 colors on swatch sticks grouped by color so that you can see the entire line.
Queen is a shimmery dark purple with a real royal feel. This is a great color for fall.
Lava is a brilliant burnt-orange/red with golden shimmer. I thought this color was really unique, and it definitely has an Autumn feel to it.
Passion is a lovely pink-ish mauve cream.
Blarney is a shimmery green with grey undertones. This shade feels a bit muted, but I think that’s what drew me to it. I’m not normally a big fan of greens, but this one is really quite nice.
Clambake is a unique shade of light orange. I chose to swatch this color because I don’t own any other quite like it. It reminds me of lobster bisque! LOL I don’t know if it works real well with my skin tone, but I like it!
So let’s take a look at all 40 colors! I can’t guarantee that these pictures are all 100% color accurate, but I tried to get them as close as possible.
Purples:
Blues:
Greens, Yellow & Gold:
Oranges & Reds:
Pinks, White & Glitter:
Black, Greys & Browns:
Summary
I think it’s safe to say that I have a crush on Revel gel polish! The application and 2-week wear were absolutely flawless, and I love the high-gloss shine and how strong my nails feel while wearing Revel. I really think this brand could revolutionize the industry by offering professional-grade quality products at such an amazing value.
Between reviews and swatches lately, I’ve hardly had time to play with nail art! I’m hoping that will change in October since my schedule is lighter and I’m almost done swatching Fall colors. I’ve been having a glitter craving lately, so I decided to do a relatively simple black manicure with a loose glitter gradient. My nails are nice and sparkly now so this should hold me over for a short while!
I applied two coats of DIY Hard Nails Black Cat (opaque in 2 coats), and then applied purple ultrafine holographic glitter from ArtsyFartsy Crafts into the tacky layer of my gel polish. I dabbed the glitter onto the curved end of the nail and then pulled it toward the tip several times to create the gradient effect. I pressed the glitter flat with my fingertip and then added a layer of top coat. Then I repeated the process with a teal glitter mix called Peacock (not sure if this one is still available for sale since I can’t find it). I didn’t pull this one quite as far so the purple still showed through. Again, I pressed the glitter flat with my finger and applied a layer of top coat and cured.
If you’re interested in learning more about this technique, I have a video on how to do a gradient with gel polish and loose glitter here.
I picked up the MM44 lace stamping plate from Messy Mansion and have been dying to use it. Lace always feels very elegant to me, and today I decided to pair it with gold. On my middle finger, ring finger, and thumb I started with two coats of ProGel Rebel & Romance from the new Pretty in Punk Collection. Then I sponged on ProGel Grunged Groupie (also from the same collection) to get a gradient effect. Normally sponged-on gradients don’t work well with gel polish, but this time it transferred the shimmer/glitter from the polish which created a neat effect. I applied a thin layer of gel top coat over the gradient, cured and wiped, and then stamped the lace onto two nails. I used Mundo de Unos black stamping polish and the MM44 lace plate.
The gold on the other two nails is a gel polish with fine gold glitter in a clear base, and it applies with great coverage in 2-3 coats. Not to be dramatic, but I’m going to create a little mystery and suspense and not tell you what this polish is just yet. It will be available for sale in the US very soon, and you will hear about it here first!
Here is a shot of what the gradient looked like before I added the stamp.
I recently added a few more LeChat Perfect Match colors to my collection, and I have swatches of two purple shades today. I really love the quality of this brand. I have several more shades to swatch in the coming weeks, including some fun Mood color-changers. The two polishes that you see below both have amazing formulas and were easy to apply, with opaque coverage in just two coats.
A Night at the Cinema is a dark purple base that’s loaded with purple glitter. It’s SUPER gorgeous in person. I’ve really been drawn to purples lately, and this color might be in my top 10 favorites of all time! I didn’t want to take it off!
Butterflies is a lovely lilac purple shade with a cream finish. This one was nearly opaque with just one coat, but I applied two for good measure.
Today I have a full review of a new one-step gel polish from Purjoi Nail Studio (pronounced “pure joy”). Joi is the name of the founder and creator of this new polish line. As a licensed technician she saw the need for a product that would allow techs to save time and money, but still provide a high quality service. The Purjoi polishes are an all-in-one application, and don’t require a base or top coat which saves time during application. They are also designed to have a thicker formula which allows for easier application with no pooling or shrinkage, and the polish also maintains its form for nail art effects. I put these claims to the test as you will read below.
Application
The Purjoi polishes do have a much thicker formula than any other gel polish I’ve tried. At first I tried applying very thin layers, but that didn’t work so well. I found that it actually was easier to apply in thicker coats, and two thick coats were all that were needed for perfect opaque coverage. The polish didn’t shrink or pool, it stayed exactly where I put it.
With this one-step polish you simply have to prep the nail (shape, buff, etc) and cleanse off any excess dust, dehydrate the nail bed with alcohol or a special cleanser, and then polish the color directly onto the nail. The curing time is 60 seconds with an LED lamp, or 120 seconds with a UV lamp. The cured polish is shiny and tacky-free, so there’s no cleansing or wiping needed. And I have to say that the shine really impressed me. It’s definitely the shiniest one-step polish that I’ve tried.
Wear
I conducted my wear test with this medium pink shade called I’m So Pretty. Not only is Purjoi the shiniest, but it also provided the most strength of any one-step gel polish. My nails still had a slight bit of give to them, but they didn’t feel flimsy like they have with some others I’ve tried. I wore the polish for 10 days, and didn’t experience any chipping or lifting, and the tip wear was minimal. Below is a picture of what my nails looked like after the 10 days were up. The shine did seem to dull a little, and there are a few visible scuffs. On the middle finger there was also a crack right in the middle of the tip. Even though the polish cracked somewhere around the 5-6 day mark, it never chipped. I actually attribute that crack to damage from a previous wear test. The nail had already bent in that exact spot before I applied Purjoi so it was vulnerable.
Removal
Purjoi claims that the polish will remove in 8-10 minutes. After 10 minutes of soaking in acetone (with my Nail Mates) it looked like the photo below. One-steps seem to sort of disintegrate and come off in tiny pieces, which is what this one did. I was able to push most of the color off of the nail after the 10 minute mark.
But, I was left with this film. I tried soaking longer to see if it would push off, but it didn’t. After another 5 minutes of soaking I decided to just buff the film off of my nail. That worked fine, but I wasn’t really happy with having to buff. When I applied this polish, I did apply a very thin layer for the first coat so I wondered if that might have attributed to the film. I conducted a second removal test with two thick coats of polish instead of a thin layer as the base, but I had the same results.
This is what my nails looked like after buffing off the film… good to go for the next wear test!
Colors & Swatches
There are 50 colors total in the Purjoi line. There is also an optional clear coat that is meant for use with the French kit, but it can also be used to seal your color to provide extra strength, or seal your nail art designs. I received three Purjoi colors to try, so below are swatches of these three shades. Each swatch is two coats of color.
This is the color that you’ve already seen above. This bright, medium pink cream is called I’m So Pretty. This polish actually had the thickest formula of the three.
Till Next Time is a very pretty teal blue/green shade. This was my favorite of the three colors, and it had the best formula.
Rock It is a dark grey polish with fine silver glitter flecks. It has some blue & purple undertones, which makes it really hard for me to accurately describe and define the category of this color. I paired it with the blues in my swatch sticks.
Nail Art
Since Purjoi claims to work well for nail art, I had to also put that to the test! I was so pleasantly surprised that I was able to draw some freehand art work with this gel polish and it stayed in place and didn’t spread. I’m not very good at freehand art normally which is why I stamp a lot, so I consider this an accomplishment. I used a very fine tip brush to apply the floral shapes, and a dotting tool to add the three dots on each nail. I’m so impressed with how crisp the lines are.
You can see that doing nail art with a one-step polish creates a dimensional look since the art is raised. I kind of liked the effect. But if you prefer a smooth finish, you can apply the optional clear coat over the whole design to seal it in.
Where to Buy
Purjoi One Step Gel polish can be purchased at www.purjoi.com, or through a distributor. While the product was designed with nail professionals in mind, it is also available at the retail level for at-home users. The product retails for $17.99 a bottle, and licensed professionals receive a discounted price of $14.99 and are eligible for special promos. Professionals must provide their credentials upon registration to be eligible for the special pricing.
October is Breast Cancer Awareness Month and I wanted to do some nail art in support of the cause. I think most of us have been affected by this disease in one way or another, and it’s important that we are reminded and aware that early detection is the key to beating it. Ladies, please don’t forget to do your monthly self-exams and contact your doctor if you notice any irregularities!
The light pink shade that you see in this manicure is Kiara Sky Sweet Talk, the white is Gelish Arctic Freeze, and that fun glitter nail is Kiara Sky Cherry Dust. The white ribbons were hand-painted using Arctic Freeze and a fine nail art brush, and the ribbon on my ring finger was created using light pink hex glitters that I individually placed on the nail. I used a dab of Gelish foundation under the hexes to secure them in place, and applied two coats of Gelish TIO over top to seal them in.
This is the first time you’re seeing Kiara Sky colors on my blog. I learned about this new two-step gel polish line while I was at Cosmoprof this year and they provided me with a few colors to try. I’m going to be writing a full review very soon, so keep an eye out for that. They have several really fun glitter polishes that look like nail art. The glitter is very dense and provides opaque coverage in just 2-3 coats. I only applied two coats of Cherry Dust to get this look!
You can visit the Kiara Sky website to search for distributors. You do have to create an account and be logged in to use the search tool. I also found a few online distributors by doing a Google search.
My great-grandmother was diagnosed with breast cancer when I was a child. I was very young at the time, but I know that she caught it early enough that it hadn’t spread and could be removed via a mastectomy. She was in her 80′s at the time and lived well into her 90′s. I’m very fortunate to have good genes as the ladies in my family live to be very old!
A few fun facts about my family:
When I was a child, all of my grandparents and great-grandparents were still alive.
My great-grandmothers all lived into their 90′s and one of them lived to be 104! I also had a great-aunt that was 104.
On my mother and grandmother’s side of the family, we have 5 generations of all GIRLS! Not one boy has been conceived. My great-grandmother had 1 girl, my grandmother had 4, my mother had 2, my aunt had 3, my sister had 2, and I had one. We’re still waiting for someone to break the streak!
So that ended up a bit off-topic, but hopefully you don’t mind a little insight into my family! In an attempt to tie back into the theme… we have a lot of women in our family which means a lot of breasts to check! LOL
I recently found myself without vision insurance, and needed new glasses because my prescription changed. Coincidentally, a rep from Firmoo.com reached out and asked if I would be interested in trying their service and writing a review. I checked out their website and saw that it was an online, mail-order prescription eyeglass service. I hesitated to respond for a while because I wasn’t sure if the topic of glasses would really be a good fit for Chickettes, and I was also a little skeptical about picking out frames online without trying them on in person. Obviously I decided to give it a try!
I spent a little while browsing the Firmoo.com website. The first thing I noticed were the very reasonable prices… the frames appeared to all be under $50, and that price includes single-vision lenses. The website was very user-friendly and easy to use, which was also a plus. The checkout process was very clear and took me through each step. I was able to enter my prescription for each eye, and select any add-ons that I wanted. The add-ons were also extremely affordable.
I chose single lenses of standard thickness, with anti-scratch, anti-reflective/anti-radiation, and UV coating. My total was $48.90! Now let me put that into perspective… I also just recently purchased a pair of prescription glasses locally (without insurance). The total for one pair of glasses with the same exact add-ons cost $600.00! I opted for frames that were a little on the expensive side at $200, but the lenses were $99 each (multiply that by two because I have two eyes!), the anti-reflective option was an additional $150, and then there were a couple other small add-ons and taxes. I could have purchased more than 10 pairs of glasses from Firmoo.com for less than what I spent on that one pair of glasses!
At those prices, I can see buying several different pairs to match different outfits. I actually ended up selecting this funky purple pair of glasses because I wanted to try a new color. If you’re not sure what style of frame to go with or what looks good on you, I recommend going into an eyeglass store and trying on a bunch of pairs. I just recently tried some on and know the basic shape that works best for my face. Here’s a quick picture of my in my new glasses.
After placing my order on Firmoo.com, they kept me updated via email on the status of my glasses. They went into production 2 days after the order was placed, they shipped another 4 days later, and they arrived at my doorstep 2 days after that. So in total it was about 8 days before my glasses arrived (shipped from China). Not too shabby!
My Firmoo.com glasses came with a hard case, a cleansing cloth, a soft pouch, and a little tiny double-ended screwdriver for making adjustments. When I first put them on they looked a little crooked, so I took them into my local eyeglass shop to have them checked out. They said that one of the lenses was actually installed crooked, and after a quick adjustment they fit much better. The quality of the glasses is nice too, they are good and sturdy.
Overall, I was very pleased with my Firmoo.com experience and am likely to use them again. Even if you’re skeptical about buying your everyday glasses online this might be a great option for a back-up pair, or for extra glasses to accessorize outfits. This would also be a great option for buying glasses for little kids since they can be pretty hard on them.
Firmoo.com is currently running a promotion where you can get your first pair FREE if you’re a first-time customer. Check out the offer here!
So now let’s get to the nails! Of course I had to do some nail art to match my new glasses. LeChat Wild Berry matched the color of the glasses perfectly, and I wanted to do something to bring in the browns and the pattern on the arms of the glasses. I started off with three coats of ibd Dockside Diva, which is my perfect nude shade. Then I took a nail art brush and dipped it in the Wild Berry polish and swiped the brush back and forth on my nails, covering most of the nails except near the tips. I did that twice, curing after each coat. And then I repeated the process with a brown shade, Gelish Want to Cuddle. With the brown I started at the tip and applied the color about half way down the nail, blending it over the purple. And lastly, I applied my gel top coat and cured one last time.
This was a messy task, and I had to do a lot of clean up before curing each coat. The pattern looked more crisp before I applied a top coat, but I like it both ways. I think it turned out kind of neat and will have to try this technique again.
I have two colors from the LeChat Perfect MatchLove Dream Collection to share with you today. Both of these shades have a frosty finish with an iridescent shimmer. There’s also a purple shade called Our Secret Eden in this collection with a similar finish that I’m now lusting after as well! These two colors provided great coverage with just two coats, and applied flawlessly from edge-to-edge. Frost finishes will show brush strokes when you apply them, so long steady strokes are needed to achieve an optimal finish.
To find a local distributor of LeChat Perfect Match, please visit the LeChat website. I have also provided links below to the products on Amazon.com. Please note that LeChat products purchased on Amazon may not come in the original packaging.
This is Shangri-La, a dark teal blue frost with an iridescent shimmer that is a lighter shade of teal. You know I’m a total sucker for blues and teals, and this one has just stolen my heart. In some lights it has a bit of a duochrome effect, where it looks both dark and light at the same time. I’m wearing this color right now, and it won’t be coming off for a little while.
My Sweet Desire is a coral-leaning orange shade, also with a lighter iridescent shimmer. This shade just sort of glow on your fingertips! It’s probably more appropriate for spring or summer wear, but I just adore it.
The LeChat Perfect Match shades also come with a matching regular nail lacquer, which is a bonus! I love being able to match my toes to my hands, but don’t like wearing gel polish on my toes.
I’ve been holding onto a little secret for a while, and today I finally get to share the details with all of you! I’m excited to announce that I have entered into a collaboration with Pink Gellac, a high quality European gel polish company based in Amsterdam. Together we bring you the Pink Gellac by Chickettes Holiday Sparkle Collection! I curated this collection by hand-selecting six colors that I thought would be perfect for the approaching holiday season! A limited quantity of these colors have been produced with the Chickettes logo on the bottles, and they will be sold exclusively through the new Chickettes Boutique!
I have been working with Pink Gellac for a little over six months and swatched their entire line of colors, which can be seen on their website. I was really impressed with the quality of their polishes, and was thrilled when they asked if I would be interested in collaborating with them on this special collection. The six colors in the Holiday Sparkle Collection are existing colors from the Pink Gellac gel polish line which consists of 48 shades and a handful of special effects gel polishes.
The Colors
Emerald Green is a teal-leaning shimmery emerald. I really wanted to include a green in my holiday collection, and I fell in LOVE with this color when I swatched it. This isn’t exactly a traditional green, but it certainly shimmers and dazzles!
Emerald Green needs to be shaken well or it can go on a little frosty and show brush stroke lines. When well mixed the shimmer gets more evenly dispersed creating a metallic-like finish. It’s opaque in two coats. And what holiday collection is complete without a red?! Ok, so Passion Pink isn’t exactly red, but it has a dark reddish pink base and a subtle pink shimmer. This shade is also opaque in just two coats!
Velvet Purple is a very unique shade. It has a blackened purple base and very subtle purple and blue shimmer that resembles crushed purple velvet. I love dark blues and purples in the winter months. This color is also opaque in two coats!
Magic Pearl is a pearly white with a golden shimmer. This color reminds me of freshly fallen, glistening snow. Not that I’m ready for snow, mind you, but alas it will be upon some of us soon. Magic Pearl is a little more sheer than some of the other colors and I personally prefer to apply three coats. If you don’t mind a little visible nail line, two coats would do the trick.
These next two polishes are fun, festive and flashy! Add some sparkle to your nails with these silver and gold glitter polishes!
Fabulous Silver is is a dense silver micro glitter in a clear base that builds up to opaque coverage in 2-3 coats. The base is thicker than your average gel polish and the glitter is very dense, which makes it wear better as a stand alone polish than as a topper. It’s perfect for accent nails!
Luxury Gold is a dense gold micro glitter in a clear base that builds up to opaque coverage in 2-3 coats. Like Fabulous Silver, the base is also a thicker consistency and the glitter is very dense. I love the luxurious feel of this gold. It’s not too yellow, and it’s also not bronzy. I recently did some nail art using Luxury Gold as an accent, which you can see here.
Here is a demonstration of how the two glitter polishes build up to opacity. They both have great coverage with just two coats, but a third coat really takes it home!
Application, Wear & Removal
I love the quality of these polishes so much that I put my name on the bottle! I think that kind of speaks for itself. I’m not going to conduct a full review of Pink Gellac since I’m selling the polishes, but Michelle at Manic Talons is conducting a wear test and writing a full unbiased review based on her findings. Keep an eye out for that in the coming days.
In my personal experience, these polishes have a great formula and are very easy to apply. They last 2+ weeks without any signs of wear. The removal time is average, with a 10-13 minute soak-off using the Pink Gellac base and top coats. The glitter polishes do take longer to remove, which can be expected of any glitter polish in a clear base.
I always tell you that you can mix and match brands, and you can absolutely use your favorite base and top coats with these colors. In the very near future, I will also be offering Pink Gellac base and top coats which each have some unique characteristics. I should have those within 1-2 weeks, and will post about them when they become available.
Where to Buy
The Pink Gellac by Chickettes Holiday Sparkle Collection and individual colors are available for sale exclusively online at the Chickettes Boutique, which is now open for business! There are currently limited quantities in stock. You will be able to place a back-order in the event that a color sells out as there are more on the way!
FREE SHIPPING is offered on orders of $65 or more within the U.S.!
The Chickettes Boutique offers global shipping. If you’re in Europe or other parts of the world, these colors are also available for purchase through the Pink Gellac website, though they won’t have the Chickettes logo on the label.
Summary
I hope you all love these colors as much as I do! It’s such an exciting time and a bit other-worldly to see my logo on the bottles. I welcome feedback and photos from anyone that purchases these colors. Please tag me on social media if you post pictures of your nails, or feel free to post photos directly to my Facebook page.
It’s almost my favorite time of year… Halloween! I love carving pumpkins, decorating, costume parties, trick-or-treating… the list goes on. You can also dress up and be as creative, silly, or strange as you want. This is the first of a few different nail art ideas that I have for this year.
For the pumpkin nails I started with two coats of Pink Gellac Velvet Purple… this is one of the new shades that I just started selling this week. I thought the dark purple with blue flecks resembled a night sky and would work well as a backdrop. I painted the pumpkins with some Mundo de Unas stamping polishes. I’m admittedly not very good with hand-drawn nail art, but I recently purchased some fine-tipped Wistonia sable brushes to practice with. I’m hoping to master fine lines and details eventually.
The spider web nails have a base of two coats of Pink Gellac Magic Pearl… also one of my new colors. I stamped the spiderweb over top using a plate from the Bundle Monster Holiday set (BM-H07) and my black Mundo stamping polish. I added a few extra lines into the spiderweb with my brush. After letting the stamping polish dry completely, I topped each nail off with my Pink Gellac top coat (which you will learn more about in a few days).
I receive a lot of questions about stamping over gel polish, and though I’ve covered it before it can’t hurt to revisit the subject. These are the steps that I normally take:
Prep your nails for a gel mani – lightly buff and cleanse.
Apply your base coat & cure.
Apply your color coats & cure.
Apply a thin layer of top coat & cure.
Wipe off the tacky layer (if there is one).
Stamp over the top coat using your stamping polish or regular nail polish (RNP). I get the best results with very thick polishes like ones from Mundo de Unas, and Konad. I have found some regular nail polishes that stamp well including metallics from China Glaze and Klean Color.
Let the stamping polish dry and then apply another layer of gel top coat over top & cure.
Clean any excess stamping polish off your skin using polish remover. A little acetone won’t hurt your new manicure as long as you are quick and don’t let it soak on your nails. You can also use non-acetone remover or alcohol.
Kiara Sky is a new two-step gel polish from the makers of INK gel polish. Kiara Sky colorbase has the base and color mixed into one bottle. A separate base coat is optional, but a top coat is required. This new formula is also solvent-free, which means that it doesn’t have a strong smell, and won’t yellow or thicken over time. There are 87 unique colors in the Kiara Sky line, and each of the gel polish colors also has a matching nail lacquer (purchased separately). I learned about this brand during my visit to Cosmoprof this past July and was fortunate to receive a few samples to try.
Wear
I was very eager to try the Kiara Sky gel polishes since some of the colors that I received are so unique, especially the glitter polishes. I did several wear tests on the gel polishes as a two-step system with just the colorbase and a top coat. Unfortunately, I wasn’t able to keep the polish on for more than a few days as each time the polish would come off in full sheets. I think my nails are over-buffed and too smooth from some of my other wear tests. That is not to say that the two-step polish wouldn’t work for others, but it didn’t work for me. After switching to using the optional Kiara Sky base I had much more success! The wear test below is my result WITH the base coat.
All of the Kiara Sky gel polishes that I tried applied really nicely from edge-to-edge with no shrinkage or pooling, and they were opaque in just two coats. For this wear test I applied the base coat, two coats of color and the top coat. I used two different colors so that I could test a cream and a glitter. The dark pink shade is #455 Socialite, and the glitter on the ring finger is #464 Cherry Dust. The cream polishes have a great consistency that’s very easy to apply. The glitters are a little thicker, but that’s so that you get full glitter coverage in just two coats. I personally found the brushes to be a little wide, which made application slightly messy for me since my nails are rather narrow and the curves can be hard to get into. I’m told that professionals prefer a wider brush to be able to cover the nails faster with fewer strokes. Below is a picture of my completed manicure.
I had no issues with lifting, chipping or peeling with the base coat, and my manicure lasted the full 14 days of my wear test. This polish also made my nails feel very strong, which I loved. They were also strong without the base coat in case you’re wondering. Below is a picture of my nails on day 14, still perfectly in tact. The only thing I noticed is that the shine of the top coat did dull a little over time.
Removal
For the removal process I soaked my nails in acetone using my Nail Mates removers. The cream polish soaked off nicely in just 10-12 minutes with minimal pushing with an orange stick… no damage or issues! Glitter gel polishes in a clear base always take longer to soak-off so I wasn’t surprised that the glitter took longer, but it was about 30 minutes total. I didn’t try applying heat, but that might have helped speed up the process a little.
Colors
So let’s take a look at some of the colors. My focus today is on the glitter polishes since I think they’re pretty unique. The glitters all apply with good, even coverage in just two coats and some of them give the appearance of textured nail art, which also looks really cool with a matte top coat. Each of the swatches below are two coats.
Graffiti (#462) is a clear base with small black glitters and white glitter in different sizes. This one has a salt and pepper feel to it and would work well as an accent nail with almost any other color.
Forbidden (#461) is very similar to Graffiti, except it has small red glitters instead of black.
Serene Sky (#463) is a clear base that’s loaded with light, sky blue glitter in various sizes.
Lava at First Sight (#420) is different from the others since the glitter is more fine and it has some holographic glitter in it that gives it some sparkle.
I also have some cream finish colors, but I will swatch and post those at a future date. In the meantime, below are some photos that I took at Cosmoprof of the 87 Kiara Sky colors. You can click on these images to view them at a larger size.
Where to Buy
Kiara Sky is carried in several beauty supply stores. You can use the distributor map on the Kiara Sky website to locate a distributor near you (requires creating an account and logging in). I was also able to find a few online distributors by searching on Google. The average price per bottle seems to be around $9, which is pretty reasonable.
 Jade Dynasty is a nice, soft shade of jade green. This shade is a bit muted and is also slightly sheer. You can see some visible nail line after three coats, which I’m not a huge fan of. But the color is really pretty and is also great for fall.
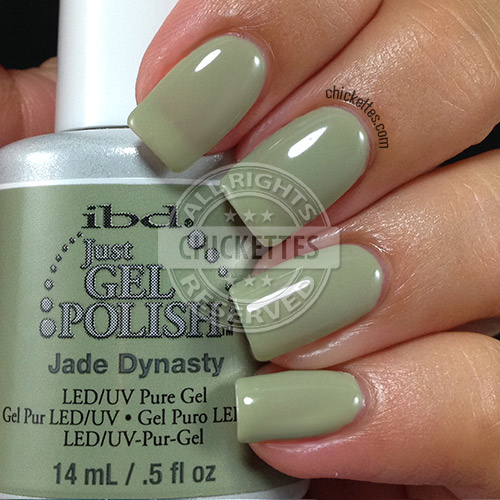


 I’m really loving the LeChat brand and will be adding more shades to my collection soon, so there will be more swatches to come! I also purchased the LeChat base and top coats so that I can do a formal wear test.


 Nail Art")
 Nail Art")


 to practice with. I’m hoping to master fine lines and details eventually.


