Hi everyone! Chickettes has teamed up with Jord Watches to bring you an awesome giveaway! The prize is a unique Jord Fieldcrest Maple wood watch, valued at $120. This is a high quality wooden timepiece for men or women with a medium-sized face and stainless steel hands and clasp. If you don’t wear watches, this piece would also make a great gift! To enter the giveaway, please use the Rafflecopter widget at the bottom of this post. The giveaway is open internationally!
As you can see, I decided to do a hand-painted wood pattern nail design to match my Fieldcrest Maple watch. I layered two shades to create the base color; Gelish Do I Look Buff (not yet available for sale) and ibd Dockside Diva. And then I painted the wood grain pattern over top using China Glaze Ingrid.
I chose this watch design because I like it’s simple elegance and I think it would look great accompanied by some stylish bracelets. I’m sure I’ll get lots of wear out of it! I need to take out a few of the links in order for this to fit my wrist, but it has 6 removable links so it will adjust to fit almost any size wrist.
The Giveaway:
The prize is a coupon code for one Jord Fieldcrest Maple wood watch with free shipping, which may be redeemed at www.woodwatches.com.
Entries for the giveaway will be collected through the Rafflecopter widget (below).
The giveaway will run through June 30th, and the winner will be announced on July 1st.
The winner will be notified via email and will have 48 hours to respond to claim the prize.
I’m excited to share a sneak peek of the new Gelish Get Color-Fall Collection that’s expected to be released in August. This collection was inspired by all of the brilliant colors of nature in the fall. These shades are all really gorgeous and lush! I’m not ready to wear fall colors just yet, so my normal swatches will be done at a later date as this collection gets closer to launching. For now I have a picture of the colors on a wheel to give you a taste of what’s to come. (You can click on the image for a slightly larger view).
The colors in this collection are:
Clean Slate – a blue/grey creme. This color is very sheer, and I would actually call it a jelly. The first thing I thought when I saw this color is that it would be the perfect shade for black lace designs with a sheer background. Guess what I’ll be trying next?
Rake in the Green – a grey/green creme. This is a lovely, dark shade. It’s very similar to Gelish I’m No Stranger to Love, except a little lighter and a little more grey.
Berry Buttoned Up – a purple pearl. I’m so in love with this shade of purple! This is exactly what the Gelish line needed.
Hello, Merlot! – a berry creme. This is such a lush, creamy red and is opaque in just 2 coats!
Whose Cider Are You On? – a brown pearl. Another totally unique shade to the Gelish line, and it’s such a rich shimmery shade of brown. This will be a big hit in fall.
Do I Look Buff? – a neutral creme. This is a perfect neutral shade for my tastes. It falls in between Need a Tan and Skinny Vanilla Latte, and has a slight pearly shimmer.
So which one(s) are your favorite?! I love them all!
Gelish MINI colors can be purchased at Sally Beauty stores.
Today’s manicure is a bit of a mix of techniques. As many of you know, I’ve been trying to figure out how to do a pure gel polish gradient and have gotten awful results with the different ideas I’ve tried. Well Nails by Shannon posted this video about her technique and it totally blew me away. I had to try it, and the nails on my index and middle fingers are the result… my first pure gel polish gradient. Now I just have to try doing it in the other direction.
The colors that I used in my gradients are Gelish All Dahlia-ed Up and Rockin the Reef, and then Lime All the Time and Rub Me the Sarong Way. I topped the gradient nails off with one coat of Vegas Nights. My thumb and ring finger have lace designs. I started with three coats of Gelish Clean Slate (this will be coming out in the fall collection in August), and then stamped the honeycomb pattern with Mundo de Unas black and Cheeky Jumbo Plate #5 (Musical Nails). I then stamped another pattern over top of that using the same plate.
And finally the pinky finger has two coats of Gelish Mali-Blu Me Away, and then I methodically placed hex glitters over top. I used my Gelish Foundation as the “glue” for the hex glitters and used a dotting tool to place each individual hex. I’m not sure if it’s noticeable, but I also did those in a gradient pattern. They shift from green, to teal to dark blue. I applied two coats of my Gelish TIO over top to get a nice glassy finish.
I have a few swatches of Daisy Duo soak-off gel polishes. The Daisy Duos come in a package with a matching bottle of regular nail polish, which is why they’re called duos… you get two for the price of one. These polishes don’t require a base coat – you apply them directly onto your nail, saving a step in the normal gel polish application process. You can see some of my other Daisy gel polish swatches here.
For each of these swatches I applied three coats of color and a top coat. Most of the colors had pretty good coverage with just two coats.
This first color is Cherry Berry, and the name pretty much sums it up! It definitely reminds me of ripe cherries. This is a really classic color that can be worn year-round.
I applied one coat of Grape Field Star over Cherry Berry for some added sparkle. This is a glitter topper with purple holographic glitter. Per the instructions on the bottle, the glitter toppers need to be shaken really well to get good coverage.
Gulf Stream is a lovely medium blue. This is my favorite of these colors, but you already know I’m partial to blues and teals. This shade of blue is slightly greyer than some of the other blues that have come out this season, so it’s not super bright. It’s another great year-round shade.
And Wood Lake is a really nice neutral brown/grey taupe shade. Taupes and tans are really growing on me lately. This is a great classic shade to wear to the office or to a job interview.
Daisy Duos are available for purchase at Esther’s Nail Center. Follow Esther’s Nail Center on Facebook & Twitter for deals and updates. Support small businesses!
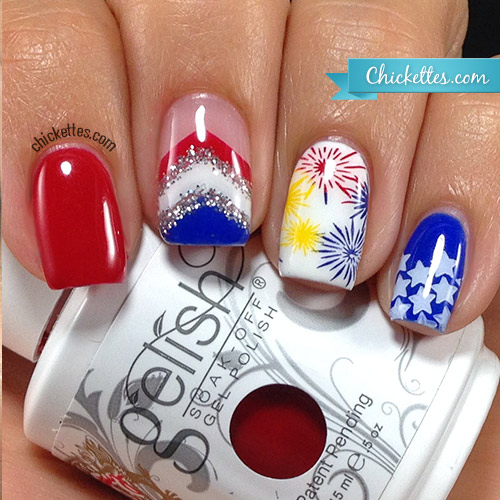
It’s hard to believe that next week is July already, and one of my favorite holidays is coming up. I love celebrating the 4th of July with family and friends… watching fireworks is always the highlight of the day for me. This is the first design that I came up with for the 4th of July this year. I have another idea that I want to try, so there will likely be another 4th themed mani featured next week.
The main colors used in this manicure are Gelish Spicy Fortune (red), Gelish Arctic Freeze (white) and Gelish Mali-Blu Me Away (blue). I used some striping tape to create the chevron look on my middle finger. My intention was actually have some negative space between each color, but the colors bled under my tape making the lines look messy so I drew on some silver glitter lines using a dotting tool and Ink Chrome Silver to hide those ugly lines.
The Bundle Monster holiday stamping collection has a couple of nice plates for Independence Day themed nails. The star pattern on my pinky is from plate BM-H25, and was stamped with Mundo de Unas white. The fireworks pattern seen on my ring finger and thumb is from plate BM-H14 which is more of a New Years themed plate. I used three different Mundo stamping polishes to create the multi-colored look; red #9, yellow #11 and blue (round bottle with no number). I applied dots of each color randomly on the stamping plate, so each nail is only stamped once.
I finally have the limited edition Gelish Playin’ It Cool Collection swatches to show you. I don’t have an inside scoop on this collection, so I’m not sure why it hasn’t shown up in stores online yet… or if it will. I do know that the colors are available in the US at Cosmoprof stores because that’s where I got mine. Well actually, one of my amazing readers picked them up for me. Thank you, Joelle!!!
There are four shades in this collection with names that are inspired by the jukebox era of the 50′s and early 60′s. These polishes had a fairly thick formula and will wrinkle if you’re not careful. They all seemed to apply a little streaky for me as well except for the red. My swatches are three coats of each as usual.
I’m trying a new swatch format with just one picture per color, but it’s a wider shot than normal. Let me know what your thoughts are on that and if it works. I’m trying to keep the posts from getting too long, and I think my usual two poses are pretty similar to one another except they’re rotated a little.
One Cool Cat is a creamy medium blue. This shade is pretty unique in the Gelish line, but ibd Swag Bag is a close comparison. On my fade test, this color seemed to get just a hair darker after prolonged exposure to sunlight.
Let’s Go to the Hop is a creamy medium pink. The only color that I have that’s similar to this is Gelish Sugar n Spice, but I’m wondering if my swatch stick for that color may have faded a bit because I remember it being brighter. Let’s Go to the Hop turned a hair lighter after exposure to sunlight in my fade test.
Doo Wop is a soft, creamy yellow. If you look at this polish really really close you can see a very subtle shimmer, but I still call it a cream because it’s not noticeable. This is a much needed shade in the Gelish line, and I hope they keep it around. This is a much richer yellow than any of the other Gelish yellows. The shade is similar to LeChat Lemon Drop and CND Shellac Bicycle Yellow.
Cruisin’ the Boulevard is a bright red. Unfortunately there’s nothing unique about this color. If you ask me, this one looks just like Gelish Red Roses, Hot Rod and Spicy Fortune…. they’re all too close to tell apart. So if you already have one of those, skip this one unless you’re looking for better opacity. Cruisin’ the Boulevard does seem to have the best coverage.
Happy Canada Day to all of my Canadian followers!! I’m sorry I don’t have a Canadian themed mani for you today.
This is my second (and probably last) Independence Day themed mani for the year. I went with a classic American flag stars and stripes look. I created this look with gel polish and stamping. This simple mani actually took several steps and a few layers of top coat. I find that I get the best results when I apply stamps and tape to a layer of top coat that’s been wiped clean of the tackiness, rather than trying to apply them directly onto the gel color. The steps that I took to achieve this mani are listed below. You can see my other 4th of July nail arthere.
Steps: (note that I cure after each coat of gel polish or TIO)
Applied a very thin coat of Gelish TIO over the white, cured and wiped the tacky layer.
Used a piece of packing tape to block off half of the nail and I painted the exposed half blue using Gelish Mali-Blu Me Away (this has been my go-to color this summer!).
Pulled off the tape, and then applied another thin coat of TIO, wiped and cured.
Next I applied another piece of tape over the blue section of the nails, leaving the white exposed.
The red stripes were then stamped onto the white area using Cheeky plate CH10 and Mundo de Unas red stamping polish (#9).
Applied another thin layer of TIO, cured and wiped.
I applied another piece of tape, this time covering the red stripes.
The white stars were stamped onto the blue using Cheeky plate CH4 and Mundo de Unas white stamping polish.
I know it sounds like my nails would be really thick with all of the layers, but I use VERY thin layers so they’re not that thick – but they are strong! :) When I go to remove this mani I will just be sure to use a nail file to break through all of the layers of TIO before soaking.
Today I have two swatches of glitter toppers from the DIY Hard Nails line of gel polishes. I first wrote about these products a couple of weeks ago when I reviewed two of the DIY color changing gel polishes. These glitter toppers can be worn on their own, over a color, or you can do fun things with them such as creating glitter gradients. They are both loaded with holographic glitters and really sparkle in the light. These swatches are two coats each over a clear base.
Blue Cocktail is a mixture of small and medium sized teal blue holo glitter, and larger silver holo hexes.
Galaxy Twilight has medium sized blue and purple hexes and small silver holographic glitters.
DIY Hard Nails gel polishes are currently only available for sale on Amazon.com. If you order 2 or more of these polishes the shipping is FREE! Also, don’t forget that if you purchase any of these polishes you could qualify to win some additional goodies. Please read the details at the bottom of this post.
I’ll have more gorgeous colors from DIY coming up over the next couple of weeks!
I picked up two of the FingerPaints flakie gel polishes at Sally’s a while back and am just now getting around to trying them out. The two that I bought are Lunar Flair and Midnight Flash. I actually have a hard time telling the two apart. I think that Midnight Flash just doesn’t have the orange/gold flecks, but they both have blue and green flecks. These pictures show two coats of Lunar Flair over Gelish After Dark. I really love this look although it’s a little dark for summer. The flakies can be applied over any color, but I thought this one would look great over blue. I don’t know if these polishes are still being sold. I don’t see them on the Sally’s site and also couldn’t find them on Amazon or eBay.
This manicure was inspired by some pictures that I’ve seen on Instagram with the sheer polka dotted look. I think the most memorable one was the polka dot and lace mani that Bad Girl Nails posted on March 7th.
The two polka dotted nails have a sheer grey base using two coats of Gelish Clean Slate (coming out next month), and then I used a dotting tool and some black gel polish to draw the border around each nail. After curing the border, I added the dots while flash curing periodically to keep the dots from running together. I have a new favorite black… Black Cat by DIY Hard Nails. I only applied one coat of black to each nail so you can see how opaque it is. After curing my outlines and dots, I applied a layer of TIO and cured… then I lightly buffed the top coat and applied a second layer of TIO. This helps minimize the bumpy look of dotted gel manicures. Next, I drew on the flowers using some of my Mundo de Unas stamping polishes, and then I applied one final layer of TIO after the polish dried completely.
Are you ready for a few more color changing polishes?! I have three more mood polishes from DIY Hard Nails. All of the DIY color changing polishes have a thick creamy formula, and they are loaded with glitter. I really love the look of these, and they apply great. You can see the two other polishes that I already swatched here. Even with the temperatures being very warm right now, these colors shift quite a lot.
Classic Galaxy shifts from a bright blue when warm, to a deep purple when cold.
Heartbreaker is pretty unique and has a drastic color shift. It changes from a soft coral-pink shade when warm, to stark black when cold.
Coca Cola Float shifts from a warm neutral tan shade when warm, to dark brown when cold.
The DIY Hard Nails gel polishes can be purchased on Amazon.com (in the US only unfortunately). If you purchase two or more products, you get free shipping. Also, please read the contest rules at the bottom of this post to learn how to earn a chance to win free products from DIY.
When this posts I will hopefully be mid-flight to Las Vegas for the Cosmoprof North America tradeshow! I have been anticipating this day for months and it’s finally here! This is my first time attending Cosmoprof and I’m super excited for the opportunity to meet with representatives from all of the different brands to learn about new collections and products that will be coming out, and also about meeting many of my fellow bloggers. If you’re interested in following me on this journey I will be posting pictures and info via Facebook and Instagram periodically, and then hopefully I’ll have lots great info to share with you when I return.
So, this is how I have done my nails for the trip…
My biggest dilemmas while planning this trip were what to wear, and of course how to do my nails! I decided to first choose what I would wear and then I would try to come up with some nail art to match. The first dress that I selected for the tradeshow is a short summer dress from Francesca’s, that is a minty teal color with geometric patterns in pink, orange and dark blue. The second dress is just a very simple teal cotton dress, and the third one was a simple dark blue cotton dress (which I may end up swapping out for a different dark blue dress – decisions, decisions). So my nail art is mostly based around the colors and patterns that I’ll be wearing, and I wanted my nails to be bling-y… it is Vegas afterall.
The art on my middle finger and thumb was hand-drawn with a dotting tool. I also spent a lot of time meticulously placing dark blue, teal and silver hex glitters in a pattern on my pinky and thumb nails. Here is a better view of the thumb.
Remember to follow me via social media to keep up with my findings at Cosmoprof, and I’ll write up a summary (or two) when I get back. You’re also in for a treat with a fun guest post while I’m away.
Hello lovely Chickettes readers! Since Andrea is living it up in Las Vegas and getting the scoop on our favorite brands for next year, I’m hijacking her blog and throwing some glitter around again. Seems appropriate for Las Vegas, right? For those of you who haven’t “met” me before, I’m Michelle from www.ManicTalons.com. My blog is also gel polish and nail art themed with a little bit of Indie polish sprinkled here and there.
The last time Andrea invited me to guest post, I showed you how to manipulate loose glitter by mixing it into a bit of top coat in this “Key to My Heart” design. Today’s mani uses the same technique, but this time I’m feeling floral.
I started with a base of Couture Gel Nail Polish Francais. Francais is a very soft, neutral pink that is part of the Couture French Manicure Collection. I then broke out my beloved ArtsyFartsy Crafts Ultrafine Holographic Glitters in Purple, Light Aqua and Light Green. I mixed a small amount of each color with a drop of top coat to create a thick paste. I then dotted the glitter mix onto the nail with a fine detail brush to form the flowers and leaves. Once the design was complete, I cured for 30 seconds in my LED lamp to lock the glitter into place and finished with a layer of top coat. For a full tutorial on glitter manipulation, check out my previous guest post here.
Here’s another shot of the final mani. I really love how well these colors work together. The overall feel of the mani screams summer to me.
Want to see a close-up? You can see in this shot that the glitter doesn’t have to be perfectly placed on the nail. There are a few stray pieces here and there, and that’s ok. No one will ever notice unless inspect your nails with a magnifying glass. And, well, if anyone is looking at your nails close enough to notice a random piece of glitter that is out of place, you should probably have a discussion with said person about boundaries and personal space.
I don’t know about you, but I can’t wait to hear the exciting news Andrea brings back from Cosmoprof to share with us. Oh how I wish I could be there with her! Maybe next year. In the meantime, I invite you to mosey on over to my little slice of the internet at Manic Talons and poke around. You just might see something you like.
Finally, a huge thank you to Andrea for inviting me to share my art here on Chickettes. It is always my pleasure.
Who doesn’t love a great shimmer polish?! These four beauties are from the DIY Hard Nails line of gel polishes, which continues to impress me. Previously I have posted about some of the amazing color changing and glitter polishes that they have available – you can read about those here. Each of these swatches show three coats of color.
BTW, if you’re wondering why I’ve used a different pose for this brand of polish it’s because the square bottle shape makes it hard for me to hold them like I normally would. My little pinky finger just doesn’t want to cooperate. LOL Anyway… onto the colors.
Pink Crystal is probably my favorite of all of the shimmers because it’s so complex. You can see tiny flecks of different shades of pink and it seems to just glow in the light. It’s really very stunning.
Glowing Lavender is a shimmery pink-ish purple (or is it purple-ish pink?). It’s another stunner, and is a perfect summer shade.
Blue Velvet is a dark blue shimmer gel polish. My camera didn’t really pick up on it much, but the shimmer is a bit duochrome in nature because you can see blue and/or purple shimmer depending on the light.
Metallica has a metallic finish that reminds me of pewter. This one does have some shimmery qualities, but it’s actually more of a frosty finish since it will show brushstrokes if you’re not careful with your application.
DIY Hard Nails gel polishes are currently only available for sale on Amazon.com. If you order 2 or more of these polishes the shipping is FREE! Also, don’t forget that if you purchase any of these polishes you could qualify to win some additional goodies. Please read the details at the bottom of this post.
I’m home from the Cosmoprof North America cosmetic trade show in Las Vegas and am on information overload! I’ve been reviewing my notes and photos from the show, trying to digest it all and figure out the best way to report it to you. This was my first time attending the show and it was an absolutely amazing experience… I’m already counting down the days until next year! While there, I met with the majority of the polish brands that have gel polish lines and learned about many new products and upcoming collections. I will write about the upcoming gel polish collections in a separate post, but today I want to focus on a couple of the trends that I spotted.
One-Step and Two-Step Gel Polishes:
There are already a few one and two-step gel lines in the market, but this seems to be the wave of the future with soak-off gels. I’m noticing many brands coming out with gel polishes that require less steps, which saves time when doing a gel manicure. I’m very curious to try some of these new polishes to see how they wear, and to test the shine factor.
Cácee introduced their new one-step gel polish at the show, called ONE Gel Polish. With this polish you prep the nail by buffing and filing and apply the ONE Gel Polish Prep, which is a bonding agent and dehydrator that helps the polish adhere to the surface of the nail. You then apply the ONE Gel Polish color directly onto the nail, and cure each coat. ONE Gel Color is a base, top and color all in one and will last up to 2 weeks. I asked whether the shine dulls over time, and they showed me that you can use a smooth buffer to bring the shine back to the nail if it starts to dull. The ONE line will be released with 66 colors.
I also learned of a new 2-step gel polish line called Kiara Sky that is being released by Glam and Glits. Kiara Sky colorbase has the base and color in one bottle. You can use it with or without a base coat, and the polish will last up to 21 days. I was told that these polishes have a new non-solvent formula which means that they don’t smell bad, and they won’t yellow or thicken. The Kiara Sky line will be launching in 1-2 months with 87 color choices, and each color also has a matching nail lacquer. There were some really unique colors and glitters in this line. I was fortunate to receive a few samples, so I will be writing more about this line in the near future.
Dashing Diva also had an all-in-one colorgel that didn’t have a tacky layer. I have to admit that they were one of the first companies that I met with and my interviewing skills weren’t quite up to par yet, so I have very little info about this line. They talked to me a lot about another innovative product that they are releasing called the Nail Guard, which is another trend I’ll be writing about soon.
Other one-step brands that you may already know about are Bioseaweed Gel UNITY, and LacQit. Other two-step brands that you may know about are Gel II and Gelaze. I plan to separately review the Bioseaweed Gel UNITY line and some of the Gel II Reaction gels.
Long-Lasting Hybrid Nail Lacquers:
There are a couple of new polish lines coming out that claim to be as tough as gel with long lasting wear, but have the application and removal of a regular nail lacquer and don’t require curing lamps. CND Vinlylux is a good example of this type of polish. Two new lines were announced at Cosmoprof. The first is called Ever Glaze by China Glaze, which will be launching in January with 36 shades.
Young Nails also revealed their new line of long-lasting nail lacquer called Caption. I actually received a demo of this product and had a couple of my nails painted (over top of my gel polish). The Caption line has a base that contains nail strengthening agents. The colors are super pigmented and only require 1-2 coats. They demonstrated the pigmentation with their black polish by painting it over a glittery gel nail and you seriously couldn’t even see what was under the black with just one coat! I also had a really pretty purple shade applied to two of my nails with two different effects. Caption is supposed to dry 3 times faster than regular nail lacquer, not dent after 15 minutes of drying, and wear for 7-14 days.
The Caption line has 60 pigment rich colors and 18 topper effects. I have a couple samples of this product and will be sure to put it to the test!
It’s vacation time! We’re on our annual family vacation in Siesta Key, Florida, relaxing and soaking up the sun. This is my mani for the week… a tropical sunset theme.
I started with a yellow base using TruGel Smoke and Mirrors. Then I created a gradient using three colors from the TruGel Ringleader collection… Smoke & Mirrors (yellow), Hoop of Flames (coral), and Freaky Fete (purple). I used the technique that Shannon demonstrates in this video, except I did it horizontally instead of vertically. I started with the yellow and coral, and then did it again near the top with the coral and purple. The result was a little streaky, but it still looked pretty good. I applied one coat of Gelish Vegas Nights over top for some sparkle and then a thin coat of my Gelish TIO.
I stamped the palm trees onto each nail using an image from the Cheeky Jumbo Tropical Holiday plate and Mundo de Unas black stamping polish. The palm tree image on this plate had a hollow trunk so I filled that in with a small brush and the black polish and I also filled in some of the black at the tips with a brush. I also removed the little hollow sun from the image using a Q-Tip and remover. I let the black stamping polish dry for a bit and then finished the mani off with a final coat of TIO.
Here is a pic of what the gradient looked like before adding the palm trees.
I have a few more colors from DIY Hard Nails to share with you today. These are the gel polishes from this line that have a creamy finish. All of these colors have great opacity, which I really love. The white and black may be my new favorites to use for nail art bases because they offer full coverage with fewer coats than most others. This is my last batch of DIY Hard Nails swatches for a while, but you can check out the others that I’ve done previously here. I may also prepare a gallery page to put these swatches all together in one place.
So let’s get to the colors. For each of these swatches I have applied three coats of color for consistency, but many of these do offer great coverage with just two coats. I also applied a glitter gradient on the ring finger of each of these swatches so that you can see how the DIY glitter toppers look over other colors.
This is Whiteout with a glitter gradient using Blue Cocktail.
Black Cat is my new favorite black. It’s seen here with a Galaxy Twilight glitter accent. I recently used black cat in some nail art which you can see here.
Red Carpet is a classic bright red, and the accent is Golden Starlight. Golden starlight is a glitter topper with gold glitter, hexes and star shapes.
Sky Blue is a soft light blue shade, and the accent on the ring finger is Blue Cocktail.
Electric Raspberry is a bright pink with some purple undertones. The accent here is also Golden Starlight.
DIY Hard Nails gel polishes are currently only available for sale on Amazon.com. If you order 2 or more of these polishes the shipping is FREE! Also, don’t forget that if you purchase any of these polishes you could qualify to win some additional goodies. Please read the details at the bottom of this post.
It’s mid-summer here and I’m still enjoying soaking up the sun, and the bright, bold colors of summer. I’m not quite ready for fall yet, but alas it’s almost upon us. During my trip to Cosmoprof North America I learned about several new collections that will be coming out this fall. Below is a quick preview of the upcoming collections. As expected, the fall colors are darker and richer, with shades of plum, brown, dark green and grey. Most of these collections will be available for purchase in July or August.
Gelish Get Color-Fall Collection: Six new shades inspired by the brilliant colors of nature in the fall. Below is a photo of the display for this collection, and a photo of the swatches that I prepared. I will be swatching the whole collection in the near future.
LeChat Pop of Vogue Collection: “Strike a pose with these 6 NEW glitters and reveal the fashionista in you!” Coming at the end of August.
LeChat Rustic Retreat Collection: “Escape to the beautiful outdoors with these 6 NEW earthy woodland shades.” Coming at the end of July.
The photo above shows the displays for these two new collections from LeChat. The color wheel below actually shows the colors from these two collections, and the colors from the Mermaid Treasures collection (see my post about this collection here). The six glitters at the bottom of the wheel are the new Pop of Vogue glitters. The six colors next to the glitters (on the left) are from the Rustic Retreat Collection The remaining six colors (top right) are the Mermaid Treasures colors.
LeChat is also releasing 12 new Mood color changing gel polishes! The photo below is the color wheel, which unfortunately doesn’t demonstrate the color shifts well. You can find more information about the 12 new shades on the LeChat website. Coming in mid-August.
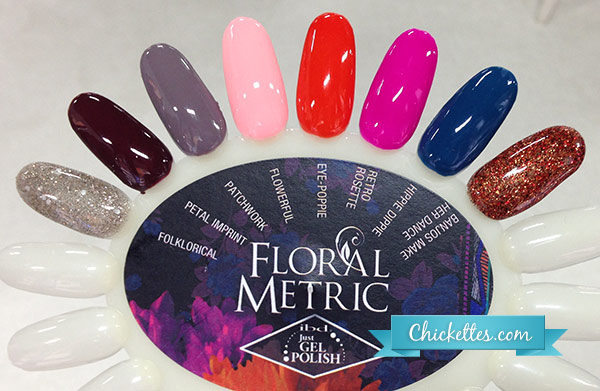
ibd Floral Metric Collection: 6 creamy shades and 2 glitters. Coming in August.
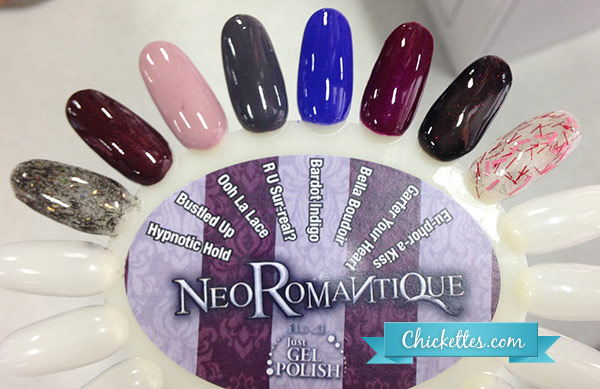
ibd Neo Romantique Collection: 6 shades and 2 glitters. Coming in September.
Gel II Foggy London Collection: This collection features 5 new shades, and two shades from their original line that are being brought back by popular demand. Coming in August.
ProGel Pretty in Punk Collection: 8 new metallic and modern shades. Available by the beginning of September.
EzFlow TruGel Stardust Dreams Collection: 6 new glitter toppers. Coming in August.
In addition to the collections, some lines are also releasing new gel polish shades…
Gelaze is releasing 23 new shades, many of which you may already be familiar with from the China Glaze regular nail polish line.
Jessica GELeration is releasing 12 new gel polish shades. I didn’t get a swatch photo, but the 12 shades are: Electric Teal, Viva La Lime Lights, Argon Blue, Pretty in Purple, Shock Me Red, Pink Diamonds, Bikini Bottoms, Pink Shockwaves, Yellow Lightning, Creamy Caramel, Palladium, and Black Lustre.
Essie is releasing 25 new gel polish shades. (Click to view larger).
I thought I’d show you how I did my daughter’s nails for our vacation. She wanted something beach-themed with sand, so I did this design that looks like the water crashing on the sand. I started with two coats of ibd Dockside Diva, topped with one coat of Gelish Vegas Nights. Those two colors alone looked really pretty, and she said she’s going to do her nails just like that next time.
I randomly applied blue from the tip to the center of the nail using ibd Swag Bag. After curing, I then took a make-up sponge and applied white to get the appearance of the foamy water on the beach. I used my Mundo de Unas white stamping polish for this. After letting it dry completely, I applied a thin coat of TIO.
She wanted some designs added to her thumbs, so I stamped a shell and starfish on her thumbs using a dark pink Mundo de Unas stamping polish. The images were from the Cheeky Jumbo Tropical Holiday plate.
BTW, I found it so much more challenging to take photos of someone else’s nails!
I’ve always been a bit of a tech geek and am usually first in line when new gadgets come out, so I really enjoyed seeing how technology is playing a role in the world of nails during my Cosmoprof trip! Did you know that you can turn your fingernail into a stylus for your touch-screen devices? Or that you can actually print designs directly onto your nail? Well you can…
Nano Nails
Nano Nails is a new product that came out earlier this year. They are press-on nails that can be used as a stylus. Interesting concept, right? How often do your nails get in the way when you’re trying to type on those little touch-screen keyboards? The photo below is courtesy of Hannah at The Dalai Lama’s Nails. I didn’t make it to the Nano Nails booth, but I did run into one of the women running the booth on the Cosmoprof floor and she gave a demonstration of the Nano Nail and explained a little about how it works.
Nano Nails come in packs of 4 for approximately $10. The Nano Nail is glued onto your natural nail and will last about a week. It won’t work if applied over a false nail (acrylic, gel, etc). The Nano Nails are grey in color and can be polished or designed to your liking. You can use non-acetone remover on them to change the design. You can also use gel polish on them, however you can’t cap the tip or the technology will cease to work. I believe that the Nano Nail only currently comes in one length, it has a square tip shape and the tip is a bit thick. I was told that you can file down the sides to make the nail fit your natural nail and that you can change the shape slightly by filing just the corner edges, but you cannot file across the tip.
I think the idea is awesome, and can’t wait to see how it evolves over time. I would love to see these nails come in different shapes and sizes/lengths and be a little thinner.
If you’d like to read more about Nano Nails, please visit their website at http://www.nano-nails.com. A couple of my blogger friends also posted video demonstrations of the Nano Nail on their Instagram accounts. Check out this video from Hannah at The Dalai Lama’s Nails, or this video from Katy at Nailed it!
Tat’z Nail’z
One of the booths that caught my eye at Cosmoprof was Tat’z. There was a lot of buzz around the booth and they had these big white machines on each corner. I walked by several times checking it out, but didn’t actually stop over until Judy (from BeautyJudy.com) showed Sarah (from Chalkboard Nails) and I her fingernail with her logo perfectly printed on it! What?! So Sarah and I headed over to the booth to investigate further.
Tat’z Nail’z is a new breakthrough in nail art… it’s a printer that allows you to print any image or design directly onto your fingernails. You can take a photo with the machine, upload an image, or select from one of thousands of pre-installed patterns. You can print onto any type of nail surface… gel, acrylic or natural nails. I sat down to demo the machine and was going to have my logo printed onto one of my nails. Below is a photo of the demonstrator taking a picture of my media card with the machine.
Once you select your image, you simply slide your hand into the round hole and get one finger in position. It prints one finger at a time, but the printing process doesn’t take long. You could do a full set of nails in less than 15 minutes. I was already wearing a funky gel polish design on my nails and we attempted to print over one of my glittery nails. That unfortunately didn’t turn out well… you couldn’t see the ink over the glitter.
So we went back to the drawing board, and this time the demonstrator painted two coats of white Vinylux over my glittery nail so that we had a solid base to work with. I don’t remember how it came about, but Sarah and I were joking around about putting her face on my nail and I said I would do it. So she had her picture taken and I printed it on my nail! LOL This is the photo that Sarah took and posted to Instagram (photo credit Chalkboard Nails).
It didn’t turn out perfect… the demonstrator said I must have moved my finger in the printer because the nail ended up with some scratches (right down the middle of Sarah’s face!). But you can still see clearly that it’s a picture of her face and it made for good conversation. I saw many other nail designs done on other people that turned out cool. The image on my nail was topped off with one coat of regular top coat and unfortunately the image faded terribly within a day. They said that it would last the full length of a manicure and that you could top coat with gel polish.
Even though my two attempts didn’t turn out perfect, I still think the idea and technology are cool. The brochure says the machine retails for $10,000 but the salon price is only $3,995. They have some payment plans and there’s also a $29/month service agreement. Obviously this isn’t ideal for personal use, but it could work well in a salon setting. I would love to see a smaller personal version. I heard that there was one at the show, but I must have walked right past and not seen it.
If you’re interested in learning more about Tat’z Nail’z, check out their website at http://www.tatznailz.com.
LED Lamp Technology
I also wanted to note that I learned about some new technology with LED lamps. While visiting the LeChat booth, they showed me their new LeChat SMD LED Lamp which has Surface Mounted Device LED lights. The lights are mounted into a circuit board which impacts the way the light is directed. The revised bulb design is supposed to make the curing of gel polish more efficient and effective. I didn’t get any pictures of this lamp, but you can see pictures and read about it here on LeChat’s website.
 As you can see, I decided to do a hand-painted wood pattern nail design to match my Fieldcrest Maple watch. I layered two shades to create the base color; Gelish Do I Look Buff (not yet available for sale) and ibd Dockside Diva. And then I painted the wood grain pattern over top using China Glaze Ingrid.