Quantcast
Channel: Chickettes Natural Nail Studio & Boutique
Viewing all 441 articles
Browse latest View live

Gelish Colors of Paradise Tie Dye Nail Art

$
0
0

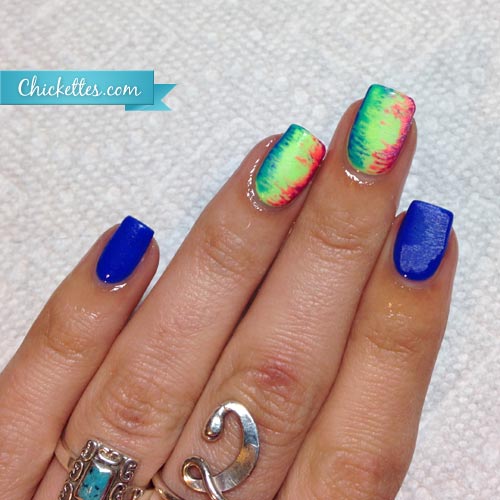
I have so many ideas for nail art with these new bright summer colors!  This is the first idea that I played with.  This mani uses almost all of the colors from the Gelish Colors of Paradise collection except for the pink shade (see my swatches here).  I didn’t intend for the end result to look like tie dye, but that’s what it reminds me of.  I feel like the two center nails need big peace signs on them.  I really want to try do some gradients, so that might be my next challenge (gel polish gradients can be tricky!).

For this mani I painted the index finger and pinky in solid blue using Gelish Mali-Blu Me Away.  I’m absolutely crazy about this color.  On the middle two fingers I applied a green base using Gelish Lime All the Time, and then I took a dotting tool and dragged some other colors onto the nail from the outside in.  For the first coat I used teal and orange using Gelish Rub Me the Sarong Way and Gelish Rockin’ the Reef.  After curing those colors, I applied a second layer of colors using the same technique of pulling the colors from the outside in.  This layer was purple and blue using Gelish Tahiti Hottie and Gelish Mali-Blu Me Away.  I flash cured a few times during the process to make sure the lines didn’t spread out too much since gel polish usually levels out when left uncured.  It looks more crisp in person.

I’m still working on the Colors of Paradise comparisons as well.  I’m trying to do an accurate fade test to include with that write-up so I need to leave the colors exposed to the light for a few days to see how they hold up.  I hope to have that ready for you by Sunday.

Chickettes.com Nail Art using the Gelish Colors of Paradise CollectionChickettes.com Nail Art using the Gelish Colors of Paradise Collection


VIDEO: Gelish Colors of Paradise Fade Report & Comparisons

$
0
0

As promised, here is my fade report on the Gelish Colors of Paradise collection (see my swatches here). I did it in video format this time. Let me know if you like seeing this type of info in video format and if you have any suggestions for improvement for the next time.

You also get a sneak peek at my latest nail art using this collection in this video.  Details about that look will be posted soon.  Enjoy!

The colors seen in this video are:
Gelish Pacific Sunset (compared with Make You Blink Pink & Brights Have More Fun)
Gelish Rockin’ the Reef (compared with Tiki Tiki Laranga & I’m Brighter Than You)
Gelish Lime All the Time (compared with Sometimes A Girl’s Gotta Glow)
Gelish Rub Me the Sarong Way (compared with Radiance Is My Middle Name)
Gelish Mali-Blu Me Away
Gelish Tahiti Hottie (compared with You Glare, I Glow)

NailMates for Gel Polish Removal

$
0
0

Hi all!  I was sent a new product to try for gel polish removal called NailMates.  NailMates are re-usable caps and pads that can be used to remove all types of nail polish and nail treatments including gel polish.  I have to admit that I was a little skeptical at first because I thought that the use of acetone might damage the product, but I’ve been using these for a few weeks now for all of my removals and have been very pleased with how well they work.

Here is what the packaging looks like.  I used my NailMates for several weeks before taking this photo, so my package may look a little worn, but it’s still in pretty good shape.  A package of NailMates comes with 10 caps and 20 removal pads.

Chickettes.com Review of NailMatesSome of the advantages of using NailMates for gel polish removal are:

  • They are reusable, so you don’t need to use tons of cotton balls and foil any more.  I was informed that the removal pads will last for many many uses, and they last even longer if you rinse them with water after each use.  After a while the inserts may start to break down and replacement pads can be purchased.  Mine are still in perfect condition after being used several times so I think they will last for a very long time with repeated use.
  • They are one size fits most.  These caps should fit on most finger sizes.  If a finger or thumb is too large to fit, you can easily cut a slit in the back of the cap to adjust the size.
  • They don’t drip!  When using NailMates, you apply acetone to the round tip of the pad since that’s the end that gets inserted into the cap.  If you don’t use too much acetone, they don’t drip at all.
  • They are nice and snug, yet still allow movement of your fingers.  With a little practice I found that I was even able to hold a nail polish brush and polish one hand while soaking off the other!  LOL

This is what my mani looked like after prepping for removal.  I roughed up the surface of the nails with a file and applied some cuticle oil to my skin (I find that this helps prevent my skin from drying out during removals).  You can find more details about this mani here.

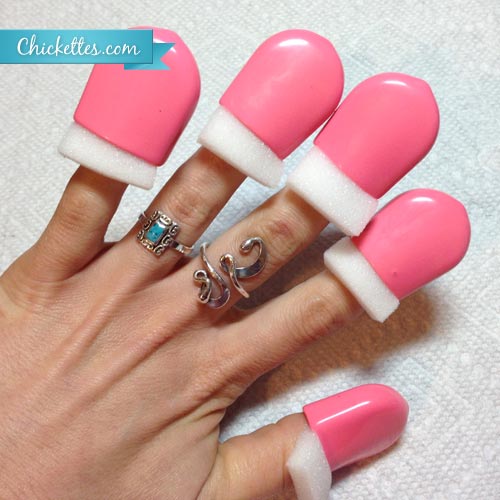
Chickettes.com Review of NailMatesThis is what a cap and removal pad look like.  You apply acetone to the round part of the pad and insert it into the cap, and then slide your finger into the cap so that the pad is resting on the nail.

Chickettes.com Review of NailMatesThis is what it looks like after all of the NailMates have been applied.

Chickettes.com Review of NailMatesI even took a side shot to show you how nice and snug they are.

Chickettes.com Review of NailMatesAfter soaking for 10-15 minutes, my polish had lifted nicely and was ready to be pushed off with an orange stick.

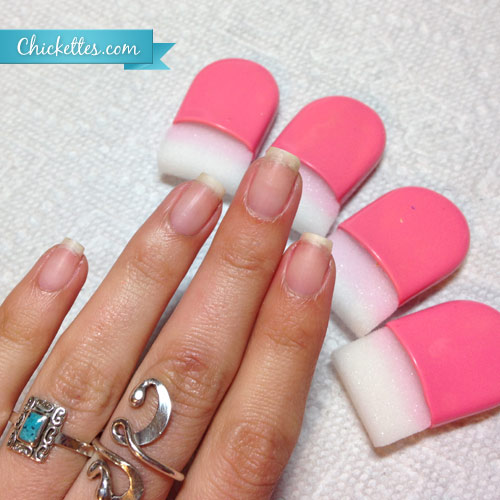
Chickettes.com Review of NailMatesThis is what my nails looked like after removing all of the polish.  You can see that the white pads did turn a little pink from the caps.  I’m told this is normal.  Some of the pads that I’ve been using for several weeks are very pink, which could also be because the remover that I use is pink as well.  The insides of the caps look a little wrinkled from the acetone exposure, but they are holding up well and it doesn’t seem to have affected their shape or durability.

The very first time I used NailMates I had a horrible soak-off, but I came to learn that it wasn’t the product that caused the problem, it was a really stubborn gel polish.  I used three coats of a Fingerpaints glitter polish and it took about an hour to remove.  All of my removals since then have taken the same amount of time as it takes with foil and cotton (about 15 minutes total).

Chickettes.com Review of NailMatesI really enjoy using NailMates for gel polish removal and will continue to use these for future removals.  If you’re interested in learning more about NailMates, please visit their website at http://www.nailmates.net

NailMates can be purchased at http://shop.nailmates.net/

Plaid Nails Using the Gelish Colors of Paradise

$
0
0

I attempted a plaid design for the first time ever.  I used all of the colors from the Gelish Colors of Paradise collection for this nail art, except for the orange.  I figured these colors might work well with a plaid design since they are a little sheer with just one coat.  The index finger has 3 coats of Tahiti Hottie, and the pinky finger has 3 coats of Rub Me the Sarong Way.  For the plaid nails, I started with a base of Lime All the Time and then hand-painted on the stripes using nail art brushes.

I would like to learn to draw thinner lines with gel polish.  I used a very narrow striping brush to draw the finer lines, but they still look thick to me.  They’re are also a little lumpy looking with all of the layers, and I wonder if there are possibly too many colors?  I’m sure this won’t be my last attempt at a plaid pattern, so I’ll try to improve upon those next time.

This will probably be my last look using the Colors of Paradise collection for a while.  I’ll be featuring several other new collections, and the next one should be posted on Friday!

Chickettes.com Bright Summer Plaid Nails using Gelish Colors of ParadiseChickettes.com Bright Summer Plaid Nails using Gelish Colors of Paradise

EzFlow TruGel Ringleader Collection Swatches (Spring/Summer 2014)

$
0
0

EzFlow TruGel Ringleader Collection Swatches by Chickettes.comHappy Friday everyone!  I asked on my Facebook page which collections you wanted to see swatched, and the EzFlow TruGel Ringleader collection was suggested so I added it to my to-do list.  I’m always open to suggestions so if you know of other interesting looking collections that are coming out, please let me know.  In the coming weeks I plan to have swatches of the LeChat Mermaid Collection, the new spring & summer Gelish Trends, the ibd Social Lights collection, and a few other surprises.

The TruGel Ringleader collection is a set of 6 creamy pastel colors that all have circus-themed names.  I love pastels and the colors are lovely, but they feel a little reminiscent of other collections that were put out this season.  This was my first time using the TruGel brand and I was very pleasantly surprised at how well the polish applied.  This is probably the first time in a while that I didn’t have to do any flash curing to get the colors to stay perfectly in place.  There were absolutely NO pooling or shrink-back issues… they applied like a dream!  I was also able to apply in nice thin, even layers with ease.  These get an “A” for the formula and ease of use.

I have not tested the wear of these polishes.  I can’t say with absolute certainty, but I believe this brand is from the same company that makes ibd Just Gel, so the quality should be very similar.  TruGel is also very reasonably priced, so that’s another perk.

Freaky Fete is a gorgeous medium purple.  This color is lighter than Gelaze Spontaneous, and darker than SensatioNail Heirloom Lilac.

Chickettes.com EzFlow TruGel Ringleader Collection Swatches - Freaky FeteChickettes.com EzFlow TruGel Ringleader Collection Swatches - Freaky FeteMagic & Mischief is a light, pastel blue.  It’s darker than Gelish My One Blue Love, but very similar to LeChat Rock Candy and Couture Milano (without the shimmer).

Chickettes.com EzFlow TruGel Ringleader Collection Swatches - Magic & MischiefChickettes.com EzFlow TruGel Ringleader Collection Swatches - Magic & MischiefTantalizing Trapeze is a bright, minty teal.  This color is similar to Gelish Mint of Spring, but is even brighter and more vibrant.  This is one of my favorite colors in the set… you know I’m a sucker for teal!

Chickettes.com EzFlow TruGel Ringleader Collection Swatches - Tantalizing TrapezeChickettes.com EzFlow TruGel Ringleader Collection Swatches - Tantalizing TrapezeHoop of Flames is a really pretty coral color.  It’s brighter than Gelish Fairest of Them All, and is another one of my favorites from this collection.  I’ve been wearing this color for a couple of days now and have received loads of compliments on it.  It looks a little more orange-y in some lights.

Chickettes.com EzFlow TruGel Ringleader Collection Swatches - Hoop of FlamesChickettes.com EzFlow TruGel Ringleader Collection Swatches - Hoop of FlamesSmoke & Mirrors is a pale, pastel yellow.  The color is almost identical to ACG Flawless except it doesn’t have the shimmer finish.  So if you’re looking for a pure cream pastel yellow, this is the one to go for.

Chickettes.com EzFlow TruGel Ringleader Collection Swatches - Smoke & MirrorsChickettes.com EzFlow TruGel Ringleader Collection Swatches - Smoke & MirrorsExtraordinary Spectacle is a pastel pink. This shade is very similar to Gelish Pink Smoothie, and I think it applies much better!  Pink Smoothie tends to apply unevenly and leaves bald spots… that was not a problem with Extraordinary Spectacle, so this may be the replacement you’ve been looking for.

Chickettes.com EzFlow TruGel Ringleader Collection Swatches - Extraordinary SpecacleChickettes.com EzFlow TruGel Ringleader Collection Swatches - Extraordinary Specacle

ibd Just Gel Polish Swatch Gallery

$
0
0

This is a summary of all of the ibd Just Gel Polishes that I have swatched to-date.  I will update this page on an ongoing basis as I swatch new colors. Click on the images to see larger photos, and click on the links to view or purchase the items on Amazon.com. The Amazon links are affiliate links, and I earn a small commission on each order that is placed through my links.  I would like to thank you in advance if you order through any of these links as the commissions help me be able to afford to purchase more colors to swatch! If you use my swatch images please DO NOT ALTER them, leave the watermarks in place and provide a link back to www.chickettes.com!

Rainbow Gradient Mermaid Nails

$
0
0

I’ve been wanting to attempt a rainbow gradient look for a while and have tried doing it with pure gel polish a few times, but that didn’t work out too well.  I know how to do gradients with pigment powders, so I decided to try that route instead and ended up creating a really cool looking gradient effect.  I’ve also been dying to use my new Lily Anna 09 stamping plate from Messy Mansion, so I layered this pattern that looks like fish scales over the gradients and the end result makes me think of a colorful mermaid!  I love it!  Michelle over at Manic Talons said that all it needs is a mermaid charm and I totally agree!

Chickettes.com Rainbow Gradient Mermaid Nails using gel polish, pigment powders, & Messy Mansion Lily Anna plate 09The Lily Anna stamping plates from Messy Mansion are rectangular plates with 12 full nail patterns each, and 2 accent patterns on the bottom.  I love the intricate designs on these plates and they stamp flawlessly!  Lily Anna 09 plate has many nature-inspired patterns including florals, wind and water.  It sparks so many new nail art ideas!


You may be wondering how I created this look, so let’s get into the details!  Before doing this on my nails, I actually practiced the gradients on a nail wheel first.  I wanted to make sure that the colors flowed well and that the pigments that I chose would work over the base colors.  In hindsight, I actually might have been able to achieve the same look by just applying the pigments over white, but I didn’t think to try that first.  Here’s what the gradient effects looked like before I applied the stamp.

Chickettes.com Rainbow Gradient Nails using gel polish and pigment powdersOn each nail I applied two coats of the base gel color, and then burnished (rubbed) the pigment powders into the tacky layer of the polish with a dry brush to get the gradient effect.  After adding the pigments, I applied my gel top coat as normal.  If you would like to see how to use pigments to create gradients, please watch this video.

Here’s a breakdown of the polishes and pigments used on each nail:

Thumb:  {Base color:  Gelish I’m Brighter Than You} | {Pigments: CND Haute Pink, Glam & Glits Burnt Out}

Index Finger: {Base color: Couture Tres Chic} | {Pigments: Glam & Glits Burnt Out, Young Nails Gold}

Middle Finger: {Base color: Couture Tres Chic} | {Pigments: Young Nails Gold, Glam & Glits Timeline}

Ring Finger: {Base color: Gelish Lime All the Time} | {Pigments: Glam & Glits Timeline, Glam & Glits Masquerade}

Pinky: {Base color: TruGel Tantalizing Trapeze} | {Pigments: Glam & Glits Masquerade, CND Deep Blue}

Nails & Cocktails!

$
0
0

nails-and-cocktails

I had a little Nails & Cocktails gathering at my house on Saturday evening with a few girlfriends. It was a lot of fun, and I hope it becomes a regular thing. :) Everyone came over around 7pm and we sat around my dining room table eating, drinking, talking and listening to music for about 2 hours before we finally headed upstairs to do nails and paraffin wax hand treatments.

All of the girls know of my blog and my polish collection, but some of them hadn’t seen it yet. I realize it may seem a little excessive to some people, but I think they all know me well enough to know what to expect. :) Below is a picture of the chalkboard in my office/nail salon that I prepared before everyone came over just in case. LOL I don’t normally do nails for anyone else except my mom, so this was a new experience. Since I’m not a nail tech, I didn’t file their nails or do any of the cuticle work… I just prepped and polished.  I asked the girls if they wanted to be hand models for the blog, and they all let me take pictures to share with you. Yay!

chalkboard

Suzy was first, and she selected Couture Tiffany’s Secret as her color. I applied three coats of this color on her nails, and then we did a little stamping. Stamping was also new to everyone, so they browsed through my plate collection and selected some designs to add to their nails. Suzy wanted a black crown on her pinky, a white heart with wings on her ring finger and some stars on her thumb.  The small accent stamps were from Cheeky Jumbo Plate #8 (Princess Charming).  The stars are from my DRK-A plate.

suzy2Carrie was up next and she wanted a peachy/coral color, so I suggested Gelish Sweet Morning Dew.  This is three coats of Sweet Morning Dew, and then we stamped some hibiscus flowers on her nails using Cheeky Jumbo plate #2 (Tropical Holiday).

carrieI didn’t get a picture that shows her fingers and thumbs, so here’s a separate shot of her thumbs with the full nail hibiscus pattern.

carrie2Tina selected one of the colors that I just swatched from the TruGel Ringleader collection, Hoop of Flames.  Another coral color, but this one is a little more reddish.  She saw me with this on my nails a few days earlier and really liked it.  She selected two small accent stamps, a heart from the Cheeky Jumbo Plate #8 (Princess Charming) and butterflies (I can’t find which plate this is from!!).

tinaHere’s are a couple of pictures that Diane took of me working on Tina’s nails.  Also, while I was doing nails all of the girls were doing paraffin wax treatments on their hands.  I was hoping to get a picture of someone sitting in the mitts, but I was too busy doing nails.  LOL  One of my friends gave me this awesome deluxe Remington paraffin bath a while ago, and I just cleaned it out and put fresh new wax in it.  It took about 6 pounds of wax to fill it up!  I went with this lavender scented wax… ahhh.  It’s so soothing!

You can see a few drinks in the pic below.  Everyone was drinking something different.  I think all of the girls were drinking different kinds of wine, and I was drinking raspberry lemonade with a twist.  Yummy!  And yes, I still have my sunglasses on my head at night… they double as a headband sometimes.  :)

me-tina-nailsme-tina-nails-2Diane waited patiently and went last since she knew her nails would take a while.  She’s going off to Comic-Con soon so she wanted some really fun themed nails.  She picked a different color and stamp for each nail and she wanted flowers on her pinkies.  I’m not even going to try to list all of the color names and stamping plates, though I did get to use one of my MoYou plates that I’ve been wanting to try… it’s the Pro Collection #10 which has a bunch of comic book themed designs including the words POW, BANG and WHAM!

From left to right, here’s a quick explanation of what’s on each nail; yellow with flowers, sparkly green with a turtle, red with a spider web, orange with the word “POW”, white with a blue comic book girl, purple with the word “WHAM”, green with the word “BANG”, yellow with bats, red with a yellow lightning bolt, and blue with flowers.

dianeAnd by the time we were done it was already 1am!! I slowed down on my drinking much earlier so that I didn’t mess anyone’s nails up too badly.  LOL  Below is a pic that I took of my raspberry lemonade with a twist and my Gelish 18G lamp.  <3

cocktailI hope you enjoyed this little glimpse into our Nails & Cocktails night, and maybe it’ll inspire some of you to have similar gatherings!  :)


Spring 2014 Gelish Trends

$
0
0

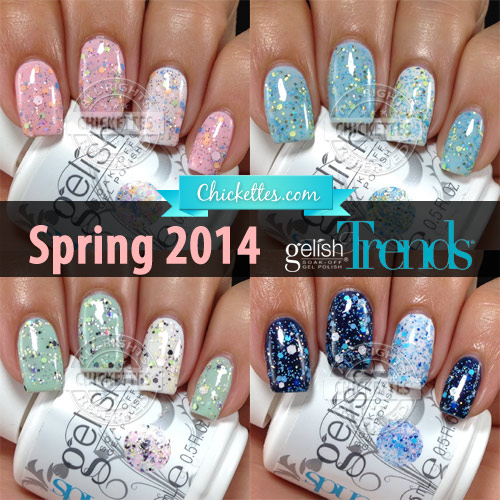
Spring 2014 Gelish Trends at Chickettes.com

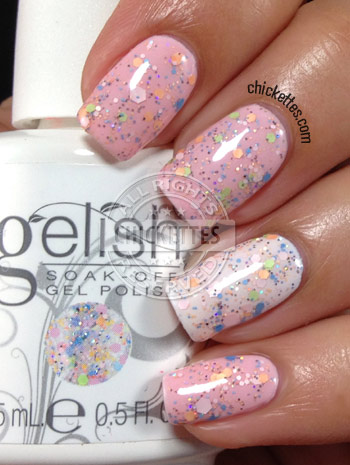
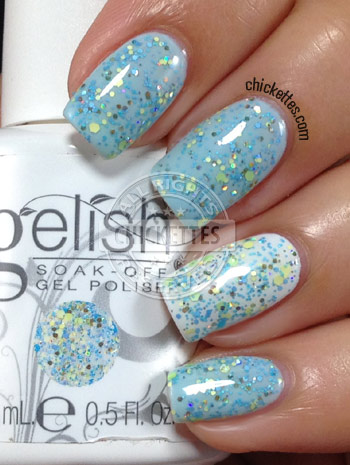
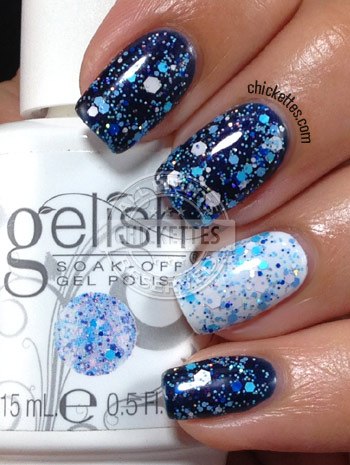
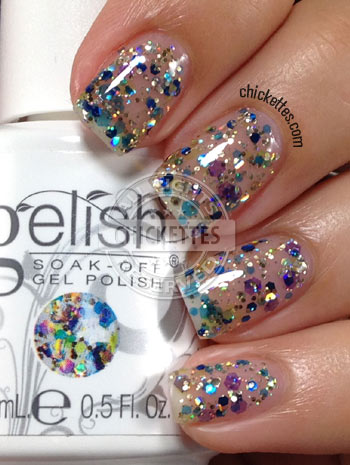
Did you know that Gelish just released 7 new Trends glitter toppers?  There are four Spring colors, and three Summer colors.  I have all of them, and today I have swatches of the four Spring Trends.  These polishes are all loaded with glitter of different shapes and sizes, in fun pastel colors.  They can be work on their own and they all look great over white or light colors.  My swatches all show the Trends paired over a base color and an accent finger with a white base (Gelish Arctic Freeze).  I applied two coats of the Trends toppers over the colors.

Still pictures never show the true sparkly goodness of glitter polishes.  All four of these toppers have some holographic sparkle to them.  All of the small dark colored looking glitter flecks are actually holographic glitter!

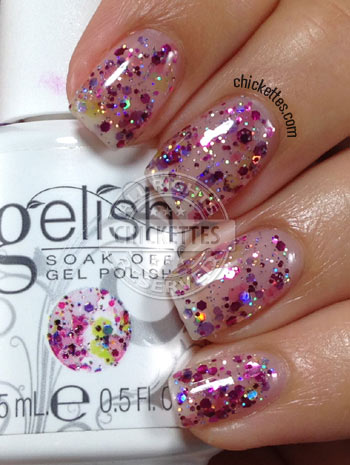
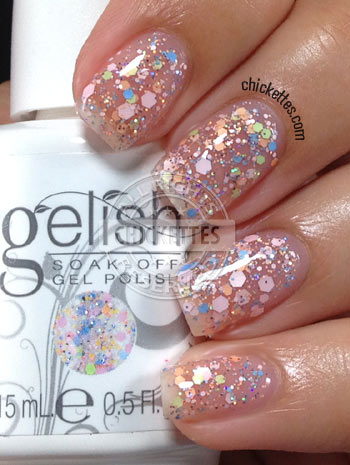
Gelish Trends Candy Coated Sprinkles has a sheer base with a pink tint, and has peach, blue, pink and green glitter, and some small holographic glitter specks.  I paired this over top of a light pink color (TruGel Extraordinary Spectacle).

Gelish Trends - Candy Coated Sprinkles - Spring 2014Gelish Trends - Candy Coated Sprinkles - Spring 2014Gelish Trends A Delicate Splatter has small blue and holographic glitter, and larger green and blue hex glitter.  This one reminds me of a Robin’s egg, so I paired it with a light blue (Gelish My One Blue Love).

Gelish Trends - A Delicate Splatter - Spring 2014Gelish Trends - A Delicate Splatter - Spring 2014Gelish Trends Feeling Speckled also has a slight pink tint to the base, and is loaded with light blue, dark blue and white glitter.  I really liked the way this one popped over darker colors so I paired it with a shade of dark blue (Gelish Deep Sea).

Gelish Trends - Feeling Speckled - Spring 2014Gelish Trends - Feeling Speckled - Spring 2014Gelish Trends Dabble It On has a clear base and is loaded with some light colored glitter in green and white, and some larger holographic hex glitters.  I paired this with a light green shade (Gelish Kiss Me I’m a Prince).

Gelish Trends - Dabble It On - Spring 2014Gelish Trends - Dabble It On - Spring 2014I’m not sure if I can pick a favorite out of this collection – they’re all pretty spectacular!

Summer 2014 Gelish Trends

$
0
0

You are going to LOVE the three new Gelish Trends polishes that were released for the Summer!  These toppers are packed with colorful glitter, and they’re super sparkly and fun.  I even put together a short video to show you how sparkly they are.

I posted the four new Spring Trends a few days ago and many of you asked if they can be worn on their own.  The Spring and Summer Trends can all be worn on their own, but they won’t provide full coverage like some of the other Trends that are more dense with glitter.  So for each of these swatches, I applied three coats on their own… no base colors, so you can see exactly what they look like.  They would all work well paired over other colors, or you can wear them just like this.  Each of the new Trends has some holographic glitter.  (I will swatch the Spring colors on their own too).

Watch the video:

Rays Of Light – Blue, Green, Purple, Gold multi-shaped mix of glitter.

Gelish Trends - Rays of Light - Summer 2014Gelish Trends - Rays of Light - Summer 2014Looking Glass – Purple, Pink, Blue & Green hexagon-shaped glitter.

Gelish Trends - Looking Glass - Summer 2014Gelish Trends - Looking Glass - Summer 2014Shattered Beauty – Pink, Green & Purple with specks of Gold glitter.

Gelish Trends - Shattered Beauty - Summer 2014Gelish Trends - Shattered Beauty - Summer 2014

Owl Designs Using Messy Mansion Stamping Plate MM38

$
0
0

Hi all!  I received this really cute owl stamping plate from Messy Mansion, and I wanted to show you a couple of designs that I created with it.  Plate MM38 has several different owl designs and some trees and birdhouses.  I love patterns that are meant to go across all four nails like the one that I stamped in the design below.  This image has two owls sitting on a branch.  The hand pose is a little awkward for me, but I wanted to show the nails side-by-side so that you can see how the design flows.

Chickettes.com - Two owls sitting on a branch using stamping plate MM38 from Messy Mansion.

For this design, I started with a white gel base using Gelish Arctic Freeze, and then I sponged on some regular nail polish to create the pink gradient on the tips (Mundo de Unas Mexican Pink #15). After letting the gradient dry, I applied my gel top coat, wiped the tacky layer and then stamped on the pattern using Mundo de Unas Turquoise #5.  I top coated once more after the stamp dried.  I stamped the tree/birdhouse pattern on the thumb, but you can’t see that image very well in this picture.

Below is a picture of this plate.  I borrowed this image from the Messy Mansion site since I realized it’s very hard to take pictures of reflective surfaces!!  LOL  As you can see there are several different individual owl designs, and I really fell in love with the sleepy owl pattern with the moons, stars and “zZz”s.  I feel that the tree is a little big for my nails.  I wanted to stamp the tree image over my sleepy owl design, but it wasn’t really recognizable as a tree because I could only fit the base or the branches and not really a full tree.

MM38aSo here is the other design that I did with this plate… the sleepy owls.  Awwww!  I started with a base of ibd Full Blu-um (you will see this swatch soon), and then I added a gradient using my CND Deep Blue and Haute Pink additives. (Learn how to use additives here). Next I top coated and wiped the tacky layer and then stamped on the sleepy owl pattern with Mundo de Unas Yellow #11.  I was going for a night sky and stars look, but didn’t totally achieve what I had in mind.  It’s cute though!

Chickettes.com - Sleepy owls using stamping plate MM38 from Messy Mansion.

Hop on over to Messy Mansion and check out their stamping plates. They have some really unique designs, and some of my favorite patterns are MM plates.

As a side note, you may have noticed that I used some new stamping polishes that I just picked up from Mundo de Unas.  I kept hearing about how awesome these stamping polishes are, and OMG, they are great!  I’ve had such a hard time finding colored polishes that stamp over other colors, so I decided to make an investment and buy some of these.  I ended up buying like 14 colors!  Ooops!  They were shipped from Mexico so it took a good few weeks for my package to arrive, but it felt like my birthday when they did.  These polishes are super thick and stamp really well, but the downside is that they smell terrible!  I mean really terrible… like kerosene or something.  I’m told the smell diminishes with time and I really hope that’s true because my office reeks like industrial paint right now.  LOL

Spring 2014 Gelish Trends – Take 2!

$
0
0

Last week I posted some swatches of the new Spring Trends (see the original post here), but I used base colors underneath and many of you asked what they look like on their own.  So I swatched each of them without a base color so that you can see the difference.  Each swatch is three coats.  These Trends don’t provide full coverage with three coats, but they can still be worn alone as seen here or they can be applied as toppers over the base color of your choice.

As with the Summer Trends, I also made a short video to show you the sparkly goodness of these polishes!

Candy Coated Sprinkles:

Gelish Trends - Candy Coated Sprinkles - Spring 2014Gelish Trends - Candy Coated Sprinkles - Spring 2014

A Delicate Splatter:

Gelish Trends - A Delicate Splatter - Spring 2014Gelish Trends - A Delicate Splatter - Spring 2014

Feeling Speckled:

Gelish Trends - Feeling Speckled - Spring 2014Gelish Trends - Feeling Speckled - Spring 2014Dabble It On:

Gelish Trends - Dabble It On - Spring 2014Gelish Trends - Dabble It On - Spring 2014

LeChat Perfect Match – Mermaid Treasures Collection Swatches

$
0
0

Chickettes.com swatches of the LeChat Perfect Match Mermaid Treasures CollectionI’ve been drooling over the LeChat Perfect Match Mermaid Treasures collection since they posted a preview about it on their Facebook page.  I have only used a handful of LeChat gel polishes to-date, but I’ve been impressed with the quality of the ones that I have tried and I’m looking to expand my collection further after trying these ones.  I really love that the LeChat Perfect Match gel polishes come with a matching regular nail polish (RNP) since I only wear RNP on my toes.  I will definitely be using one of these colors for my next pedicure!

The Mermaid Treasures collection includes six sparkly jewel-toned colors.  The bottles say they are a “frost” finish, but I would call them more of a shimmer finish, though they do also have some frost qualities since you can see some brushstrokes if you’re not careful when polishing.  These polishes were very easy to apply in thin coats.  Each of my swatch photos shows three coats of color.  My experience with shrink-back was a bit mixed – some of them applied edge to edge without any shrink-back issues and others required some flash curing to keep them in place.  I found that giving them a good shake helped this issue though, so just be sure to shake them really well before applying.

I hope my photos do these polishes justice – the shimmery finishes are really pretty in person!

Royal Crystal is a shimmery purple.  The name is very suiting since it does look and feel very royal.

Chickettes.com - LeChat Perfect Match Mermaid Treasures - Royal CrystalChickettes.com - LeChat Perfect Match Mermaid Treasures - Royal CrystalMajestic Wonders is a shimmery teal – one of my favorites of course.  I’ve been wearing this color for a couple of days and love it.  There is a bit of visible nail line with this polish and a couple of the others, but it’s not that noticeable.  The whites of my nails are very white, so it’s usually more obvious on my nails.

Chickettes.com - LeChat Perfect Match Mermaid Treasures - Majestic WondersChickettes.com - LeChat Perfect Match Mermaid Treasures - Majestic WondersHeart of Gold is a golden shimmer.  This one has some holographic sparkle to it.  I took a blurry picture to show off the holo effects since you can’t really see it in the normal pictures.
Chickettes.com - LeChat Perfect Match Mermaid Treasures - Heart of GoldChickettes.com - LeChat Perfect Match Mermaid Treasures - Heart of GoldChickettes.com - LeChat Perfect Match Mermaid Treasures - Heart of GoldPearl Rose is a bright, shimmery red.  I’m not normally a fan of red polish, but this one is really quite stunning.  It’s also much brighter than most of the reds that I own.

Chickettes.com - LeChat Perfect Match Mermaid Treasures - Pearl RoseChickettes.com - LeChat Perfect Match Mermaid Treasures - Pearl RosePrecious Coral is a shimmery coral as the name suggests.  I was really surprised by this polish.  I wasn’t sure I would like this, but this turned out to be one of my favorites of the collection… I may even like this one better than the teal shade (gasp!).  It’s such a warm, inviting color.

Chickettes.com - LeChat Perfect Match Mermaid Treasures - Precious CoralChickettes.com - LeChat Perfect Match Mermaid Treasures - Precious CoralSea Trinket is a lovely pink-ish peach shade.  This one is very soft and feminine and is great for spring and summer.

Chickettes.com - LeChat Perfect Match Mermaid Treasures - Sea TrinketChickettes.com - LeChat Perfect Match Mermaid Treasures - Sea TrinketSo what do you think?  Which ones are your favorites?  I love them all!

LeChat Majestic Wonders with Water Stamp

$
0
0

I took a little break over the weekend, so I just have a simple post for today.  I’ve been wearing LeChat Majestic Wonders from the Mermaid Treasures collection, and I spiced it up a little with some stamping.  I used the negative space water drop image from Messy Mansion plate MM29, and a purple stamping polish from Mundo de Unas.

I’ve been receiving lots of questions about how to get a crisp image when stamping.  In my experience I’ve found that the polish is usually the culprit when the images are blurry, or the stamper moved around on the nail.  Not all polishes work well for stamping.  You need ones that are very thick and fast drying (regular nail polish, not gel!).  Typically metallics work well, but when it comes to other colors I’ve been sticking with actual stamping polishes like the Konad brand and now the Mundos.  You can see that the Mundo stamping polishes are very opaque and stamp very well, even over other colors.  I recently picked up 14 different colors from them, so I’m sure you’ll be seeing lots of new stamped nail art from me.

I also have a video with some nail art stamping basics if you’re interested in learning more.

purple-teal-stamping


Egyptian Hieroglyphics Nail Art w/Messy Mansion Stamping

$
0
0

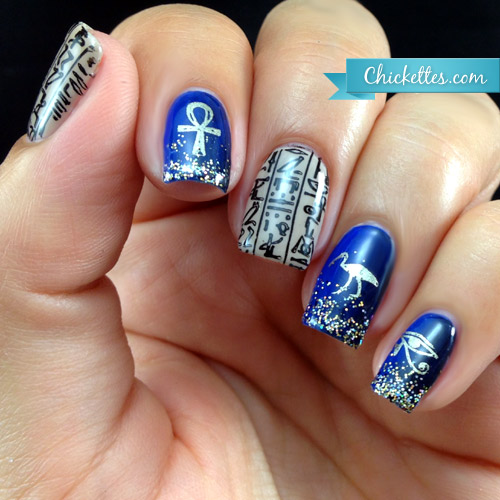
I received stamping plate MM32 from Messy Mansion which has a bunch of different Egyptian images, and decided to do some nail art with hieroglyphics.  I knew I wanted to stamp with gold, so I opted for a dark base so the gold would pop, and then the accent nails have a tan base with black stamps so they contrast.

The dark base is actually a blue to black gradient.  I’ve been struggling with gel polish gradients, but Nails by Shannon just posted a YouTube video showing how she does gel polish gradients… what a great technique!  I had to try this out and it worked beautifully.  The blue used here is Gelish Mali-Blu Me Away, and the black is Couture Little Black Dress.  I stamped the hieroglyphic symbols using China Glaze Passion.  For the accent nails I applied ibd Dockside Diva for the base, and then stamped with Mundo de Unas black. I also added some loose glitter to the tips of the dark nails using Artsyfartsy Crafts holographic gold glitter.

Egyptian Hieroglyphics Nail Art from Chickettes.com


DIY Hard Nails Color Changing Gel Polish & a Contest!

$
0
0

I have a brand new soak-off gel polish brand to share with you today called DIY Hard Nails.  Their polish line includes glitters, shimmers and color changing gels.  Today I have a couple of the color changing polishes to share with you, and I will soon have photos of a couple of the glitters and one of the shimmer colors.

Before I get into the details, I want to mention that DIY Hard Nails is sponsoring a contest with three prizes.  Details of the contest will be posted at the bottom of this post, so don’t miss that!

I did a wear test on these because I was curious.  DIY Hard Nails says on their listing that their polishes can be mixed with other brands, but I used their base and top coat for the wear test to see how they held up.  The base and the top coats were thinner than most brands that I’ve tried, but they were very easy to apply and cured well.  I really like that my nails didn’t feel bulky, yet they were still very strong.  I did this test with one of the color changing polishes and the polish was nice and thick and applied really well.  There was no shrink-back or pooling and only two coats of color were required.  I wore the polish for 10 days, which is about the longest that I ever wear one color, and I’m happy to report that I didn’t have a single chip or any lifting!  While the polish lasted wonderfully, the soak-off did take longer than normal.

Now, onto the colors!  This first one is called Pink Frost and it changes colors from white to pink depending on the temperature.  I have never seen a mood polish that has glitter in it… I really love the look!  This color was slightly tricky to apply just because the color turned light as soon as it hit my nails so it was hard to see where the first coat was applied, but I just used caution and avoided my skin and it worked out fine.  I used two coats of color for this swatch.  You could make the colors more bold with another coat, but I didn’t feel it was necessary.

Chickettes.com Review of DIY Hard Nails Color Changing Polish - Pink Frost

Chickettes.com Review of DIY Hard Nails Color Changing Polish - Pink Frost

And this is Pink Galaxy, which shifts from pink to blue-ish purple depending on the temperature and is also loaded with glitter!  I love the purple color, and the shift is so pretty.  This polish was almost completely opaque in just one coat, but I applied two coats for good measure.

Chickettes.com Review of DIY Hard Nails Color Changing Polish - Pink GalaxyChickettes.com Review of DIY Hard Nails Color Changing Polish - Pink Galaxy

These polishes are currently only for sale here through Amazon.com (in the US only).

Contest Details!

DIY Hard Nails is offering the chance for customers to win one of three prizes.

Prize #1: $50 Amazon gift card and 3 DIY Hard Nails polishes of your choice

Prize #2: 3 DIY Hard Nails polishes of your choice

Prize #3: 1 DIY Hard Nails polish of your choice

HOW TO QUALIFY:

Reviews must be posted by August 15th, and all purchases will be verified. Only valid within the US.  The winners will be contacted via email.

ibd Just Gel Polish – Social Lights Collection Swatches

$
0
0

Chickettes.com - ibd Social Lights Collection Swatches & Review

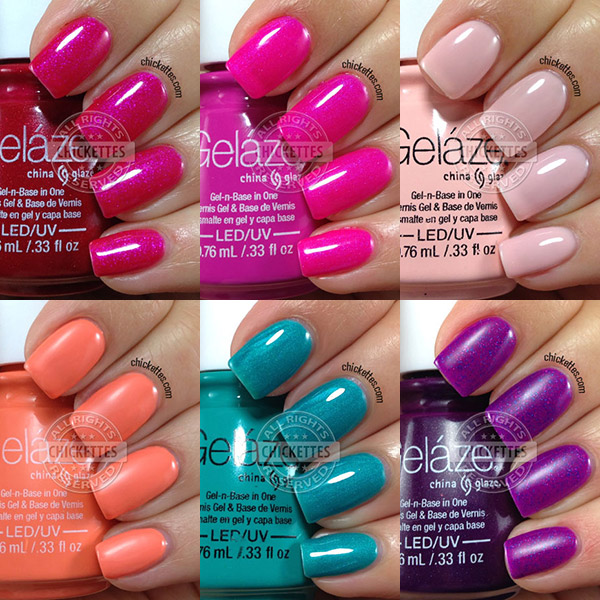
Good morning and Happy Father’s Day to all of the dads out there and to the moms that are doing double duty! I have swatches of the new ibd Social Lights collection for you today. This collection has eight colors total; 6 creamy colors and 2 glitter toppers. Each of the color swatches show three coats of polish, while the glitter toppers are only two coats each. These colors all applied great, and I love the quality and affordability of the ibd brand.

This is Cashmere Cutie, a soft purple cream.  This is the shade that I actually swatched last and chose to wear for a few days.  I wore this one out in the sunlight yesterday and did notice that the polish looked a little splotchy – there were darker purple patches.  You can kind of see some hints of this in my photos below as well. I’m not sure what’s causing that – it could be that my top coat was applied inconsistently or it could just be the color.  It’s not really visible most of the time – I can’t see any splotches right now as I’m typing this.  I just thought that was important to mention.

This color is very similar to Couture Glam Squad, and is more purple than Gelish It’s a Lilly.

Chickettes.com - ibd Just Gel Polish Social Lights Collection - Cashmere Cutie

Chic to Chic is a very pretty bright pink cream.  I wanted to put this next to the purple shade so that you can see the difference between the two since Cashmere Cutie does have some pink-ish undertones to it.  Chic to Chic is a unique pink in my collection.  The closest color that I have to this is Gelish Sugar & Spice, which is a little darker.

Chickettes.com - ibd Just Gel Polish Social Lights Collection - Chic to ChicChickettes.com - ibd Just Gel Polish Social Lights Collection - Chic to Chic

Full Blu-um is a soft medium blue cream.  This has been a popular shade this year, and I have a few colors that are very very similar; LeChat Rock Candy, Couture Milano, and TruGel Magic & Mischief.  This shade is darker that Gelish My One Blue Love.

Chickettes.com - ibd Just Gel Polish Social Lights Collection - Full Blu-umChickettes.com - ibd Just Gel Polish Social Lights Collection - Full Blu-um

Polo Can U Go is a creamy lime green. This shade is similar to Gelish Lime All the Time, except it’s a little more muted.

Chickettes.com - ibd Just Gel Polish Social Lights Collection - Polo Can U GoChickettes.com - ibd Just Gel Polish Social Lights Collection - Polo Can U Go

Gala-vant is a bright, neon orange cream.  My camera freaks out on colors like this so I can’t say that the photos are 100% color accurate.  This shade is almost identical to Gelish I’m Brighter Than You and Gelaze Flip Flop Fantasy.

Chickettes.com - ibd Just Gel Polish Social Lights Collection - Gala-vantChickettes.com - ibd Just Gel Polish Social Lights Collection - Gala-vant

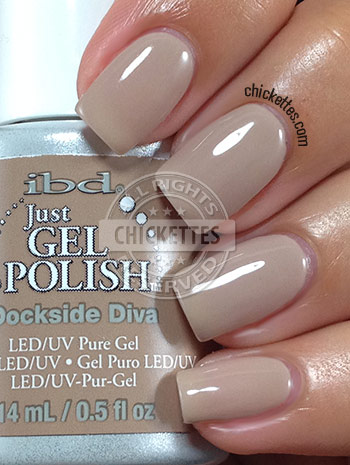
Dockside Diva is a tan/nude cream.  I normally prefer bright colors and avoid neutrals like the plague, but I really like this color.  It works well with my skin tone, and is perfect for when you need something professional.  I recently used this color as a base in my Egyptian Hieroglyphics nail art.

Chickettes.com - ibd Just Gel Polish Social Lights Collection - Dockside DivaChickettes.com - ibd Just Gel Polish Social Lights Collection - Dockside Diva

Billion-heiress is a glitter topper that’s loaded with small pink glitters and holographic bar glitter. This is only two coats, but I had to give the bottle a really good shake and some additional shakes along the way to get this type of glitter coverage.

Chickettes.com - ibd Just Gel Polish Social Lights Collection - Billion-heiressChickettes.com - ibd Just Gel Polish Social Lights Collection - Billion-heiress

And finally this is Yacht-a Yacht-a Yacht-a, another glitter topper.  This one has tiny silver micro-glitters in the clear base with multi-colored hex and bar glitters.  I had to do some fishing to get the colorful glitters to come out of the bottle.  I’m not really a huge fan of the bar glitters in this one, but it makes me think of a festive celebration.

Chickettes.com - ibd Just Gel Polish Social Lights Collection - Yacht-a Yacht-a Yacht-aChickettes.com - ibd Just Gel Polish Social Lights Collection - Yacht-a Yacht-a Yacht-a

Do you have any favorites out of this collection?  My two favorites are Cashmere Cutie and Dockside Diva.

Oh, and I attempted to do a fade test on these when I first got them.  Unfortunately I forgot that I put my swatch sticks in a window sill and I let them sit there for probably a month or longer.  After that much exposure to summer sunlight, they will definitely fade!  LOL  Any ibd that I’ve ever tested previously has passed the fade test with flying colors, so it’s a pretty safe bet that these will fare well also.

CND Shellac Swatch Gallery

$
0
0

This is a summary of all of the CND Shellac polishes that I have swatched to-date. I will update this page on an ongoing basis as I swatch new colors. Click on the images to see larger photos, and click on the links to view or purchase the items on Amazon.com. The Amazon links are affiliate links, and I earn a small commission on each order that is placed through my links. I would like to thank you in advance if you order through any of these links as the commissions help me be able to afford to purchase more colors to swatch! If you use my swatch images please DO NOT ALTER them, leave the watermarks in place and provide a link back to www.chickettes.com!

Gelaze Swatch Gallery

$
0
0

This is a summary of all of the Gelaze polishes that I have swatched to-date. I will update this page on an ongoing basis as I swatch new colors. Click on the images to see larger photos, and click on the links to view or purchase the items on Amazon.com. The Amazon links are affiliate links, and I earn a small commission on each order that is placed through my links. I would like to thank you in advance if you order through any of these links as the commissions help me be able to afford to purchase more colors to swatch! If you use my swatch images please DO NOT ALTER them, leave the watermarks in place and provide a link back to www.chickettes.com!

LacQit Summer Collection & GIVEAWAY!

$
0
0

LacQit One-Step Gel Polish Summer 2014 CollectionLacQit recently released some new goodies!  They have five new colors for summer… four bright, fun colors and a lovely neutral shade that’s perfect for French manis.  LacQit is a one-step gel polish that can be applied directly onto your nail without a base or top coat, they don’t require any wiping, and they last just as long as other gel polishes. They just released an optional no-wipe top coat at the request of some of their users, which provides a long-lasting shine.

LacQit also has a new mini-sized travel kit which includes a mini heart-shaped LED lamp, one LacQit color, a file, a cuticle stick, and 10 remover packets.  The mini LED lamp is really cute and is perfect for travel.  I’m going to take it with me when I go on vacation in case I need to do any touch-ups while I’m away.  You can cure one or two nails at a time with this lamp, and it runs on batteries or it has a USB cord and can plug into any USB charging device for power.  I hooked mine into my iPhone charger.

LacQit provided me with one of the mini kits to share with you!  You can find the GIVEAWAY info toward the bottom of this post.

lacqit-mini-travel-lamp

First, let’s take a look at the new colors!  Each of these swatches is three coats of color.  They looked good with two, but I always apply three coats for consistency.   These colors are what I would call crellies (creamy jellies) since they are sheer enough to show some visible nail line (VNL).  I didn’t use the optional top coat for these swatches except on the neutral shade, so you can see just how shiny they are without it.  The shine may dull a little over time without the top coat.

Topless in the Tropics is a gorgeous red-ish pink.

LacQit Topless in the Tropics

Pool Side Popsicle is a bright orange cream.

LacQit Poolside Popsicle

Nice Lime, Mojito! is a fun, bright green!
LacQit Nice Lime, Mojito!
Goodmorning Sunshine is a fun, bright yellow with a similar consistency to the green shade.
LacQit Good Morning Sunshine
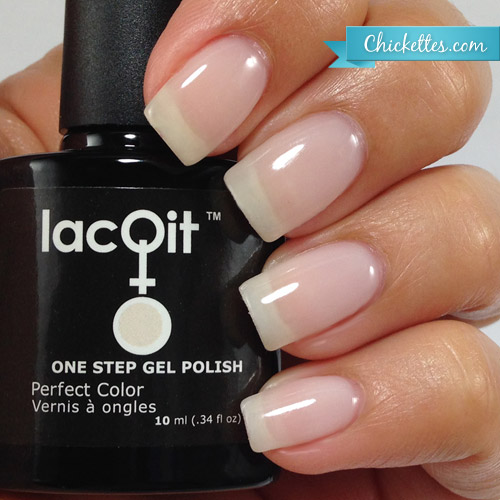
There’s Sand in My Castle is a sheer neutral shade with a pink tint.  This is a perfect shade to use for French manicures.  The tips of my nails are so white that it almost looks like I have a French manicure without adding any white!  This color can also be worn on it’s own like this.
LacQit There's Sand in My Castle

Visit www.lacqit.com for more information and to purchase any of these polishes!

Giveaway Information

The Prize:

ONE lucky winner will receive a LacQit mini travel kit, including the mini LED lamp and one color; Nice Lime, Mojito!  I’m also going to throw in a bottle of Topless in the Tropics because I accidentally ended up with two of them.  :)

The Rules:

  • The giveaway will run through June 27th.
  • Entries will be collected via Rafflecopter only.
  • The winner will be selected randomly via Rafflecopter and announced on June 28th.
  • The winner will be notified via email, and will have 48 hours to claim the prize or a new winner will be selected.
  • This giveaway is open INTERNATIONALLY.
  • Entries will be verified.

GOOD LUCK!

Enter the Giveaway

a Rafflecopter giveaway

Viewing all 441 articles
Browse latest View live


Latest Images