Quantcast
Channel: Chickettes Natural Nail Studio & Boutique
Viewing all 441 articles
Browse latest View live

Colorful Animal Print Nails

$
0
0


Bright glitter polish, animal print and studs all in one manicure!  I had some fun this weekend creating this funky spring nail design.  I used four Gelish nail colors; High Voltage, The Great Googly Moogly, Black Shadow and Oocha Coocha Bing Bang Bam.  I used Konad black stamping polish and stamping plate M57 for the animal print, and the studs on the accent finger are from the Born Pretty store.  I think I’ll actually keep this design on for the whole week… who wants to place bets on that?  LOL

Chickettes.com Colorful Zebra Print Nailscolorful-zebra-nail-art-3colorful-zebra-nail-art-2


What’s the difference between UV and LED Nail Lamps?

$
0
0

What's the difference between UV and LED nail lamps?

I receive a lot of questions about UV and LED lamps for curing gel polish, and thought it might be helpful to provide a brief comparison of the two.

UV LED
Cost More affordable Generally more expensive, though prices are starting to come down
Curing Time 2 minutes 30-60 seconds
Efficiency Use more energy (less efficient) Use less energy and are more eco-friendly
Bulb Life Bulbs need to be replaced periodically Bulbs last the life of the lamp and never need replacement
Types of polish Effectively cures ALL types of gel polish Only cures polishes that are formulated for LED technology


Most soak off gel (SOG) manufacturers sell lamps that are compatible with their products, and you would likely get the best results when using a lamp provided by the manufacturer.  I personally like to use a variety of brands and find that my Thermal Spa UV lamp is very reliable when it comes to curing all different types of gel polish.  As I mentioned above, not all polishes are formulated to work with LED lamps so if you own one you should check with the polish manufacturers to determine which ones are compatible.  Many believe that LED is the future of SOG and most brands will provide LED formulated products over time.  In the meantime, I’ll keep my UV light handy!

I will also comment quickly that both types of lamps emit UV light, and that one lamp is not “safer” than the other in terms of UV exposure.  Read my previous article about two quick and easy things you can to to minimize UV exposure during your gel manicure.

Below are a few lamp recommendations:

Thermal Spa UV Lamp:  I own and love this lamp.  I’ve been using it for 2 years and haven’t had to change the bulbs yet (knock on wood).  You can cure both hands at once in this lamp and it has a timer so it turns off automatically when the curing time is up.

Shany UV Gel Lamp: This lamp was recommended by friends as a cheaper alternative to the Thermal Spa unit.  This lamp also has a timer built in.  It’s more compact and is only big enough to cure one hand at a time.

Harmony Gelish 18G LED Lamp:  Gelish makes and recommends this lamp for curing their products.  If you read my blog, you know that I’m a huge Gelish fanatic and recommend their products.  Some of my fellow SOG addicts use and recommend using this lamp with all LED polishes.  It cures Gelish foundation in just 5 seconds, and colors in 30 seconds!  Many pros use this lamp, and it’s on my personal wish list.  Edited: I originally said that this will cure both hands at once, but it’s only big enough to do one hand at a time (all five fingers).

Orly Smartgels LED Lamp or Red Carpet LED Light:  These are smaller and cheaper LED lamp options, but you can only cure four fingers at once and have to do the thumb separately.  They don’t have a timer, but how hard is it to count to 30?

DuoLite LED and UV Lamp:   Esther’s Nail Center sells a combo lamp that has both types of curing technology in one unit!

Gelish Carnival Hangover Swatch

$
0
0

This is Carnival Hangover by Gelish. All of the swatches that I’ve seen for this polish have looked more purple, but mine looks like a bright pink.  I’m not sure if this one might be a color changer and changed in the bottle before I opened it.  I just purchased it a couple of weeks ago, so it hasn’t been sitting around here for too long.  Hmm… I do love the color though. It’s an awesome shade for spring/summer and I’m sure I’ll get some wear out of it.  You can also see this color in my recent zig zag skittlette manicure.

gelish-carnival-hangover

gelish-carnival-hangover-2

Beauty Blogazons Weekly Roundup

$
0
0

beauty blogazon roundup

Gelish Tiki Tiki Laranga

Glitter Gradient Manicure

$
0
0

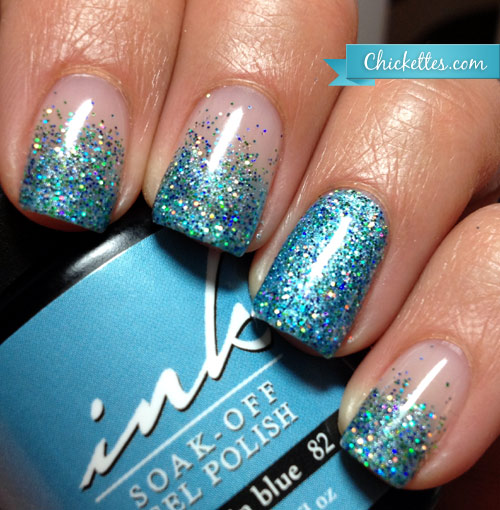
Oooohhhh… glitter!  I’m in love with loose glitter right now.  I just got a bunch of holographic glitters, so expect some more glitter manis from me in the future.  To achieve this gradient look I first applied my Gelish foundation, and then applied Ink When in Blue on just the tips (and the whole accent nail).  Then I took a dry makeup brush and dipped it in glitter and patted it onto the tips of my nails and pulled it downward creating the gradient effect.  I topped it off with two coats of Gelish Top It Off to get a completely smooth finish.  Check out Artsyfartsy Crafts on Ebay for loose glitter.

This first picture was taken in my lightbox.

Chickettes.com Nude to Glitter Gradient

The next two photos were taken under my OttLite, in attempt to better show off the shininess and holographic glitter effects.

Chickettes.com Nude to Glitter Gradient Chickettes.com Nude to Glitter Gradient

And finally, two macro shots to give an even closer look. :)

Chickettes.com Nude to Glitter Gradient Chickettes.com Nude to Glitter Gradient

Ink Nude Swatch

$
0
0

I have another Ink brand swatch for you today… this one’s called “Nude“.  It has a gorgeous shimmer finish and seems to just glow!  It’s a bit peachy for my personal taste, but this is a great neutral color. (Excuse the little bubbles in my top coat on the ring finger!)

Chickettes.com Ink Nude Swatch

Chickettes.com Ink Nude Swatch

I also couldn’t leave well enough alone and eventually added some loose holographic glitter to it.  This pic is intentionally blurry to show off the holo effects  :)

Chickettes.com Ink Nude w Holographic Glitter

Don’t Steal & Give Credit Where Credit is Due

$
0
0

Chickettes.com Watermark - Give Credit Where Credit is Due

Today you may notice that all of my Gelish swatches have a new watermark symbol on them.  Unfortunately, I’ve been having a lot of issues with people and companies stealing my images and cropping out the watermark (aka copyright infringement!).  I really didn’t want to cover my pictures with invasive watermarks, but I don’t see any other way to protect my property.

I spend countless hours polishing my nails, taking photos, editing and writing blog posts in an attempt to create a valuable resource for nail polish lovers.  I don’t make a lot of money doing this… it’s a labor of love.  All I ask in return is that if you use my pictures, please leave the watermarks in tact and give credit!  It’s really that simple.  Just because you find images on Google or social media sites doesn’t mean they are free for the taking and you can do whatever you like with them.  These photos are my property and I reserve all rights to them.

If you see my photos in use without the proper credits in place, please let me know through my contact form.  Don’t post their links in the comments because we don’t want to send any traffic or business their way!  Thanks for understanding.


VIDEO: Glitter Gradient Manicure

$
0
0

I made a video showing how to achieve this glitter gradient using soak off gel polish and loose glitter.  View the original post here.

Chickettes.com Glitter Gradient Manicure

Indigo Illumination Gel Polish #5 – Duochrome

$
0
0

I just purchased five duochrome gel polishes from the Indigo Illumination line. OMG! These things are freaking fantastic – the duochrome effects are to die for. They’re so hard to capture in pictures, so I had to take a short video to show you how the colors change based on the lighting. I just moved my light back and forth above my hand and you can see how dramatic the color change is.

This is #5 (Saturn), and it shifts from teal blue to a deep purple. This gel polish is NOT the soak off variety… it has to be filed off if you apply it by itself. If you use this polish I highly recommend wearing undies under it (use a soak off polish underneath). I applied Saturn over top of two coats of Gelish My Favorite Accessory.

These were purchased directly from Indigo as part of a large group order.  Shipping to the states is rather high, so it’s helpful if you have other people to go in on an order with you.

Update:  These polishes do not cure with some LED lamps, UV is the way to go.

Chickettes.com - Indigo Illumination Gel Polish #5 Saturn - Duochrome

Gelish Golden Treasure & Twinkle Swatches

$
0
0

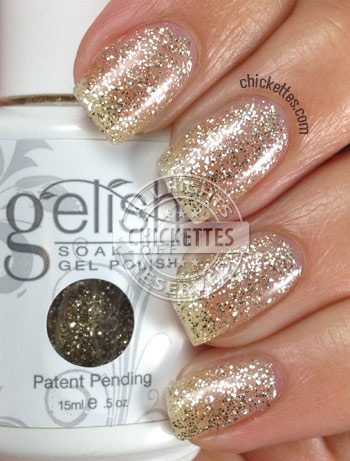
I’ve been searching for a gel polish that has fine gold glitter, but is also very dense and provides full coverage.  I purchased Gelish Golden Treasure and Gelish Twinkle, but unfortunately neither of them quite fit the bill since they don’t provide full coverage.  They are both lovely though and since they have a clear base they would be great glitter toppers over other colors.

In person I really can’t tell a huge difference between the two, so I don’t see the need to own both.  Twinkle is a little more of a yellow gold, and it has some holographic glitters sprinkled in the mix.  I applied three coats of each in the swatches below.

This is Golden Treasure:

Gelish Golden Treasure Swatch Gelish Golden Treasure Swatch

And this is Twinkle:

Gelish Twinkle Swatch Gelish Twinkle Swatch

Ink – When In Blue Swatch

Gelish High Voltage Swatch

$
0
0

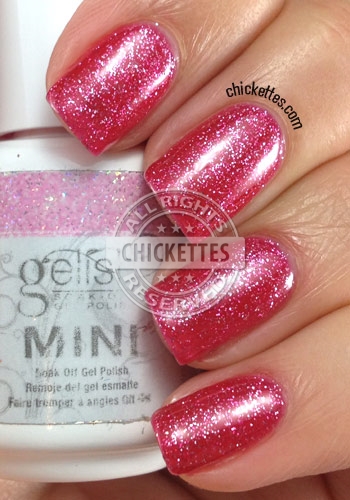
Are you ready for another glittery Gelish polish?! This is High Voltage – a pink jelly base that’s loaded with glitter.  I feel like such a girl… I can’t get enough glitter right now.  LOL This is three coats of High Voltage and it applied very evenly.  I’m working my way through these Gelish swatches.  At this rate I might have the entire line swatched by the end of the year!  I heard there will be some new summer colors coming out so hopefully I’ll know more soon.

I’m also working on some gel polish FAQ’s.  Let me know if you have any questions and I’ll try to address them in a post this week.

Gelish High Voltage Swatch

Gelish High Voltage Swatch

Gelish High Voltage

VIDEO: How to Apply Gelish Structure Gel

$
0
0

At the request of some of my readers I made a short video to demonstrate how to apply Gelish Structure GelClick here to read the article that I wrote about this process previously, and let me know if you have any questions!

Here is an example of the #6 gel brush that I mentioned, and this is the Bundle Monster brush kit that I use.

SOG Gel Polish FAQ’s

$
0
0

I receive a lot of questions about gel polish manicures and I thought I would start a list of FAQ’s. I will caveat this by telling you that I am NOT a licensed nail tech, just a girl with a gel polish obsession. If you’ve read my blog before you are probably already aware that I am a bit of a Gelish fanatic, so most of the information below is based on my experience with that brand. The same principals apply for most gel polish brands.

How do you prevent gel polish “shrinkage”?

You may have noticed that some gel polishes tend to shrink back or pull away from the edges when you apply them.  I’ve heard many recommendations to dry brush your foundation before applying the color.  It’s just like it sounds – you just take a dry brush and brush the tacky layer of your foundation in one direction, then apply the color.  I have tried this and really didn’t notice too much of a difference.  I find that some colors are just a little trickier to work with.

My solution for this problem is to apply the color onto one or two nails and then put them in my UV light for 10 seconds to give them a partial cure.  It stops the shrinkage while I apply color to the rest of my nails.  Once I have all of my nails polished I cure them for the full length of time.

Also, make sure that your polish is well mixed/shaken (shaking can cause bubbles, so be careful).  Sometimes the ingredients will separate if they’ve been sitting for a while and this also causes shrinkage issues.

How do you work with polishes that are thick and tend to “wrinkle” when curing?

This has been an issue with some of the new collections that Gelish has put out lately.  The formula of the polishes is thicker than normal and they will sometimes wrinkle when you cure them in your lamp.  With these polishes you need to apply very thin coats.  Try warming your polish before using it by placing the bottle in some warm water or by using body heat.  You can also use a gel polish thinner to make the consistency a little thinner and easier to apply.  I have done this with a few of the wrinklers and it helped a lot.

Can acetone be used to thin gel polish?

No.  Gel polish has has a special formula that allows it to cure with UV technology.  I recommend using a thinner that is specifically for gel polishes.  I use this LaRosa GELish Thinner.

Why does my gel polish chip or peel off after only a few days?

To be honest, this isn’t a problem that I experience often (maybe because I change my polish too frequently!).  However, I have found that what holds the gel polish is place is the bond of the foundation to your natural nail.  To get the best bond, lightly buff your nails and make sure that they are clean and free of any oils.  If you moisturized your hands recently, wash them, use alcohol or the cleansing solution to clean your nails really well, and apply the pH Bond.  Also be sure to cap your tips when you apply the foundation gel as well as all of the other coats of polish that you apply.

Do you have a list of gel polishes that fade?

These are the Gelish colors that I have experienced fading with or have heard from a friend about fading:

  • He Loves Me He Loves Me Not
  • Up in the Blue
  • Take Action
  • Go Girl
  • It’s a Lily
  • Princess Tiara
  • You’re So Sweet You’re Giving Me a Toothache

Can I mix and match gel polish brands (ie, use Gelish foundation and TIO with another brand of color)?

Yes.  I often use my Gelish foundation and top coat with other brands.

Can gel polish be used for stamping?

In my experience, no.  Gel polishes tend to spread out making it very hard to try to get crisp lines when stamping.  You also don’t usually get full opacity with one coat, so it just doesn’t work well.  I normally use regular nail polish to stamp on top of my gel manicures.  I apply the top coat, wipe it clean, stamp, and then top coat again.  And if you mess up when stamping you can just wipe it off and try again!

Can I use regular nail polish with a gel foundation and/or top coat?

Yes, but your manicure will not last as long.  I have applied the Gelish foundation and Structure gel on my nails and then polished them with a regular polish and regular top coat.  When doing this it is possible to remove the regular nail polish with a non-acetone remover and then reapply another color.  I don’t recommend using a glitter polish because that requires some soaking and will damage the gel base.  Also, the base will start to wear/peel after a couple of applications/removals.

I have also applied regular polish in between the Gelish foundation and top coat.  When doing this you have to be sure that the regular nail polish is completely dry before applying the top coat.  If it’s not dry you can get some puckering in the polish and you can still mess up your nails if you bump them on something.

As I mentioned above, I also use regular nail polish for stamping.  Since stamping generally doesn’t cover the whole nail my stamped manicures usually last just as long as a regular gel manicure.

What type of lamp do you use and can you recommend a good UV or LED lamp?

I use a Thermal Spa UV lamp most of the time.  I recently wrote an article about lamps with some recommendations.  Read it here.

How do you swatch gel polish?  Doesn’t it take a lot of time to apply and soak off?

It does take time, but I have learned a few tricks to make the process go a little faster.  When I’m planning to swatch several colors in one session, I don’t apply the foundation gel and apply the color directly onto my nails.  I used to think that it was the top coat that makes the soak off take longer, but I found that it’s actually the foundation.  Without the foundation, I can file off the top coat real quick and then the soak off with acetone only takes a few minutes.  I also only polish the four fingers on my left hand when I’m doing a swatch session.

I recently learned another new trick for when I want to wear a color for only a couple of days. Instead of using the foundation gel, I use a regular nail polish base.  This keeps my nails from getting stained, but it doesn’t allow the gel polish to form that bond with my nails so I can soak it off faster when I’m ready to change colors.

How do you care for your hands and cuticles and keep them looking good with the frequency of your polish changes?

I don’t have a lot of tips to share here.  I always moisturize my hands after applying gel polish and just when my hands feel dry in general.  My favorite lotion right now is True Blue paraffin lotion from Bath & Body Works, and I’ve been using a cuticle oil and the nail and cuticle serum from Julep.  I also use CND cuticle remover about once a week, and I occasionally use my heated spa mitts or parafin bath when I want to pamper my hands a little.  ;)

What type of lighting and camera do you use for your swatch photos?

Most of my pictures are taken in a lightbox that I created out of a cardboard box and some tissue paper.  You can read more about that here.  This lighting sometimes washes out the shimmer effects of some polishes and I can’t capture duochrome or holographic effects very well with it.  I also use an OttLight for taking pictures sometimes, and it’s also the light that I work under when doing my nails.  All of my photos are taken with my iPhone 4S… no fancy cameras here.

Here are links to some other articles I have written with gel polish tips & tricks:


Ink Denim & Zippers

$
0
0

My friend Janie sent me a few new gel polishes from my wishlist for helping her out on a project. Thanks, girlie!! This is Ink Denim, and the name kind of says it all.  It’s a shimmery dark blue that resembles a shade of denim.  I’ve been wearing this for a couple of days now and have received several compliments on it.  I’m really loving the Ink brand and can’t wait to try more of their colors.  I still have a couple more untried ones on my shelf.
Ink Denim Swatch

Ink Denim Swatch

Today I remembered that I had some zipper water decals and thought what better to pair with denim?  :)   I applied a regular nail polish base over top of my gel manicure, painted on some colored triangles and applied my decals.   I then topped everything off with Seche Vite.  I’m sure the art won’t last long this way, but you know I’ll be ready to change up my mani soon again anyway!

Denim & Zippers Nail Art

Me.Lissa Custom Nail Lacquer

$
0
0

I have a few new indie polishes from Me.Lissa Custom Nail Lacquer to share with you today. I love glitter polishes that can be built up in layers to full opacity, so Me.Lissa sent me three polishes of this variety from her new Great Gatsby Collection to try.  The first picture that’s shown for each color demonstrates how they look based on the number of coats applied.  From left to right, they show 1 to 4 coats.  They all had really good coverage with three coats, they were very easy to apply and the glitter distributed evenly.  I swatched these polishes on their own, but they would also work great as toppers over other colors.  Visit the Me.Lissa Etsy store to purchase these polishes.  They are limited edition and will only be sold as long as supplies last, so get them while you can!

Struck Upon a Star has a purple tinted base and is loaded with different colored glitter in a variety of shapes and sizes, and some of them are iridescent and holographic.  There are also holographic stars in the mix.  I was a little worried when I first saw this polish that the stars might not lay down well, but I didn’t have any issues with them at all.  After applying three coats and a top coat, my nails had a nice glassy finish and the holographic effects were very cool.

Me.Lissa Custom Nail Lacquer - Struck Upon a Star

I Did Love Him Once has a pink shimmer base and red, black, and white square and hex glitters.  It also has some bar glitter and red hearts.  I had to do a little fishing to get the hearts, but I like that you could wear this with or without the hearts if you choose.

Me.Lissa Custom Nail Lacquer - I Did Love Him Once

Valley of Ashes has a grey base with a silvery shimmer and is loaded with black hex and micro glitters.  This might be my favorite of the three since I think it’s very versatile and could be worn with almost any outfit.  (Yes, I try to match my nails to my clothes LOL).

Me.Lissa Custom Nail Lacquer - Valley of Ashes

Geometric Nail Art & Gelish You’re Such a Sweet-Tart

$
0
0

It’s actually starting to feel like spring outside… ahhhhh.  The warm air inspired me to play with some bright colors. This manicure started with a base of Gelish You’re Such a Sweet Tart and then I used nail art striping tape to apply some additional geometric shapes on top of it. The other colors used are Gelish My Favorite Accessory and Carnival Hangover. I added the dots with a dotting tool and my Konad white polish.  I really had no plan and just randomly added shapes, but I think it turned out kind of cool.

Chickettes.com  Geometric Nail Art with Gelish

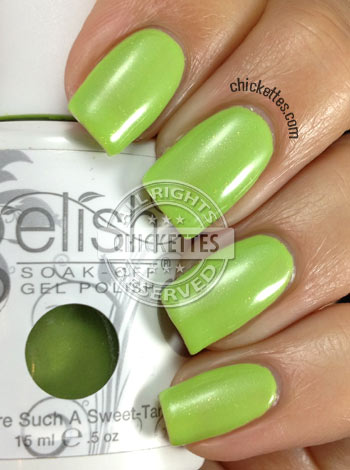
This is Gelish You’re Such a Sweet-Tart from the Candy Land Collection. It’s a fun, bright green with a subtle shimmer.  This is a great spring/summer color.

Gelish You're Such a Sweet-Tart

Gelish You're Such a Sweet-Tart

VIDEO: How to Remove Gel Nail Polish from Home

$
0
0

At the request of many, I created a short video that shows how to remove gel polish using the foil method.  In general, the longer you soak, the easier the removal will be.  Let your nails soak for 10-15 minutes before checking on them and then scrape off what you can with an orange stick.  If your polish doesn’t come off easily, put the foil back on and soak longer.  You don’t want to damage your nails by scraping with force to remove gel polish that’s still stuck on the nail.

You can read my previous article about how to remove gel polish here.

Gold Leopard Print Nail Art

$
0
0

I’m attending a fundraiser this evening for the Juvenile Diabetes Research Foundation and the theme is “Boots & Bling”.  I’ve been stressing about this for the last two weeks trying to find the perfect outfit and of course I knew I had to “bling” my nails to match!  I didn’t own a pair of cowboy (cowgirl?) boots, so that was the first item I had to search for.  I didn’t want to spend a fortune because it’s highly unlikely that I will wear them again, except maybe on Halloween.  So I headed over to a resale shop called Plato’s Closet and ended up finding my entire getup for the event for just $20!  I bought a pair of boots, a leopard print dress, and a small gold purse to match.  Score!

Chickettes.com Gold & Leopard Print Inspired Nail Art

The nail art was all done with Gelish.  The leopard print nails started with a base of Medieval Madness, and one coat of Twinkle for some gold sparkle.  Then I used a dotting tool and drew on the leopard spots using Sweet Chocolate and Meet the King.  The “bling” finger has a base of Meet the King, and I brushed on some loose gold glitter into the tacky layer before applying the top coat.  I wasn’t able to get the glitter perfectly smooth, so there are some small imperfections.  On my thumb and pinky, I applied two coats of Sweet Chocolate and then used nail art striping tape to create the triangle shapes that I filled in using Meet the King.  And finally I applied some gold stud accents that were purchased at Michael’s craft store.   Whew!  This took some time.  :)

Chickettes.com Gold & Leopard Print Inspired Nail Art

I also found a cute little leopard print ring at Charming Charlies.

Chickettes.com Gold & Leopard Print Inspired Nail Art

Chickettes.com Gold & Leopard Print Inspired Nail Art

Chickettes.com Gold & Leopard Print Inspired Nail Art

Here is a closer look at the pattern of the dress and the belt that I’m going to wear with it.  You can see where I got the inspiration for the thumb and pinky with the round gold studs.

gold-leopard-inspiration

Viewing all 441 articles
Browse latest View live


Latest Images